How to Use a Can Light Calculator to Determine the Right Number and Placement for Your Space

A can light calculator lets you figure out the right number and placement of recessed lights for any room in minutes. You don’t have to worry about tricky math or guesswork. Manual lighting calculations can take a long time and involve many steps, but a can light calculator does all that for you. You can focus on choosing your favorite Led Light or Product for your Home instead. If you want to know more about us, just keep reading.
Key Takeaways
Use a can light calculator to easily find how many recessed lights you need and where to put them in any room. You do not have to guess.
Measure your room’s length, width, and ceiling height with care. Put these numbers into the calculator to get the right answer.
Figure out how many lumens you need for your room type and size. This helps make sure your room is bright and has no dark spots.
Place lights about half the ceiling height apart. Keep them 2 to 3 feet from the walls. This stops shadows and gives even light.
Change your lighting plan if your room is special, has high ceilings, or a strange shape. Add more lights or move them if you need to.
Can Light Calculator Basics

What Is a Can Light Calculator
You might wonder what a can light calculator actually does. Think of it as your personal helper for planning can lighting in any room. This tool takes your room’s size and helps you figure out how many lights you need and where to put them. You just enter your room’s length, width, and ceiling height. The can light calculator then does the math for you. You don’t have to worry about making mistakes or guessing.
A recessed lighting calculator works for all kinds of spaces. You can use a free recessed lighting calculator online without paying anything. Many calculators even let you pick the type of bulb or fixture you want. This way, you get the right amount of light for your space. If you want to make your home look bright and welcoming, a can light calculator is a great place to start.
Tip: Try sketching your room on paper before using a free recessed lighting calculator. This helps you see where each light will go.
Why Use Calculators
You might ask, “Why should I use a calculator instead of just guessing?” The answer is simple. Calculators save you time and help you avoid common lighting mistakes. When you use a free recessed lighting calculator, you get results that fit your room’s needs. You won’t end up with too many or too few lights.
Here are some reasons to use a recessed lighting calculator:
You get the right number of lights for your space.
You can plan the best placement for each light.
You avoid dark corners and shadows.
You save money by not buying extra lights.
A free recessed lighting calculator makes the whole process easy. You can try different layouts until you find the one you like best. With a can light calculator, you can create a bright, even look in any room.
Using a Can Light Calculator
Room Measurements
Getting the right measurements is the first step to perfect illumination. You want to make sure your recessed lighting calculator gives you accurate results. Here’s how you can measure your room with precision:
Measure the length of your room by stretching your tape measure from one end of the longest wall to the other.
Measure the width by going from one side of the shortest wall to the opposite side.
Measure the ceiling height from the floor straight up to the ceiling.
If you have an open floor plan, break the space into smaller zones and measure each one separately.
Write down all your numbers. You’ll need them for the calculator.
Tip: Always use feet for your measurements. This helps the calculator work correctly and gives you the best illumination.
Calculating Area and Lumens
Once you have your measurements, you can start figuring out how much illumination your space needs. The area of your room is simple to find. Just multiply the length by the width. For example, if your room is 12 feet long and 10 feet wide, the area is 120 square feet.
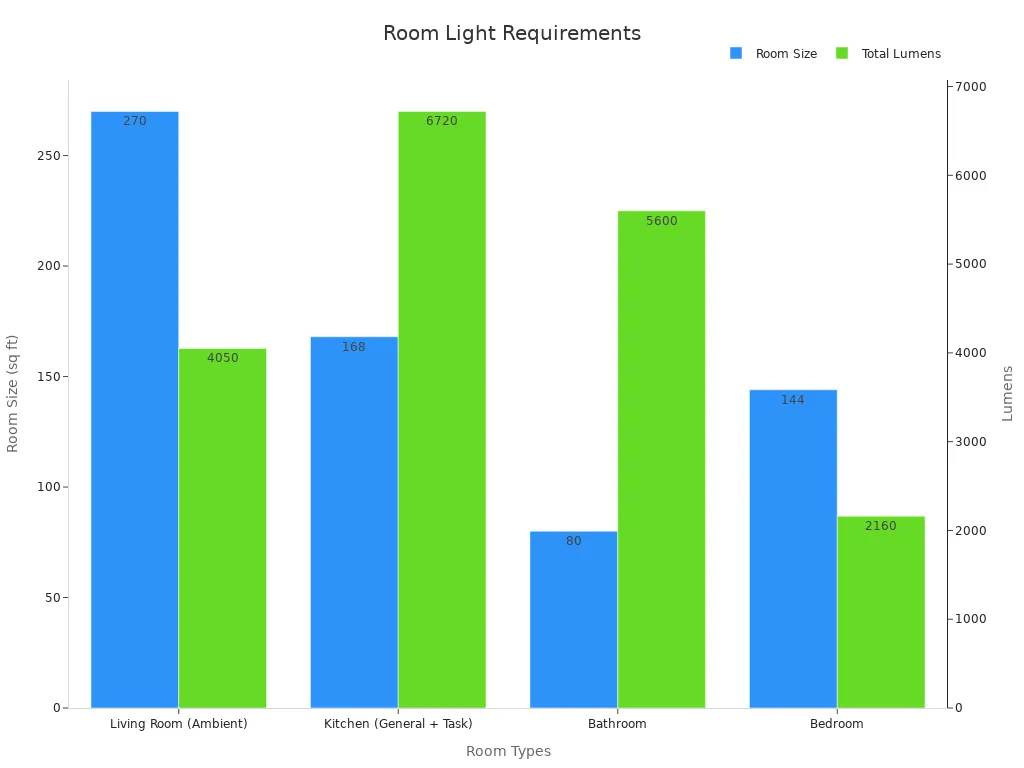
Now, let’s talk about lumens. Lumens tell you how bright your lights will be. Different rooms need different levels of illumination. Here’s a handy table to help you see how many lumens you need for each room type:
Room Type | Room Size (sq ft) | Foot-candles Needed | Total Lumens Needed | Fixture Output (lumens) | Number of Lights Needed |
|---|---|---|---|---|---|
Living Room (Ambient) | 270 | 15 | 4,050 | 800 | 6 |
Kitchen (General + Task) | 168 | 40 | 6,720 | 800 | 9 |
Bathroom | 80 | 70 | 5,600 | 800 | 7 |
Bedroom | 144 | 15 | 2,160 | 800 | 3-4 |
You can use this table to calculate the number of lights you need. For example, if your kitchen needs 6,720 lumens and each fixture gives off 800 lumens, you’ll need about 9 lights. This is a key part of how to calculate recessed lighting for any space.
Note: Dark walls or high ceilings may need more lumens for the same level of illumination.
Entering Data in Calculators
Now you’re ready to use the recessed lighting calculator. Enter your room’s length, width, and ceiling height. Add the total lumens needed for your space. The calculator will use these numbers to figure out the number of lights and the best placement for even illumination.
Most calculators also ask for the type of fixture and bulb you plan to use. This helps match the output to your needs. Some even let you adjust for wall color or ceiling height, which can change how much illumination you get.
Pro Tip: Sketch your room on paper and mark where you want each light. This makes calculating placement easier and helps you see if your plan will give you balanced illumination.
Reviewing Results
After you enter your data, the recessed lighting calculator will show you the recommended number of lights and their placement. Check the suggested spacing between each light. A good rule is to divide your ceiling height by two. For example, if your ceiling is 8 feet high, space your lights about 4 feet apart. This spacing gives you even illumination and helps avoid shadows.
Studies show that following these spacing guidelines leads to balanced illumination and fewer dark spots. Placing lights about 3 feet from the walls also helps prevent shadows and gives your room a bright, open feel.
Digital calculators for lighting have proven to be accurate and reliable. They use tested equations and real-world data to give you quick, practical results. You can trust these tools to help you calculate the number of lights and get the right illumination for any room.
Guidelines: Always double-check your measurements and review the calculator’s suggested placement. Adjust for furniture, wall color, or special tasks if needed. This way, you can make sure your illumination fits your lifestyle.
By following these steps, you can use a recessed lighting calculator to plan your lighting like a pro. You’ll get the right number of lights, perfect spacing, and the best illumination for your space.
Recessed Lighting Placement
Placement Tips
Getting the right placement for your recessed lights makes a huge difference in how your room feels. You want even illumination and a balanced look. Start by thinking about spacing. The most common guideline says you should space recessed lights at about half your ceiling height. For example, if your ceiling is 8 feet high, place your lights about 4 feet apart. This spacing helps you avoid bright spots and dark corners.
You also need to think about the distance from the wall. Place your first light about 2 to 3 feet away from the wall. This keeps the corners bright and stops shadows from forming. Here’s a simple table to help you plan your spacing layout:
Step | Description | Explanation |
|---|---|---|
1 | Calculate distance from wall to first light | Divide the room dimension by twice the number of lights in that row |
2 | Calculate spacing between lights | Double the distance from wall to first light |
3 | Apply for both length and width | Repeat the calculation for room width to get spacing in both directions |
Tip: Always use the same spacing between lights in both directions for a balanced recessed lighting layout.
If you have a large room or a high ceiling, you might need more lights or closer spacing. Adjust your plan based on the room’s size and how much illumination you want. Remember, the right placement gives you even distribution and makes your space feel open and bright.
Avoiding Shadows
No one likes dark spots or harsh shadows in their home. You can avoid these problems by focusing on even distribution and smart placement. When you spread your lights evenly across the ceiling, you fill the room with soft, uniform illumination. Here’s how you can do it:
Increase the number of lights if you see dark areas between fixtures.
Use larger recessed lights for a wider beam and better coverage.
Place your lights higher on the ceiling to direct shadows downward and make them less noticeable.
Add other types of lighting, like lamps or wall sconces, to support your recessed lighting layout.
Avoid clustering lights together, which can create uneven distribution and more shadows.
The type of cover you choose for your lights also matters. Frosted or thicker covers soften the light and reduce shadows, which works well in living rooms or bedrooms. Clear covers give you a sharper beam, which is better for task lighting but can create more shadows. Try to match your cover to the room’s purpose.
Strategic placement and good spacing between lights help you get the best distribution. You want your room to feel bright and welcoming, not patchy or gloomy. If you have lots of natural light or big furniture, use these to your advantage. Move your lights so they work with the room, not against it.
Common Mistakes
Many people make the same mistakes when planning their recessed lighting placement. You can avoid these problems by following a few simple guidelines:
Placing lights too close to the walls. This can cause harsh shadows and uneven illumination.
Using uneven spacing between lights. This leads to dark spots and poor distribution.
Forgetting to adjust for furniture or special tasks. Always think about where you read, cook, or work.
Ignoring ceiling height. Low ceilings need fewer lights with wider spacing, while high ceilings need more lights and closer spacing.
Not testing your lights after installation. Always check your lighting and adjust the direction if your fixtures can tilt or swivel.
Note: For an 8-foot ceiling, keep your recessed lights about four feet apart. This guideline helps you get even illumination and avoid dark spots.
If you feel unsure about electrical work or have a complex ceiling, consider hiring a professional. They can help you get the best placement, follow safety guidelines, and make sure your recessed lighting placement looks great. Good planning and careful spacing give you a room that feels bright, comfortable, and stylish.
Room-Specific Advice
Kitchens
You spend a lot of time in your kitchen, so you want it to be bright and practical. Start with general lighting to cover the whole space. For most kitchens, you need about 20 lumens per square foot for ambient light. If your kitchen is 150 square feet, you need around 3,000 lumens just for basic lighting.
Task lighting is important for places where you chop, cook, or wash dishes. You want 50 to 100 lumens per square foot on countertops and stovetops. Try using downlighting above work areas to keep shadows away. Accent lighting can make your kitchen look stylish by highlighting shelves or artwork.
Here’s a quick guide:
Lighting Type | Purpose | Recommended Lumens per Sq Ft |
|---|---|---|
Ambient | General lighting | ~20 |
Task | Work areas | 50-100 |
Accent | Style | Brighter than ambient |
Tip: Place recessed lights 4-6 feet apart and about 3 feet from walls for even coverage.
Living Rooms
Your living room needs to feel cozy and flexible. Use general lighting to brighten the whole area. Add task lighting near reading chairs or game tables. Accent lighting works well to show off art or a fireplace. Try to layer your lights so you can change the mood. If you want to know how to determine the size of recessed lighting, think about your ceiling height and the size of your room. Bigger rooms or higher ceilings need larger fixtures or more lights.
Bathrooms
Bathrooms need bright, clear light for safety and grooming. For the floor, aim for about 500 lumens per square meter. At the sink, you want around 1,600 lumens for each vanity. Layer your lights with a mix of downlighting and wall lights. Task lighting by the mirror helps you see clearly when brushing your teeth or shaving. Accent lighting can add a spa-like feel if you place it around a tub or shower.
Bathroom Area | Recommended Lumens Range |
|---|---|
Single sink vanity | |
Vanity with extras | ~2300 lumens (downlight + 2 wall lights) |
Bedrooms
You want your bedroom to help you relax and sleep well. Recent studies show that soft, warm light in the evening helps you fall asleep faster and wake up feeling better. Try using low color temperature lights (about 2000 K) before bed. Task lighting by your bed is great for reading. Accent lighting can make your room feel special by highlighting photos or shelves. Customizing your lighting supports your sleep and keeps your room comfortable.
Note: Adjust your lights to match your bedtime routine. Avoid bright, cool lights at night for better sleep.
Using Recessed Lighting Calculators for Custom Spaces
Unusual Room Shapes
Not every room looks like a perfect square or rectangle. Sometimes, you have a space with odd corners, angles, or even curves. Using recessed lighting calculators in these rooms can feel tricky. Most calculators work best with simple shapes, so they give you an estimate, not a perfect answer. You need to pay close attention to your measurements. Take your time and measure each wall and angle. Write down every number.
Irregular rooms often have dark spots or shadows. You can fix this by aiming your lights at walls or special features. Try to highlight artwork, shelves, or any area you want to stand out. Move large furniture out of the way before you plan your lighting. This helps you see where the light will go. Sometimes, you need extra lights to cover every part of the room. Overlapping the light from different fixtures can smooth out the brightness and make the space feel even.
Here are some quick tips for odd-shaped rooms:
Measure every wall and angle carefully.
Aim lights at walls or features to reduce shadows.
Remove big furniture that blocks light.
Add more lights if you see dark patches.
Lighting calculators need you to adjust for angles and coverage. This step matters most in rooms with strange shapes or vaulted ceilings. Careful planning helps you avoid glare and keeps the room bright.
High or Low Ceilings
Ceiling height changes everything about your lighting plan. A high ceiling makes a room feel open, but it can also make it hard for light to reach the floor. You may need more lights or brighter bulbs. Place your fixtures closer together to avoid dark spots. Sometimes, you need to use adjustable fixtures that point light down.
A low ceiling brings its own challenges. You want to avoid making the room feel crowded. Use fewer lights and space them farther apart. Choose shallow fixtures that do not hang down. This keeps the room feeling open and comfortable.
When using recessed lighting calculators, always enter the correct ceiling height. The calculator uses this number to suggest the right spacing and number of lights. If your ceiling slopes or has beams, measure the highest and lowest points. Plan your lights so they work with the shape of the ceiling, not against it.
Tip: For high ceilings, use fixtures with a narrow beam to focus light where you need it. For low ceilings, pick wide-beam lights to spread light across the room.
Careful planning and the right calculator settings help you get the best results, no matter what kind of ceiling you have.
You can make a great lighting plan by measuring your room. Put these numbers into a can light calculator. Then look at the layout it gives you. These calculators help you pick the best fixtures, spacing, and brightness for each room.
They help you get even, safe, and energy-saving lighting.
You can change your plan for your style or needs.
Photometric tools let you see and change your design before installing.
With the right tools and a good plan, any space can have good lighting!
FAQ
How do I know if I need more can lights in my room?
Look for dark spots or uneven lighting. If you see shadows or areas that feel dim, you probably need more lights. Try using your calculator again with different numbers. You want your room to feel bright and even.
Can I use a can light calculator for sloped ceilings?
Yes, you can! Just measure the highest and lowest points of your ceiling. Enter those numbers into the calculator. This helps you get the right number and placement for your unique space.
Tip: Always double-check your measurements for sloped ceilings.
What if my room is not a perfect rectangle?
You can still use a can light calculator. Break your room into smaller shapes, like rectangles or squares. Measure each part and add the results together. This method helps you cover every corner.
How far should I space can lights from the wall?
Keep your first light about 2 to 3 feet from the wall. This spacing helps prevent shadows and keeps your room bright. Use the same distance for each wall to get even lighting.
😊 Even spacing makes your room look great!
See Also
Selecting The Best LED Light Replacement For Home Or Business
Finding The Ideal LED Lighting For Commercial Use Cases
Tips For Picking The Best Lighting Sign System Solution
Comprehensive Guide To LED Area Lights: Uses And Installation
