Install Lighted Edging to Transform Your Pathways and Garden Borders

Imagine walking into your garden after dark. Lighted edging along the borders gives a soft glow. This glow changes how your space looks. You can see every part of your garden paths. Each step is safe and looks nice. Edging shows where your garden starts and ends. It also keeps the borders tidy. Install Lighted Edging with Led Light to show off your favorite spots outside. Pick natural materials for edging so it matches your garden. Home gardens look even nicer with the right Product. If you want to learn more About Us, just look around!
Key Takeaways
Lighted garden edging makes your garden look nice and safe. It lights up paths and borders. Your garden looks good during the day and at night.
Pick natural materials like stone or wood for your garden. These match your garden style. Use LED or solar lights to make a glowing look.
Plan your project by measuring your garden first. Choose the best materials. Get the area ready before you start.
Put in edging and lights so they stay in place. Dig a trench that is the right size. Place the materials in a straight line. Make sure wires are safe from water.
Keep your garden edging bright and safe by cleaning it often. Check the lights every month. Fix any problems right away.
Why Lighted Garden Edging?
Curb Appeal
You want your garden to stand out. Lighted edging gives your garden borders a clean, finished look. When you add lights, your garden glows at night. Neighbors and guests notice the soft shine along your pathways and borders. You can use natural materials like stone or wood for edging. These blend with your plants and flowers. The right edging makes your garden pathways look neat and inviting. Even a small garden feels special when you highlight the borders with light.
Tip: Try mixing natural edging with modern lights for a unique style.
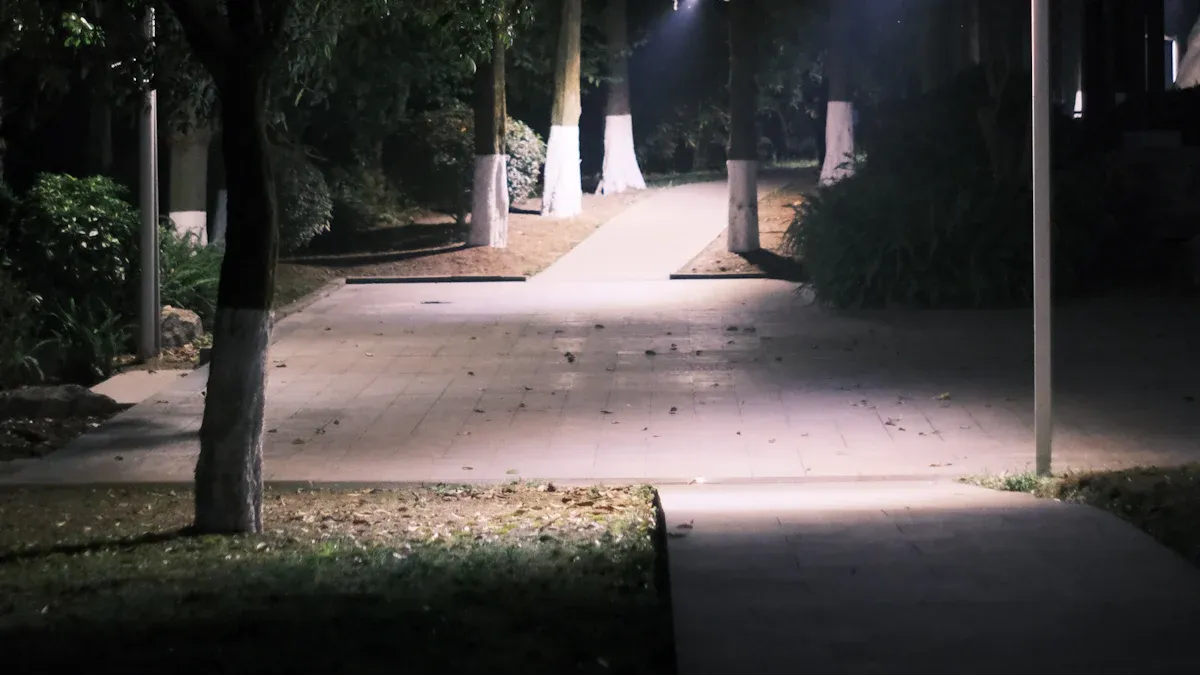
Safety at Night
Walking outside after dark can be tricky. You might trip over uneven borders or miss a step on your garden pathways. Lighted edging helps you see where you are going. It marks the edges of your garden and keeps everyone safe. Good lighting can even prevent accidents. Take a look at these numbers:
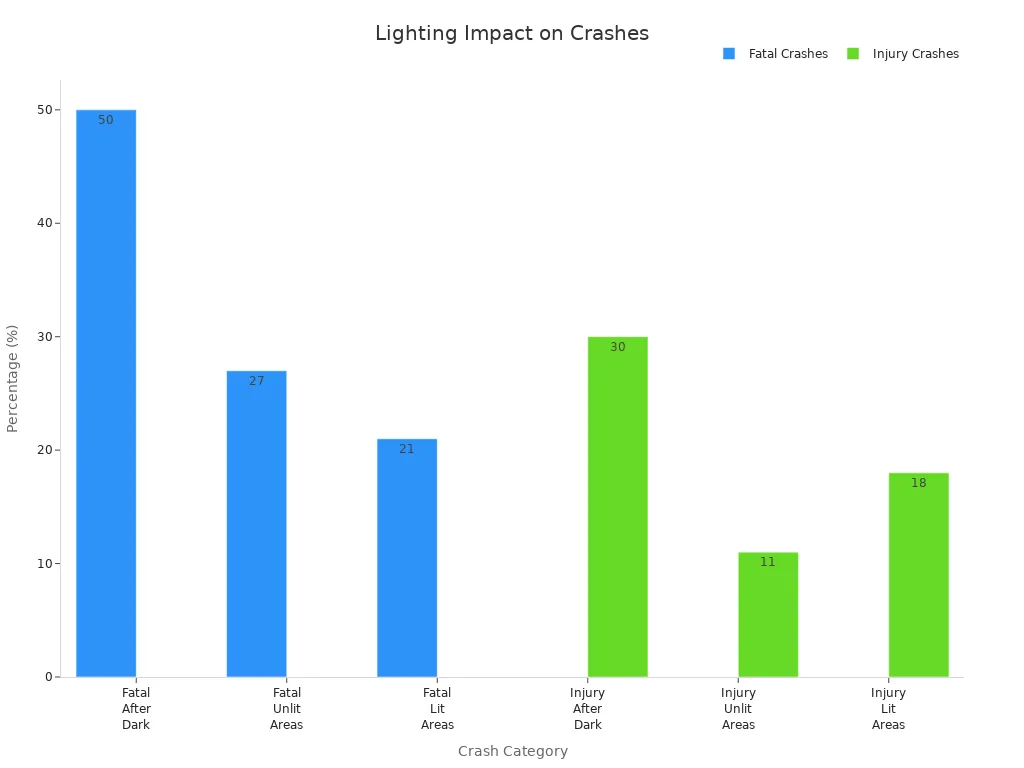
A recent report shows that nearly half of all fatal crashes happen after dark. In unlit areas, 27% of fatal crashes occur. In lit areas, the number drops to 21%. This proves that better lighting, even in your outdoor spaces, can make a big difference. When you install edging with lights, you help protect your family and guests.
Highlighting Features
You work hard to make your garden beautiful. Why let it disappear at night? Lighted edging draws attention to your favorite plants, garden borders, and special spots. You can use edging to guide visitors along garden pathways or show off a flower bed. Lights make your garden look magical after sunset. You get to enjoy your outdoor space longer, and your borders always look tidy. With the right edging, your garden feels welcoming day and night.
Landscape Edging Ideas

Materials for Garden Edging
There are many ways to edge your garden. Some people like classic stone edging. Stone looks strong and never goes out of style. You can use big stones or small pebbles for borders. These borders can last a long time. Metal edging, like aluminum or corten steel, gives a modern look. Wood edging, such as cedar or pine, feels warm and natural. Plastic edging is good if you want something easy to bend. It is also simple to shape. Many gardeners now use composites made from recycled things. These choices are good for the earth and look nice.
Here’s a quick look at popular choices:
Category | Details / Examples |
|---|---|
Product Types | Paver restraint edging, roll edging, strip edging (fixed and flexible) |
Materials | Composites, metal, plastic, stone, wood |
Regional Preferences | Warm climates: plastics/composites; Cold climates: metal/stone; Europe: stone/metal |
Trends | Sustainability, minimalist and organic designs, modular systems |
Tip: Mix natural stone with wood for a border that pops.
Modern Lights Options
Lights can make your garden look magical at night. LED strip lights are great for straight garden edges. You can hide them under stone or metal borders. This gives a soft glow. Modular LED systems snap together and fit any shape. Rope lighting bends around corners and curves. Solar-powered lights are easy because they do not need wires. You can pick warm or cool colors for your garden. Adding lights to edging makes your garden safer and more fun.
Design Inspiration
Try new ideas for your garden edging. Use natural stone for a country path. Or line your borders with smooth river rocks. Mix wood and stone for a new look. Plant-based edging, like low hedges or grasses, gives a soft edge. You can even use recycled glass or metal for a modern style. Think about how lights will show off your favorite spots. Mix edging materials with built-in lights for a smooth finish. Your garden will look great day and night.
Note: The best garden edging uses natural things and creative ideas. Make your garden show your style!
Plan and Prepare
Measure Pathways and Borders
Start by looking at your garden. Walk along your pathways and borders. Use a tape measure to find out how long each section is. Write down the numbers. This helps you know how much garden edging and lights you need. Think about the shape of your garden. Notice if the ground is flat or sloped. Check for rocks, tree roots, or wet spots. These things can change how you install edging. When you plan ahead, you avoid surprises later.
Here’s a simple way to plan your project:
Decide what parts of your garden need edging and lights.
Look at the ground and see if it is flat, bumpy, or has water nearby.
Make a sketch of your garden and mark where you want the edging.
Figure out how much edging and how many lights you need.
Set a budget for your project.
Pick the right materials for your garden style.
Keep track of your spending and supplies as you go.
Tip: Drawing a map of your garden helps you see the big picture and keeps your project on track.
Gather Tools and Materials
Now you need to collect your supplies. You will need garden edging, lights edging, and tools. Most people use a shovel, tape measure, gloves, and a level. If you use solar lights, you do not need wires. For wired lights, get weatherproof connectors and outdoor cables. Choose edging that matches your garden. Some people like natural stone or wood. Others pick metal or plastic for a modern look. Make sure you have enough lights to cover all your borders and pathways.
Choose Lights Edging
Pick lights edging that fits your garden style. LED strip lights work well for straight lines. Rope lights bend around curves. Solar lights are easy to install and save energy. If you use wired lights, make sure all parts are safe for outdoor use. Weatherproof your connections to keep water out. Test your lights before you put them in the ground. Good planning makes your garden edging last longer and look better. When you choose the right lights, your garden shines every night.
Install Lighted Edging
Prepare the Area
You want your garden to look great and stay safe. Start by checking the area where you plan to install lighted edging. Walk along your garden borders and pathways. Look for rocks, roots, or anything that might get in the way. Mark where you want the edging to go. Use spray paint or string to outline the path.
Before you dig, always check for underground utilities. Call your local service to mark any wires or pipes. Wear gloves and sturdy shoes. Keep heavy tools and equipment away from the edge of your trench. If you need to dig a trench, make sure it is about 3 to 6 inches deep for most garden edging and lights. This keeps everything stable and safe.
Safety Tip: Always inspect your trench before you start work. Watch the weather, because rain can make the ground slippery or cause the trench to collapse. Store any extra soil away from the edge. Put up barriers or cones so no one falls in.
Here’s a quick checklist for preparing your area:
Mark the garden borders and pathways.
Identify and mark underground utilities.
Wear personal protective equipment (PPE).
Keep tools and soil away from trench edges.
Check the trench for safety every day.
Plan for emergency rescue if needed.
Set Garden Edging
Now you can set your garden edging. Choose the material that fits your style. You might like stone for a classic look or metal for something modern. Place the edging into the trench you made. Make sure it sits straight and even. Use a level to check as you go. Press the edging down so it stays in place.
If you use flexible edging, bend it around curves and corners. For straight lines, keep the edging tight against the ground. Fill in soil on both sides to hold it steady. Tap the edging gently with a rubber mallet if you need to. This step gives your garden borders a clean, finished look.
Pro Tip: Mix stone and wood for a border that stands out. Try different patterns to match your garden.
Install Lights
You are ready to add lights to your garden edging. Decide if you want solar or wired lights. Solar lights are easy to place and do not need wires. Wired lights give you more control over brightness and color. Lay out your lights along the edging before you install them. Make sure each light faces the right way.
If you use wired lights, bury the cables in the trench with the edging. Keep the wires at least 3 inches deep to protect them. Use weatherproof connectors and wrap them with electrical tape. This keeps water out and makes your lights last longer. Anchor each fixture so it does not move. For solar lights, push the stakes into the ground next to the edging.
Here’s a step-by-step list for installing lights:
Plan where each light will go along the garden borders.
Place the lights and check the spacing.
Bury wires in the trench or set solar units in the ground.
Use connectors and tape to seal all wiring.
Anchor each light for stability.
Note: Choose LED lights for your garden. They use less energy and last longer. Clean the fixtures often to keep your garden bright.
Test and Secure
After you install lighted edging, test the whole system. Turn on the lights and walk along your garden borders. Check for dark spots or lights that do not work. Adjust the angle or position if needed. Make sure all wires stay hidden and safe from water.
Check that the edging feels solid. Press down on each section to see if it moves. If you find loose spots, add more soil or use extra anchors. Look at the lights at night to see how your garden glows. Fix any problems right away.
Keep your garden edging and lights in top shape by checking them every month. Clean off dirt and leaves. Replace any broken lights. This way, your garden stays safe and beautiful all year.
Maintenance and Tips
Clean and Inspect
You want your garden to look its best all year. Start by checking your edging every month. Walk along your garden borders and look for dirt, leaves, or grass that might cover the lights. Use a soft brush or cloth to wipe away any debris. If you see mud or stains, rinse with water. Make sure the lights on your edging stay bright and clear. When you keep your edging clean, your garden shines at night.
Tip: Clean your garden edging after heavy rain or storms. This helps prevent buildup and keeps everything working well.
Replace Lights
Sometimes, a light on your edging may stop working. You can fix this quickly. First, turn off the power if you use wired lights. For solar lights, remove the old unit. Check the new light before you install it. Place the new light in the same spot. Make sure it fits tight against the edging. Test the light to see if it works. If you use solar lights, let them charge in the sun before checking at night. Your garden will glow again in no time.
Always keep a few spare lights handy.
Follow the instructions for your specific edging lights.
Double-check connections for wired lights.
Troubleshoot Issues
You might notice a section of your edging lights does not turn on. Start by checking the power source. Look for loose wires or broken connectors. For solar lights, make sure nothing blocks the sunlight. Clean the solar panels if they look dirty. If you see water inside a light, dry it out and seal any gaps. Sometimes, you need to reset the system or replace a battery. Keep your garden safe by fixing problems right away.
Note: Regular checks help you catch small issues before they become big problems. Your edging and garden will stay beautiful and bright.
You can change your garden with lighted edging. Your pathways and borders will look amazing at night. Edging adds style and keeps your garden neat. You get a safer space for family and friends. Try this project and see your garden glow. You do not need special skills to install edging. Show off your outdoor space and enjoy your garden every evening. Share your edging ideas or explore new ways to highlight your borders. Your garden will thank you!
FAQ
How do I choose the best lights for my garden edging?
Think about your garden style and how much light you want. LED strip lights work well for straight lines. Solar lights are easy to install. Pick weatherproof lights for outdoor use.
Tip: Test a few lights at night before you buy a full set.
Can I install lighted edging by myself?
Yes, you can! Most edging kits come with simple instructions. You just need basic tools like a shovel and gloves. Ask a friend for help if you have a big garden.
What if my lights stop working after rain?
Check for water in the light covers. Dry them out and seal any gaps. Make sure all wires and connectors stay weatherproof. Clean off mud or debris.
Keep extra lights and connectors handy for quick fixes.
How do I keep my garden edging looking new?
Wipe the lights and edging every month. Remove dirt, leaves, and grass. Replace broken lights right away. Walk your garden at night to spot any dark areas.
Note: Regular cleaning helps your garden shine bright all year.
See Also
Creative Patio LED Lighting Ideas To Enhance Outdoor Spaces
Effective Lighting Solutions For Areas Beneath Canopies
Top Five LED Outdoor Lights To Boost Safety And Visibility
Optimizing Parking Lot Illumination With LED Lighting Options
