Installation Guide: How to Properly Mount Wall Mounted Exterior LED Lights for Maximum Effect

You want your outside area to look great and be safe. Good installation of wall-mounted lights shows off your Home’s best parts and keeps you safer. A step-by-step guide helps you put up exterior wall lights like a pro. The right way to install lights makes them last longer. Many exterior LED light fixtures can work for up to 25,000 hours, even in tough weather. Placing lights in smart spots changes your space and makes it look amazing. This Installation Guide gives you easy steps for every light, fixture, and Product you pick. Led Light choices fit every outside area and style, so your About Us page and Home look special.
Key Takeaways
Think about where to put your outdoor LED lights. Make sure they light up important spots like doors and paths. Try not to make shadows or bright spots that hurt your eyes.
Always turn off the power before you start. Use the right tools and wear safety gear. This keeps you safe from getting shocked.
Pick weatherproof fixtures with the right ratings. Make sure they have good quality marks. This helps your outdoor lights last longer and stay safe.
Follow each step in the installation guide. Attach the mounting brackets tightly. Connect the wires the right way. Make sure all connections are safe from water.
Keep your lights working well by cleaning and checking them often. Fix any problems fast to keep them safe and bright.
Benefits
Safety
You want your home or business to always feel safe. Outdoor lighting helps you see better at night. Bright walkways help stop trips and falls. Wall-mounted LED lights make it safer outside. Motion-detecting lights let you know if someone is there. This makes it harder for trespassers to hide. Good lighting helps emergency workers find your place fast. LED light fixtures work in any weather, so you stay safe all year.
Curb Appeal
Outdoor lighting does more than just make things bright. It helps your property look nice and friendly. LED lights with landscaping and clear signs make a warm space. People notice buildings with good lighting and want to visit. Here are some ways exterior LED lights help curb appeal:
Smart lighting shows off your building’s best parts.
Upgrades help with safety and make your place look honest.
Nice outdoor lighting makes your business easy to spot at night.
Efficiency
LED outdoor lighting saves money and lasts a long time. New LED light solutions use much less power than old bulbs. Most energy becomes light, not heat, so you waste less. LED bulbs can last up to 50,000 hours. You do not need to change them often, so you save on repairs. Many outdoor lights have motion sensors and smart controls now. These turn on only when needed, saving even more energy. Using less power helps the planet and cuts down on light pollution.
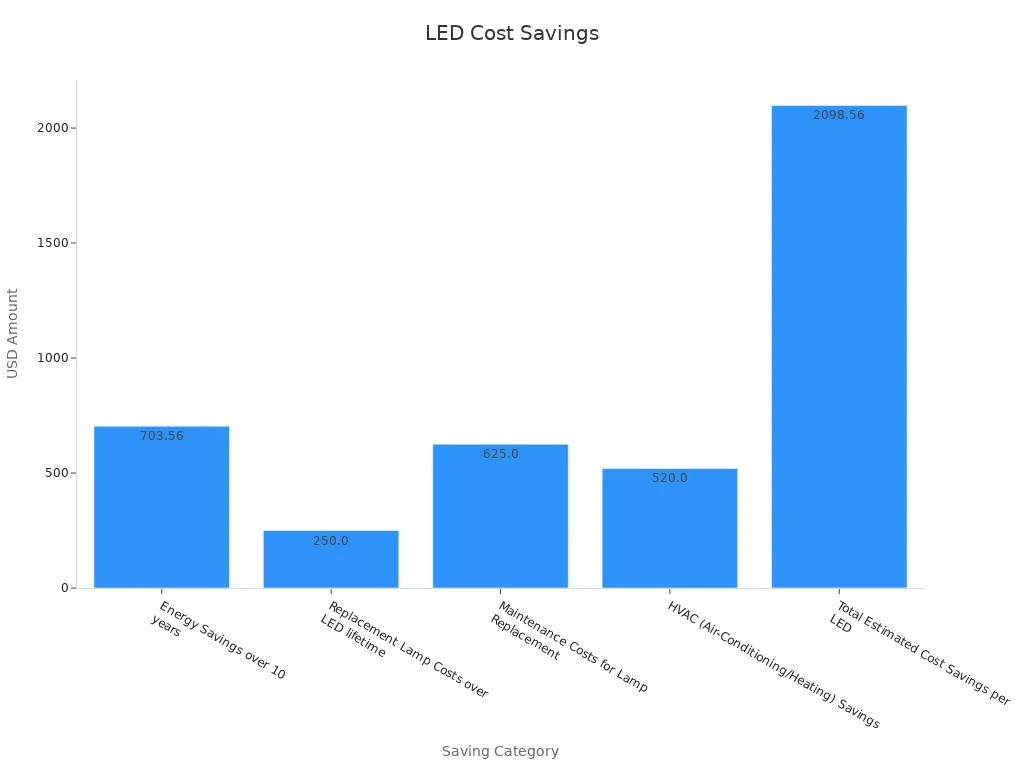
Cost Saving Category | Amount (USD) |
|---|---|
Energy Savings over 10 years | $703.56 |
Replacement Lamp Costs over LED lifetime | $250.00 |
Maintenance Costs for Lamp Replacement | $625.00 |
HVAC (Air-Conditioning/Heating) Savings | $520.00 |
Total Estimated Cost Savings per LED | $2,098.56 |
Planning
Location
When planning your installation, you need to choose the right location for your exterior wall lights. Start by looking at the areas you want to light up. Entryways, walkways, and patios often need extra brightness. You should also check for obstacles like trees or overhangs that might block the light. For led outdoor lights, higher mounting positions cover larger spaces, but the light may seem less bright. Most security lighting works best at 8 to 12 feet high. For pathways, 7 to 10 feet is a good range. Always follow local codes and safety rules for mounting heights. Make sure your fixtures have a wet rating, such as IP65 or higher, to handle rain and snow. Using motion sensors or photocell sensors helps your lights turn on only when needed, saving energy and making your exterior safer.
Tip: Choose the right location by thinking about how you use each space at night. Place outdoor wall lights where they will not create shadows or glare.
Fixture Choice
Selecting the correct type of up-and-down light is important for both style and function. You can pick from many mount types, such as weatherproof, slip fit, or arm mounts. Retrofitting old fixtures with led bulbs saves money and is easy to install. New led wall lights offer better quality, modern looks, and more safety. Think about the color temperature of your led outdoor lights. Warm light feels cozy, while cool light looks bright and crisp. Check the beam angle to control how wide the light spreads. For up and down outdoor lights, make sure the fixture matches the size and purpose of your space. Always use fixtures made for exterior use to ensure long-lasting performance.
Lighting Layout
A good lighting layout helps you get the most from your exterior wall lights. Use different light distribution patterns to match your needs. Type III patterns work well for driveways and small parking areas, spreading light forward and to the sides. Type IV is best for building exteriors, sending light outward with little spill behind the fixture. Type V gives even, all-around light for large open spaces. Stagger your up and down outdoor lights along walls to avoid dark spots. Plan your layout to highlight features like doors, plants, or signs. Installing up and down lights at the right height and angle can make your home look more welcoming and safe.
Note: Smart controls, such as dimmers or scheduling apps, help you adjust your led outdoor lights for different times and needs.
Tools & Materials
Tools List
You need the right tools to put up wall-mounted exterior LED lights. Using the best tools helps you work quickly and keeps the lights safe. Here are the main tools you should get ready:
Voltage detector
Wire strippers
Wire cutters
Wire nuts
Electrical tape
Screwdriver
Drill
Hammer
Ladder
Safety gloves
Wall anchors
Tip: Check your tools before you start. Make sure they work and are not broken.
Materials
Picking good materials is important for a safe and strong installation. You should buy products that meet safety and quality rules. These rules help stop problems like rust, electrical issues, or lights breaking early. The table below lists some important safety and quality marks for LED lighting materials:
Quality Benchmark Category | Relevant Standards / Certifications | Purpose / Requirement Description |
|---|---|---|
Electrical Safety | Makes sure luminaires and LED modules are safe to use in dry, damp, or wet places. | |
Photometric Performance | IESNA LM-79, LM-80, TM-21 | Checks how well LEDs keep their brightness and color over time. |
Mechanical Robustness | ANSI C136.31 | Proves lights can handle shaking in places like bridges. |
Environmental Resistance | ISO 9227 | Tests if lights can last in tough weather without rusting. |
Factory Quality Management | ISO 9001, ISO 14001, ISO 45001, ISO 50001 | Shows the factory cares about quality, the environment, worker safety, and saving energy. |
Electromagnetic Compatibility | EMC Compliance | Makes sure products do not cause or have problems with electromagnetic waves. |
Hazardous Substance Restriction | RoHS Compliance | Limits dangerous materials in electronics to help the environment. |
Certification Marks | CE, UL, ENEC, CB, EMC, RoHS | Shows the product meets safety and quality rules in many places. |
Note: Look for these marks on the box or label before you buy anything.
Safety Gear
You need to protect yourself when you install lights. Wearing the right safety gear keeps you safe from getting hurt or shocked. Always use gear that has safety marks. Here is what you should wear:
Safety gloves (insulated for electrical work)
Safety glasses or goggles
Non-slip shoes or boots
Hard hat (if you work under things or on ladders)
UL-certified products for electrical safety
CSA, ETL, or CE certified gear for extra safety
RoHS-compliant products to avoid dangerous materials
Remember: Certified safety gear and LED products help stop electric shock, overheating, and fires. Always check for UL, CSA, or CE marks before you start.
Installation Guide

Putting up exterior wall lights might look hard at first, but this guide will help you do each step safely and the right way. You will learn how to put up outdoor wall lights so they work well and last a long time. Follow these steps to make sure your led outdoor lights stay bright and strong for years.
Power Off
Safety is always the most important thing. Turn off the power at the circuit breaker before you start. This keeps you safe from getting shocked. Use a voltage tester to check that the wires are not live. Never skip this step, even if you feel sure. Turning off the power is a rule you must always follow.
Tip: Put tape over the breaker switch. This reminds others not to turn it back on while you work.
Remove Old Fixture
If you already have a fixture, you need to take it down first. Start by taking out any bulbs or shades. Use insulated tools to loosen the screws. Gently pull the old fixture away from the wall. Unscrew the wire nuts and take off the ground wire. Remove the old bracket if it does not fit your new fixture. Always check for damage to the box or wires before you move on.
Always turn off the power at the breaker.
Use a voltage tester to make sure wires are safe.
Loosen screws and pull the fixture off.
Disconnect all wires carefully.
Remove the old bracket if you need to.
Prepare Surface
A clean and dry wall helps your lights stay up. Wipe the area with a damp cloth or alcohol to get rid of dust and dirt. Let the wall dry all the way. Check for bumps or cracks and fix them if you see any. For rough or bumpy walls, use mounting clips or anchors for extra hold. This step helps your lights stay up in any weather.
Note: Put up outdoor wall lights when it is room temperature. This helps glue and tape stick better.
Mount Bracket
The bracket holds your led fixture in place. Pick a bracket made from strong metal like stainless steel or aluminum. These do not rust and last longer outside. Line up the bracket with the holes on your fixture. Use anchors or bolts to attach it to the wall, especially for brick or concrete. Make sure the bracket sits flat and does not move. A steady bracket keeps your led outdoor lights safe.
Pick weather-resistant finishes for more protection.
Follow the instructions for where to put the bracket.
Wiring
Wiring is a very important part of putting up lights. Use UL-certified connectors and cables made for outside. Connect the ground (green or bare), hot (black), and neutral (white) wires in the right order. Twist the wires together and use wire nuts to hold them. Wrap the connections with electrical tape for extra safety. If you put up lights in wet places, use GFCI outlets and waterproof connectors. Always follow the National Electrical Code and local rules for wiring outside.
Tip: Check all your wire connections before you move on. Good wiring keeps your wall lights working safely.
Attach Fixture
Now you can put the fixture on the bracket. Hold the led fixture in place and line up the holes. Use screws or bolts to attach the fixture tightly. Do not make the screws too tight or you might break something. Make sure the fixture sits flat against the wall so water cannot get in. Test the fixture by gently shaking it. A tight fit keeps your led outdoor lights safe.
Install LED Bulb
If your fixture needs a bulb, put in the led bulb now. Pick a bulb with the right wattage and color for your space. Screw the bulb in gently but firmly. For up and down outdoor lights, make sure the bulb faces the right way. Some fixtures have built-in leds, so you can skip this step if yours does.
Weatherproofing
Weatherproofing keeps your wall lights safe from rain, snow, and dust. Use fixtures with a high IP rating, like IP65 or higher. Seal all gaps and edges with silicone sealant. Cover wire connections with waterproof wire nuts and tape. Put on covers or shields if your area gets lots of bad weather. Use UV-resistant cables and materials to stop sun damage. Check seals and covers often to keep your lights strong.
Weatherproofing Solution | Benefit |
|---|---|
High IP-rated fixtures (IP65+) | Blocks water and dust |
Silicone sealant | Seals gaps and stops leaks |
Waterproof connectors | Protects electrical connections |
UV-resistant cables | Stops sun damage |
Protective covers | Shields from rain, snow, and debris |
Remember: Always follow the instructions for your led outdoor lights. This helps you meet all safety and quality rules.
If you follow this guide, you can put up outdoor wall lights that look good and last a long time. Each step helps you get the best from your wall lights and keeps your home safe and bright.
Testing & Adjusting
After you finish installing your exterior wall lights, you need to test and adjust them for the best results. This step helps you make sure your led outdoor lights work well and look great. Use this guide to check every detail and get the most from your new lighting.
Power On
Turn the power back on at the breaker. Stand back and look at your exterior wall lights as they light up. Watch for any flickering or dim spots. If you see problems, turn off the power and check your wiring. Make sure all led connections are tight and secure. You want every led to shine at full brightness.
Test Function
You should test each led fixture to make sure it works as expected. Follow these steps:
Look at the led chips for even brightness and color.
Make sure all wires and connectors are tight and safe.
Turn each led outdoor light on and off to see if it responds right away.
If your exterior wall lights have dimmers or motion sensors, test those features too.
Let the lights run for a few hours. Feel the housing. It should be warm, not hot.
Watch for flickering or uneven light. This can mean a loose connection or a problem with the power supply.
Tip: Look for certification marks like UL or CE on your led fixtures. These marks show your lights meet safety and quality standards.
Adjust Angle
Now you can adjust the angle and position of your exterior wall lights. Aim each led fixture to cover the right area. Use the guide from the manufacturer for the best mounting height and beam angle. Try these tips:
Move fixtures up or down to change how much area they light up.
Turn the led housing left or right to highlight doors, plants, or signs.
Use wider beam angles for large spaces and narrow beams for focused spots.
Space your exterior wall lights evenly to avoid dark patches or too much overlap.
Check the light at night. Walk around your property and see if every area looks bright and safe.
You want your led outdoor lights to show off your home’s best features and keep every path clear. Good adjustment helps you save energy and get the most from your led system. This guide helps you finish your project with confidence.
Maintenance
Cleaning
You need to keep your led wall lights clean to help them shine bright and last longer. Dirt and dust can block light and lower the output. Clean the lenses and fixtures at least twice a year. If you live in a dusty or harsh area, clean them more often. Use a soft cloth and mild soap with water. Avoid harsh chemicals that can damage the led housing.
Tip: Set a cleaning schedule based on your local weather and dust levels. Regular cleaning stops dirt from building up and keeps your led lights working well.
Inspection
Check your led fixtures often to make sure they stay safe and work right. Look at all parts, such as cables, lenses, power supplies, and mounting brackets. Make sure nothing is loose or broken. Test the electrical connections and measure voltage to spot any problems early. Use a checklist to track what you inspect and when. Write down any issues and fix them quickly.
Inspect all led system parts for damage or loose wires.
Clean lenses to keep light bright.
Test voltage and wiring for safety.
Check backup power if you have it.
Keep a log of all checks and repairs.
If you find a big problem or need to replace a part, call a licensed electrician. This keeps you safe and makes sure your led lights meet all rules.
Troubleshooting
Sometimes, led lights may not work as expected. Common problems include flickering, dimming, or sections not lighting up. Loose wires, wrong wiring, or voltage drops can cause these issues. Use a multimeter to check voltage at different points. If you see a big drop, you may need to fix the wiring. For mounting problems, check if the fixture is secure. If led strips fall off, use new tape or mounting brackets.
Check for loose or frayed wires.
Make sure you use the right connectors and wire gauge.
Test sensors and dimmers to see if they work.
Replace damaged led segments if needed.
Note: If you cannot fix the problem or if you see signs of electrical damage, call a professional. Safety always comes first.
You can achieve a safe and beautiful outdoor space by following each step in this guide. Properly installed LED lights use up to 90% less electricity than old bulbs and can last as long as 50,000 hours. This means you save money and spend less time on repairs. Take your time, use the right safety gear, and check your work. To keep your lights shining bright, remember these tips:
Clean and inspect your fixtures regularly.
Watch for dirt or damage that could block light.
Plan maintenance based on your local weather and how often you use the lights.
With careful planning and routine care, you can enjoy long-lasting, energy-efficient lighting for years.
FAQ
How high should you mount exterior wall LED lights?
You should mount most exterior wall LED lights 8 to 12 feet above the ground. This height gives you good coverage and helps prevent glare. Always check the manufacturer’s instructions for the best results.
Can you install exterior LED lights yourself?
Yes, you can install exterior LED lights yourself if you follow safety steps. Always turn off the power at the breaker. Use the right tools and safety gear. If you feel unsure, call a licensed electrician.
What does IP65 mean for outdoor lights?
IP65 means your light is protected from dust and low-pressure water jets. You can use IP65-rated lights outside in rain or snow. This rating helps your lights last longer in tough weather.
How do you keep outdoor LED lights from rusting?
Pick fixtures made from stainless steel or aluminum. Use silicone sealant around edges. Clean your lights often. Check for rust or damage during regular inspections. Replace any rusty parts right away.
Why do LED lights flicker after installation?
LED lights may flicker because of loose wires, bad connections, or voltage drops. Check all wiring and connectors. Make sure you use the right power supply. If the problem continues, ask a professional for help.
See Also
Complete Instructions For Installing High Bay LED Lighting
Advantages And Types Of LED Outdoor Lighting Installation
How To Design Effective LED Outdoor Signs For Impact
Selecting The Best LED Lighting For Your Home Exterior
How To Pick Parking Lot LED Lights By Brightness And Mounting
