LED Emergency Lights: Types, Applications, and Installation Best Practices

LED emergency lights help keep you safe when the power goes out or in emergencies. You count on these lights to show you the way out and help you stay away from danger. Good LED emergency lights follow safety rules and help you meet tough laws. You need emergency lighting that works well and is simple to use in every place, at home or at work. Some systems use Solar Light technology or link to a Product from trusted companies. Find out more About Us and see why picking the right emergency lighting is important.
Key Takeaways
LED emergency lights turn on fast when power goes out. They last longer than old bulbs. They help save energy and money.
Follow safety rules like NFPA 101 and OSHA. Put emergency lights in halls, stairs, and exits. Make sure they stay on for at least 90 minutes.
Pick the right emergency light for your building. Maintained lights stay on all the time. Non-maintained lights turn on only during outages.
Test your emergency lights every month. Do a full battery test once a year. This keeps them ready and safe.
Choose strong fixtures with good battery backup. Put lights where people can see escape paths. Make sure lights do not cause glare or confusion.
LED Emergency Lights Overview
What Are LED Emergency Lights
You depend on LED emergency lights to help you find your way when the power goes out. These lights are a very important part of any emergency lighting system. They use special technology, not like old bulbs, to give off bright and steady light. When the main power stops, they turn on right away. This makes sure you can always see in an emergency.
LED emergency lights have two ways to get power. When things are normal, they use electricity from the grid and charge their battery. If the power goes out, sensors notice it and switch to battery power. This change happens fast, so the lights keep working. You can press a button to test the system. This button acts like there is a power loss and checks if the lights work.
Tip: Test your lights every month. Change the battery every 3 to 5 years to keep your system working well.
Main parts of LED emergency lights are:
LED lamp that saves energy and lasts a long time
Rechargeable battery, often lithium-ion
Control parts that manage power
Sensors that know when the power is out
Strong case to protect the light
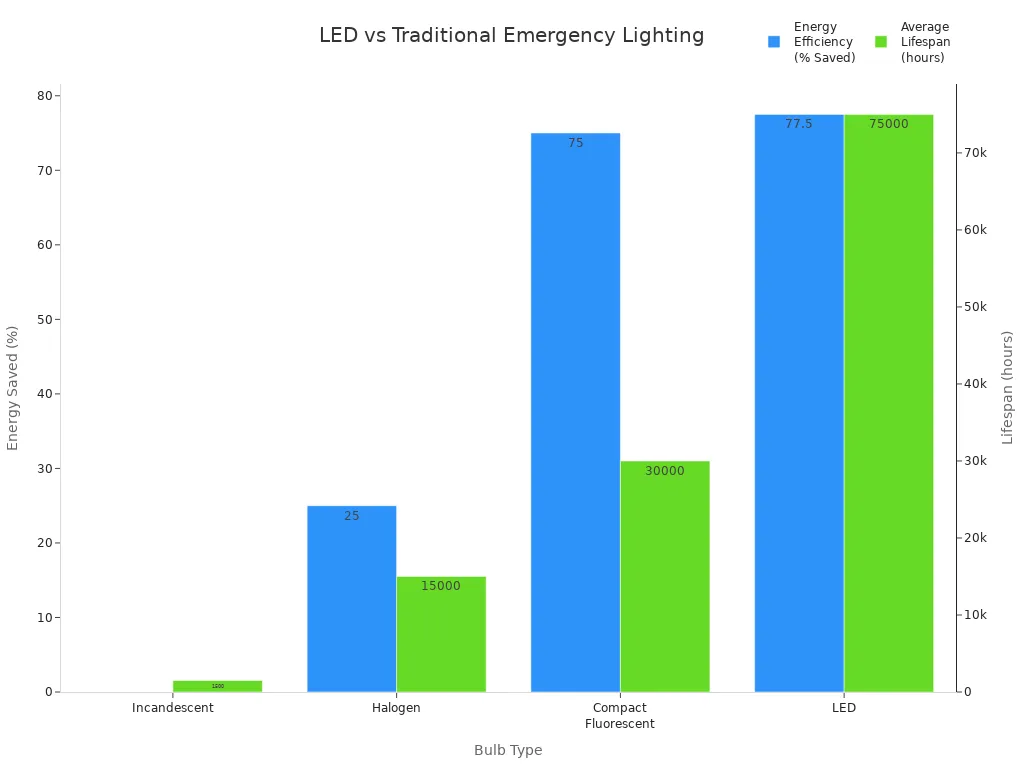
LED emergency lights save energy and last much longer than old bulbs. Old bulbs only work for about 1,000 to 2,000 hours. LEDs can work for 50,000 to 100,000 hours. This means you do not have to change them as often. It also costs less to take care of your emergency lighting.
Safety and Compliance
You have to make sure your emergency lighting follows all safety and compliance rules. These rules keep people safe and help you avoid fines. Groups like the National Fire Protection Association (NFPA 101), Occupational Safety and Health Administration (OSHA), and International Building Code (IBC) make these rules. Your city or state might have more rules too.
Regulatory Code/Standard | Key Requirements for LED Emergency Lighting in Commercial Buildings |
|---|---|
NFPA 101 Life Safety Code | Minimum 1 foot-candle illumination along exit routes for at least 90 minutes during emergencies. |
OSHA Standards | Adequate emergency lighting, visible exit signs, and regular testing. |
International Building Code | Independent power source, proper installation, and maintenance for safe evacuation. |
Local and State Codes | Additional or stricter requirements based on regional needs. |
You need to put emergency lights in hallways, stairs, and shared spaces. The lights must turn on in 10 seconds or less after the power goes out. They should stay on for at least 90 minutes. You should check your lights every month and every year to make sure they follow the rules. Doing this keeps your emergency lighting ready and helps everyone get out safely if there is an emergency.
Types of LED Emergency Lights
Picking the right types of emergency lights keeps people safe and helps you follow the rules. Each emergency lighting fixture has its own job, so you need to know how they work and where to put them.
Maintained and Non-Maintained
There are two main types of emergency lights. These are maintained and non-maintained. They work in different ways and go in different places.
Feature | Maintained Emergency Lights | Non-Maintained Emergency Lights |
|---|---|---|
Definition | Lights are always on, powered by mains during normal operation; switch to battery during outages | Lights are off during normal operation; switch on only during power failure |
Functionality | Wired to main power with battery backup; continuous illumination | Battery backup activates lights only when mains power fails |
Typical Applications | Commercial buildings, public spaces requiring constant lighting | Industrial environments, escape routes, fire exits |
Energy Consumption | Higher due to continuous operation | Lower, only active during emergencies |
Installation | More complex wiring needed | Easier installation with less wiring |
Advantages | Continuous safety lighting, smooth transition to emergency mode | Energy saving, cost-effective, dedicated emergency use |
Disadvantages | Higher energy use, complex installation, more maintenance | No lighting during normal operation, requires battery maintenance |
You should use maintained emergency lighting in places like theaters and shopping centers. These places need lights on all the time. Non-maintained emergency lighting is best for escape routes and fire exits. These lights only turn on when the power goes out. Non-maintained types of emergency lights save energy because they do not run all the time. You need to test and check the batteries often to make sure they work.
Tip: Test non-maintained emergency lighting every month to make sure it works in an emergency.
Emergency Escape Lighting
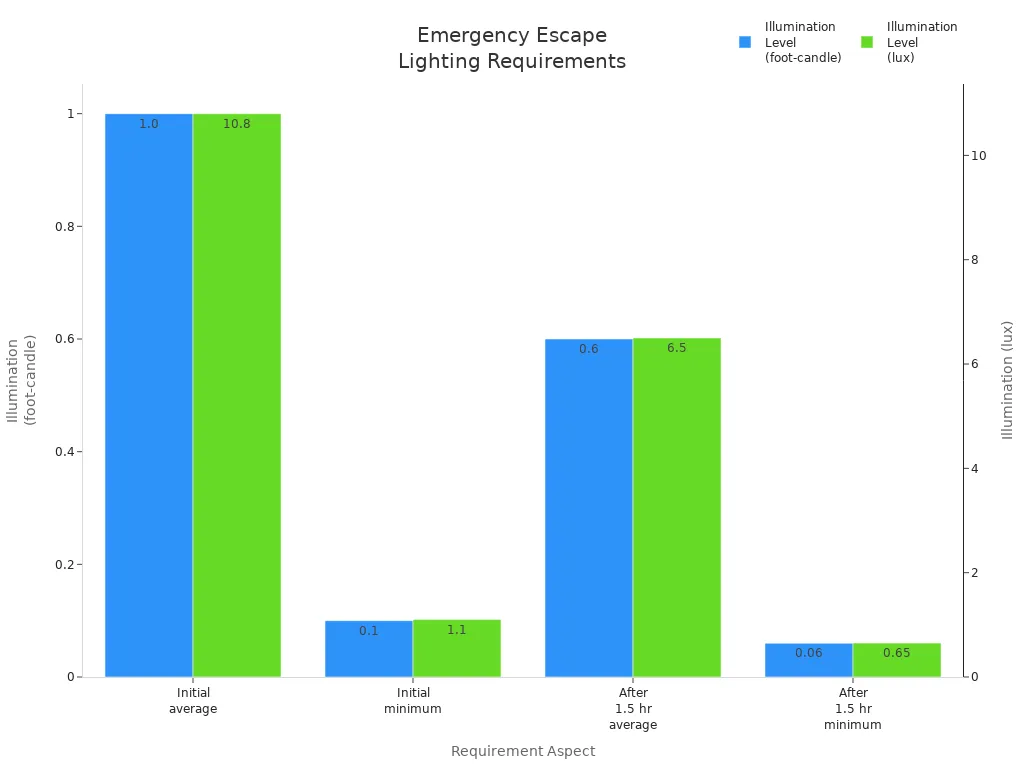
Emergency escape lighting helps you get out of a building when the power fails. The lights must be bright enough and last long enough to meet safety rules. NFPA 101 says emergency lighting needs to give at least 1.0 foot-candle of light on average. It cannot be less than 0.1 foot-candle anywhere along the path. The lights must stay on for at least 90 minutes after the power goes out.
Requirement Aspect | Illumination Level (foot-candle) | Illumination Level (lux) | Notes |
|---|---|---|---|
Initial average illumination | 1.0 | 10.8 | Measured along path of egress at floor level |
Initial minimum illumination | 0.1 | 1.1 | At any point along path of egress |
Illumination after 1.5 hours | 0.6 (average) | 6.5 | Minimum average allowed after 90 minutes |
Illumination after 1.5 hours | 0.06 (minimum) | 0.65 | Minimum at any point after 90 minutes |
Maximum-to-minimum ratio | 40:1 | N/A | Maximum allowed ratio of illumination |
You must put emergency egress lighting on stairs, aisles, ramps, and hallways that lead to exits. These lights turn on by themselves when the power fails. They help everyone find the safest way out.
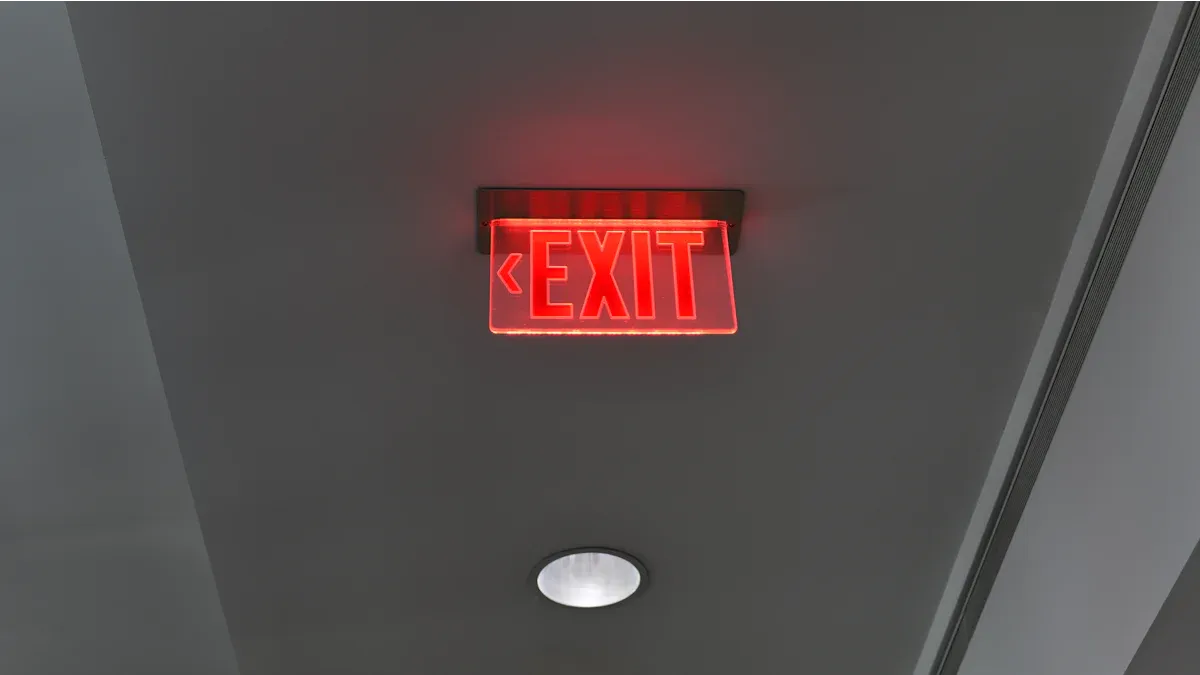
Exit Signs
Exit signs with lights are very important for emergency escape. You need these signs to show exits clearly and help people get out. LED exit lights are brighter and easier to see than old types. They use batteries that charge up and keep the sign lit if the power goes out.
LED exit signs use about 4 watts, which is less than old signs.
They last over 10 years, so you do not need to change them often.
You save money on repairs because they last a long time and have good batteries.
You can put these exit lights in the right spots to follow ADA and NFPA rules.
Note: Always make sure your exit signs can be seen even if there is smoke or it is dark.
Tubular LED (TLED) Lights
Tubular LED lights, called TLEDs, are a new way to light up emergencies. You can put these lights into old fluorescent fixtures, so upgrades are easy and cheap. TLEDs come in three types: A, B, and C. You can pick the one that works best for your building’s wiring.
TLEDs save energy and last longer than old bulbs.
They are brighter, so you need fewer lights to meet safety rules.
TLEDs shine light where you need it most.
You might need to change the emergency ballasts to use TLEDs the right way.
Only certified electricians should install TLEDs to make sure your emergency lighting works safely.
Thermoplastic and Steel Fixtures
You need to pick the right material for your emergency lighting fixture. Thermoplastic and steel fixtures have different good points.
Feature | Steel Fixtures | Thermoplastic Fixtures |
|---|---|---|
Durability | Rugged, tamper-resistant, withstands abuse, impact, vandalism; powder-coated to resist rust | Less sturdy, can crack or break on hard impact; resistant to rust and corrosion but can yellow or become brittle over time with UV/heat exposure |
Environmental Suitability | Ideal for harsh environments: industrial facilities, warehouses, parking garages, public areas | Best for dry, indoor environments: offices, schools, retail stores; flame-retardant but not for extreme heat, cold, or wet unless specially rated |
Weight | Heavier, installation may require two people and robust mounting | Lightweight, easy to install by one person |
Cost | Higher cost (starting around $80, can exceed $150 for high capacity) | Budget-friendly (typically $20-$50) |
Battery Capacity | Larger batteries, supports multiple remote heads, longer runtimes | Smaller batteries, generally supports only attached lamp heads for 90 minutes |
Code Compliance | Required by codes in cities like NYC and Chicago; UL 924 listed | UL 924 listed and code-compliant for most areas, but prohibited in some jurisdictions like NYC and Chicago |
Maintenance | Durable housing reduces damage-related maintenance | Batteries need replacement every 3-5 years; housing easy to service but less impact-resistant |
Appearance | May be bulkier, but low-profile steel designs exist | Often low-profile, smooth, aesthetically pleasing designs |
Steel fixtures are best for places like factories or public spaces where lights need to be tough. Thermoplastic fixtures are good for offices, schools, and stores where you want easy setup and a nice look.
Wet and Hazardous Location Lights
You need special emergency lighting fixtures for wet or dangerous places. These lights must have at least an IP65 or NEMA 4X rating to keep out water, dust, and rust. You will see these lights in outdoor stairs, car washes, kitchens, and other wet spots.
Wet-location emergency lighting has sealed cases to block water.
Hazardous location lights often have IP66 ratings to stop strong water jets and dust.
They use strong materials like thermoplastic, fiberglass, or coated aluminum.
These lights meet UL 924, UL 844, and UL 1598A safety rules.
The battery backup gives at least 90 minutes of light in an emergency.
Always check the IP rating before you put emergency lighting in wet or dangerous places.
Portable and Standalone Units
Portable and standalone emergency lighting units give you choices in important places. You can use these lights in hospitals, data centers, warehouses, parking garages, and building sites. They give bright light for at least 90 minutes with their own battery.
Portable units are good for temporary lighting during building work or repairs.
You can pick thermoplastic models for inside or steel ones for tough jobs.
There are wet-location and hazardous-location portable lights for outside or hard places.
These units help you keep things safe and meet emergency lighting rules when the power goes out.
Use portable emergency lighting fixtures to help people leave safely and keep things running in any place.
Emergency Lighting Applications
Evacuation Routes
You need bright emergency lights on every escape path. This helps people leave a building safely. The right light levels help you follow safety rules. They also keep everyone safe in an emergency. Here are some steps to make sure your escape route lighting is correct:
Put lights on all exit paths like halls and stairs so people can see.
Add emergency lights in rooms, bathrooms, and storage spaces bigger than a closet if they have no windows.
Place lights so there are no very bright or very dark spots.
Point lights at the floor where people walk, not at the walls or ceiling.
Use lights and exit signs that meet OSHA, NFPA 101, and local rules.
Make sure exit signs have backup power and are easy to see.
Put up signs with arrows if the escape path turns.
Check and fix your emergency lights every year.
Tip: Put emergency lights at every turn, change in floor, or hallway crossing so people can always see the way out.
Stairwells and Hallways
Stairwells and hallways must have good emergency lights for safe exits. You should follow NFPA 101 rules for how bright the lights need to be:
Location | NFPA 101 Section | Minimum Illumination Level | Measurement Point |
|---|---|---|---|
Stairwells | 7.8.1.3 (1) | 10 foot-candles (108 lux) | Walking surfaces |
Hallways | 7.8.1.3 (2) | 1 foot-candle (10.8 lux) | Floor during normal operation |
Good lighting in these places helps people find exits fast and stay safe.
Open Areas
In big open rooms, spread out emergency lights so there are no dark spots. Put the lights 7 to 8 feet high for the best view. In long halls, do not put lights more than 30 feet apart. Light up all escape paths, even if they turn, go up or down, or lead outside. NFPA 101 says you need an average of 1 foot-candle of light on the floor along escape paths. The brightest spot cannot be more than 40 times brighter than the darkest spot. Use stronger lights or more lights in big rooms. Test your emergency lights often to make sure they work.
High-Risk Zones
Labs and factories need special emergency lights for safe exits. These lights must turn on by themselves if the power goes out. The lights should stay on for at least 1.5 hours. Keep an average of 1 foot-candle of light on escape paths, and never less than 0.1 foot-candle anywhere. After 90 minutes, you still need at least 0.6 foot-candle on average. Test the lights every month and year, and write down the results. Only let trained electricians put in and fix these lights.
Residential and Commercial Spaces
Emergency lighting rules are different for each building type. Stores and offices need full systems with exit signs, lit paths, and backup power. Apartment buildings must have emergency lights in shared spaces like halls and stairs. Most single-family homes do not need emergency lights, but check your local rules. All emergency lights must turn on by themselves and stay on for at least 90 minutes. Test and fix your lights often so they always work in an emergency.
Installation Best Practices
Code Compliance
You have to follow all codes and rules when you put in emergency lighting. Following the rules keeps people safe and helps you not get fined. Some common mistakes are blocked exits, dim lights, and exit signs that do not work. Never let anything block an exit or hallway. Always make sure your emergency lights are bright enough on every escape path and that exit signs stay lit during emergencies.
You must follow rules from groups like NFPA 101, OSHA, and your local codes. These rules say where to put lights, how bright they should be, and how long they must stay on. Your emergency lights need to turn on in 10 seconds or less if the power goes out. They must stay on for at least 90 minutes. You should keep notes about every check and repair to show you follow the rules.
Tip: Check your emergency lights often and fix problems fast. This helps you avoid mistakes and keeps your system ready for emergencies.
Fixture Selection
Picking the right fixtures is very important for your emergency lighting. Think about your building’s size and type. Offices, warehouses, and homes all need different emergency lights. Make sure your fixtures follow all local and national rules.
When you pick fixtures, look for these things:
Choose fixtures that fit your building’s layout.
Make sure each fixture follows NFPA 101 and other safety rules.
Pick batteries that last at least 90 minutes, like lithium-ion or NiCad.
Use LED fixtures because they save energy and last longer.
For wet or tough places, pick fixtures with high IP ratings to block water and dust.
Put fixtures in all important spots, like escape paths, exits, stairs, and risky areas.
Think about how easy it is to take care of the fixtures. Some have self-testing to make checks easier. Pick fixtures that look good in your building, but always put safety first.
Placement and Mounting
Putting lights in the right places is very important for safety. You need to put lights in halls, stairs, and near exits. Place them so all escape paths are bright and easy to see. Do not put lights where they shine in your eyes or confuse people.
You can mount lights in different ways:
Wall mounting works well in halls and stairs.
Ceiling mounting covers big open spaces.
Recessed mounting hides the light for a neat look.
End mounting is good for exit signs by doors.
Suspension mounting uses rods or chains for high ceilings.
Track and rail mounting lets you move lights if you need to.
Always use strong supports. In places with earthquakes, add extra bracing. Make sure every light connects to backup power. Plan your setup to follow all fire and escape rules.
Note: Put emergency lights at every turn, floor change, or hallway cross. This helps people find the way out.
Power and Battery Backup
Your emergency lights need good power and battery backup. Most systems use low-voltage batteries like NiCad, NiMH, or lithium. These batteries must keep lights on for at least 90 minutes, as NFPA 101 says. You can use battery units in each light or connect to a big battery or generator.
LED emergency lights use less power, so batteries last longer. Always check that your backup power meets all state and local rules. Do not use old, heavy lead-acid batteries. Pick batteries that do not need much care and last longer.
Always test your battery backup to make sure your emergency lights will work when you need them.
Testing and Maintenance
Testing and taking care of your emergency lights keeps them working. You must test your lights every month for at least 30 seconds. Once a year, run a full test for 90 minutes to check the battery. Write down every test, the date, who did it, and any repairs.
Follow these steps for checks:
Look for broken parts, loose wires, or dirty covers.
Pretend the power is out to see if lights turn on and stay on.
Check if the lights are bright enough for safety.
Make sure sensors and wires work right.
Change batteries and fix problems right away.
Use software to track your tests and repairs.
Pro Tip: Keep your test records for at least four years. This helps you show you follow the rules if someone checks.
If you take care of your emergency lights, you can feel safe. You know your building is ready and you follow all the rules.
Choosing the right LED emergency lights protects people and helps you meet important codes. You should always:
Check that your lights follow NFPA, OSHA, and local rules.
Test and clean your lights every month.
Pick durable, energy-saving fixtures with long warranties.
Ask experts for help with large systems or code questions.
Stay updated on new regulations to keep your building safe and ready for any emergency.
FAQ
What is the main benefit of using LED emergency lights?
LED emergency lights last a long time and use less power. They help you save money on repairs and your electric bill. These lights are also brighter and work better in emergencies.
How often should you test your emergency lighting system?
Test your emergency lights once every month. Do a full 90-minute test one time each year. Write down each test to prove you follow safety rules.
Can you install LED emergency lights yourself?
You can put in simple units if you read the instructions. For bigger jobs or to follow the rules, hire a licensed electrician. This makes sure your lights work right and meet all safety standards.
Where should you place emergency lights in a building?
Put emergency lights in halls, stairs, exits, and big rooms. Always light up escape paths and places where people gather. Check your local rules for the best spots.
See Also
Exploring Various LED Replacement Lights And Their Advantages
