Outdoor LED Flood Lights: Weather-Resistant Features and Installation Best Practices

Outdoor LED Flood Lights deal with hard weather all year. Rain, dust, and sunlight can make problems. These problems include early breakage and weak light. You want your Home to be bright and safe. So, picking the right Product is important. A flood light is weather-resistant with strong seals, good materials, and smart design. If you install your Led Light the right way, it works better. It also lasts longer. About Us: We help you pick solutions that last.
Common outdoor lighting challenges include:
Color changes over time
Higher upfront costs
Reliability issues during storms
Key Takeaways
Pick LED flood lights because they last a long time. They can work for up to 100,000 hours. This means you do not have to change them often.
Get lights with a high IP rating, like IP65 or more. This helps them handle tough weather, such as rain and dust.
Choose the best beam angle and color temperature for your space. This makes your area safer and look better.
Clean and check your lights often to keep them bright. This helps you find problems early and makes them last longer.
Install your lights the right way. Use waterproof connectors and make sure they are mounted tightly. This keeps your lights safe and working well.
LED Flood Lights Benefits
Durability
You want outdoor lights that last. LED Flood Lights stand out because they keep shining for years. Take a look at this table. It shows how long different lights work before you need to replace them:
Lighting Type | Typical Lifespan (hours) |
|---|---|
LED | 25,000 - 100,000 |
Incandescent | 1,000 |
Halogen | 2,500 |
CFL | 8,000 |
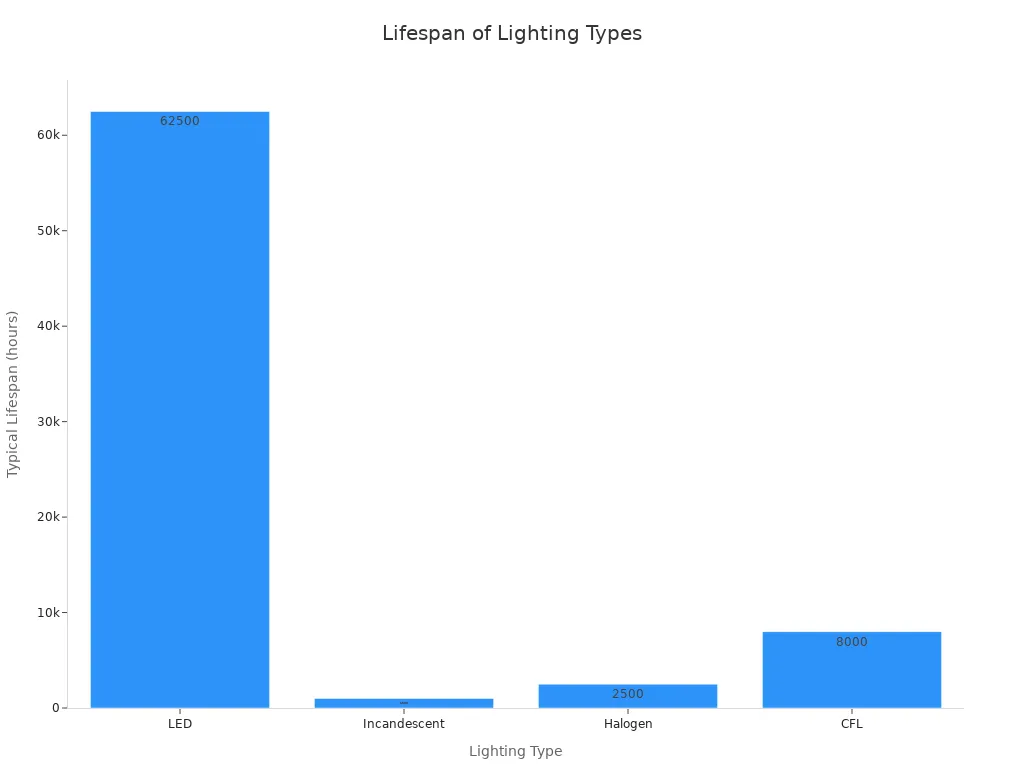
You can see that LED Flood Lights last much longer than other types. You spend less time and money changing bulbs. That means less waste and fewer trips up the ladder.
Energy Efficiency
Saving energy helps your wallet and the planet. LED Flood Lights use much less power than old halogen lights. Here’s a quick look:
Light Type | Power Consumption (Watts) | Energy Savings (%) |
|---|---|---|
Halogen Flood Light | 500 | N/A |
LED Flood Light | 50 | 90 |
LED Flood Lights can save up to 80% less energy compared to halogen lights.
You can swap a 500-watt halogen for a 50-watt LED Flood Light. That’s a 90% drop in energy use.
You notice the difference on your electric bill. You also help reduce pollution.
Safety and Visibility
Bright lights keep you safe. LED Flood Lights give you strong, clear light. You see better at night. Your yard, driveway, or business stays bright. Here’s why that matters:
LED Flood Lights provide bright, high-contrast illumination, improving visibility compared to sodium vapor lamps.
They offer better color rendering, so you spot details from far away. Security cameras work better, too.
A well-lit area keeps intruders away. No dark spots for hiding.
"Improved street lighting is widely thought to be an effective means of preventing crime, second in importance only to increased police presence." – U.S. Department of Justice
Lighting improves visibility and decreases concealment in public settings, which boosts safety.
Residents feel safer when outdoor spaces are well-lit.
You protect your property and help prevent accidents. LED Flood Lights make your outdoor space safer for everyone.
Weather-Resistant Features
IP Ratings
When you buy outdoor lights, you see numbers like IP65, IP66, or IP67. These numbers show how well the lights keep out dust and water. Bigger numbers mean better protection. Look at this table to see what each rating means:
IP Rating | Dust Protection | Water Protection |
|---|---|---|
IP65 | Dust tight | Low pressure water jets from any direction |
IP66 | Dust tight | High-pressure water jets from any direction |
IP67 | Dust tight | Submersion in water up to 1 meter for 30 minutes |
If you live where it rains a lot or floods, pick a higher IP rating. The right rating helps your LED Flood Lights last longer and work well in bad weather. Some lights have special designs like pressure vents and sealed joints. These keep water and dust out. Your lights stay bright and work well, no matter the weather.
Material Quality
You want your lights to look nice and stay strong. The materials in outdoor LED Flood Lights matter a lot. Some metals stop rust, and others handle heat and cold. Check out this table:
Material | Corrosion Resistance Properties |
|---|---|
Aluminum | Effectively prevents rust in seawater. |
Stainless Steel | Stable and corrosion-resistant even after long exposure, though surface reactions may occur. |
Plastic | Prevents corrosion but may deform and decay under heat and UV rays. |
Silicone Rubber | Excellent resistance to ozone, oxygen, light, and weather aging; good gas and moisture barrier. |
316 stainless steel is used near the ocean because it fights rust. Marine-grade aluminum does not fade and stands up to salty air. Some lights use tough thermoplastics or silicone for hot or cold places. If you pick lights made from these materials, they last longer and look good every year.
Sealing Methods
Water can get into small cracks and break your lights. Makers use smart ways to seal lights and keep water out. Here are some common ways:
Silicone-based sealants: Flexible and strong, great for waterproofing.
Polyurethane sealants: Stick well and last outside.
Waterproof sealants: Protect seams and connections from leaks.
Silicone sleeves: Give extra moisture protection.
Some lights have double seals for more strength. Others use gel-filled connectors for wet or underground spots. You might see silicone or EPDM gaskets that block water and chemicals. These seals help your LED Flood Lights work during storms and keep shining when the weather is bad.
Tip: Always check if your lights have tight seals and gaskets. Good sealing means fewer problems and longer life.
UV and Temperature Resistance
Sun and changing temperatures can damage outdoor lights. UV rays cause fading and cracks. High heat makes lights dim and not last as long. Cold weather can make materials break. Here is what you should know:
UV-resistant coatings stop fading and cracking.
UV-stabilized housings and lenses keep lights looking new.
Powder coatings on aluminum help keep color and shine in strong sun.
Temperature Condition | Effect on Performance and Lifespan |
|---|---|
High Temperatures | Reduces brightness by 5% to 70%, causes color shifts, and can decrease lifespan by 50% with a 10°C increase in junction temperature. |
Low Temperatures | Improves performance but may cause brittleness and gaps in seals. |
Frequent Fluctuations | Causes thermal stress, leading to deformation and possible failure. |
If you live where summers are hot or winters are cold, pick lights with UV-stabilized materials and strong coatings. These features help your LED Flood Lights stay bright and strong, no matter the weather.
Choosing LED Flood Lights
Beam Angles
Picking the right beam angle helps you get the light where you want it. You might want to highlight a tree, light up a path, or cover a big wall. Each job needs a different beam angle. Take a look at this table to see which angle fits your space:
Beam Angle (Degrees) | Application Description |
|---|---|
10-15 | Highlights tall trees and small features, creates drama |
25-45 | Good for outdoor spaces and paths, balances focus and spread |
55-60 | Covers broad objects, keeps light strong |
Over 120 | Lights up big walls or wide open spaces |
You should think about what you want the light to do. Use a narrow beam for tasks like spotlighting a statue. Go wider for general lighting in a yard. Adjustable beams let you change the spread, which is great for security or events.
Color Temperatures
Color temperature changes how your space feels. Warm white light makes patios cozy. Cool white light helps you stay alert. Daylight tones work best for security. Here’s a quick guide:
2000K-3000K: Warm white, perfect for relaxing outside.
3100K-4500K: Cool white, brightens up areas and helps you focus.
4600K-6500K: Daylight, ideal for security and showing off features.
Setting | Recommended Color Temperature | Description |
|---|---|---|
Security | 5000K | Crisp visibility, helps cameras and keeps you safe |
Landscape | 2000K-3000K | Warm and cozy, great for family gatherings |
3100K-4500K | Bright and lively, chases away shadows | |
4600K-6500K | Looks like daylight, good for security and highlighting |
If you want to keep your home safe, pick a higher color temperature. For a relaxing vibe, go lower.
Application Needs
Every space needs something different. Sports fields need wide beams and tough lights. Parking lots need bright, even light for safety. Your patio might need softer light for comfort.
"Different spaces require different types of lighting depending on their purpose and function. For example, a parking lot may need bright and uniform lighting to ensure safety and visibility for drivers and pedestrians."
Application | Lumen Requirement |
|---|---|
Residential Patio | Lower lumens for ambiance |
Commercial Parking Lot | Higher lumens for safety |
Sports fields: Wide beams, strong lights for weather and impact.
Parking lots: Very wide beams, lights that resist vandalism.
Residential areas: Long-lasting lights, focused beams for easy upkeep.
Think about what you want from your LED Flood Lights. Match the beam angle, color temperature, and strength to your space. You’ll get the best results and keep your area safe and bright.
Installation
Getting your outdoor lighting right starts with smart planning and careful setup. You want your LED Flood Lights to shine bright, last long, and stay safe in any weather. Let’s walk through each step so you can install your lights like a pro.
Site Assessment
Before you grab your tools, take a good look at your space. You want to make sure your lights do their job and don’t run into trouble later. Here’s a simple checklist to guide you:
Assess the Area: Walk around and spot any trees, walls, or objects that might block the light. Think about why you need the lighting—security, decoration, or safety.
Calculate the Illumination: Figure out how much light you need. A driveway needs more brightness than a garden path.
Consider Light Direction: Decide where you want the beams to point. Do you want to highlight a feature or cover a wide area? The angle matters for both looks and safety.
Tip: Draw a quick map of your yard or parking lot. Mark where you want each light and what you want it to do.
Fixture Selection
Picking the right fixture makes all the difference. You want lights that fit your needs and stand up to the weather. Here’s what to look for:
Brightness: Check the lumens. Sports fields need super bright lights, while patios do fine with softer ones.
Color Temperature: Warm white feels cozy. Cool white works best for security and clear visibility.
Beam Angle: Narrow beams spotlight features. Wide beams cover big spaces.
Waterproofing & Durability: Look for an IP65 or higher rating. This keeps out rain and dust.
Energy Efficiency: Choose LED models to save power and money.
Mounting Options: Wall mounts work for security. Pole mounts cover large areas.
Note: Always match the fixture to your space and weather. A tough, waterproof light lasts longer and needs less fixing.
Wiring
Wiring your lights safely is key. You want to follow the rules and keep everything working in rain or shine. Here’s a quick table to help you remember the main standards:
Compliance Standard | Description |
|---|---|
National Electrical Code (NEC) | Use weatherproof wires and boxes. Ground your lights and protect circuits from overload. |
OSHA | Make sure work areas are bright enough to prevent accidents. |
Environmental Regulations | Pick energy-saving lights to cut down on pollution and keep your neighborhood looking good. |
Use outdoor-rated cables and connectors.
Seal all wire joints with waterproof tape or gel.
Keep wires off the ground and away from water.
Tip: If you’re not sure about wiring, call a licensed electrician. Safety comes first!
Mounting
Mounting your lights the right way keeps them steady in wind and rain. You want them to stay put and keep shining. Here’s how you can do it:
Use strong brackets that won’t bend or break.
For wall mounting, attach to solid brick or concrete. Use anchors if needed.
For pole mounting, dig a hole at least 2 feet deep. Pour concrete for extra strength.
Always use weatherproof screws and sealants to block water.
Callout: Check your local wind zone map. Pick fixtures that can handle the highest wind speeds in your area.
Angle Adjustment
Getting the angle right helps you light up your space without blinding anyone. You want good coverage and no glare. Here’s what works best:
Mount your lights 8-12 feet high for security.
Tilt them downward at 22-30 degrees. This spreads the light and keeps it out of people’s eyes.
Test the angle at night. Walk around and see if you missed any dark spots.
Tip: Adjust the angle until you see even light and no harsh shadows.
Electrical Safety
You want your lights to work safely for years. Good waterproofing and code compliance protect against shocks and breakdowns.
Pick fixtures with an IP65 or higher rating for wet areas.
Seal every connection with waterproof tape or gel.
Use ground fault circuit interrupters (GFCIs) for extra protection.
Check all wires and boxes for damage before turning on the power.
Safety Alert: Never install lights when it’s raining or the ground is wet. Wait for dry weather to avoid accidents.
Maintenance
Cleaning
You want your outdoor LED flood lights to shine bright every night. Dirt, dust, and bugs can block the light and make your yard look dim. Regular cleaning keeps your lights working their best. Here’s what you can do:
Wipe the surface of each flood light with a soft, dry microfiber cloth.
Clean the lenses and fixtures to remove dust, dirt, and debris.
Use a microfiber cloth for regular dusting to prevent buildup.
Remove insects and cobwebs from around the lights.
Tip: Clean your lights every few months or after a storm. You’ll notice a big difference in brightness.
Inspection
Checking your lights helps you catch problems before they get worse. You don’t want moisture or loose wires to cause trouble. Here’s a simple checklist:
Look for signs of wear or damage on the fixture and lens.
Inspect wiring and seals to make sure water can’t get inside.
Adjust the angle of your lights if you see shadows or heat spots.
Trim plants and bushes near the lights so nothing blocks them.
Inspection Task | Why It Matters |
|---|---|
Check for damage | Prevents early failure |
Inspect wiring | Stops moisture and corrosion |
Adjust angle | Keeps light even and reduces heat |
Trim vegetation | Prevents fixture damage |
Note: Schedule a professional inspection once a year. Experts can spot issues you might miss.
Troubleshooting
Sometimes your lights flicker or stop working. You can fix many problems yourself. Try these steps:
Check the power supply and make sure the circuit breaker is on.
Inspect the bulb and fixture for damage. Make sure the bulb sits tight.
Evaluate wiring and connections for loose or damaged wires.
Use a multimeter to test voltage and current if you have one.
If you find corrosion or broken parts, replace them right away.
Re-seat any loose connections to restore power.
🛠️ If you’re unsure about electrical work, call a licensed electrician. Safety comes first!
Regular cleaning, inspection, and troubleshooting help your LED flood lights last longer and shine brighter. You save money and keep your outdoor space safe and beautiful.
When you pick LED Flood Lights with tough, weather-resistant features, you get lights that last through rain, snow, and heat. You keep your outdoor spaces safe and bright by cleaning, inspecting, and sealing your lights.
Want a safer yard or business? Start with the right lights and take care of them. You will see better results and save money over time.
FAQ
How do you know if an LED flood light is waterproof?
Check the IP rating on the box or product label. Look for IP65 or higher. This means your light can handle rain and dust. You can use it outside without worry.
Tip: IP67 lights work best for heavy rain or flood-prone areas.
Can you install LED flood lights yourself?
Yes, you can install them if you follow safety steps. Use waterproof connectors and outdoor-rated wires. If you feel unsure, call a licensed electrician for help.
How often should you clean outdoor LED flood lights?
Clean your lights every three months. Wipe off dust, dirt, and bugs. If you live in a stormy area, check and clean them after each big storm.
What does color temperature mean for outdoor lighting?
Color temperature tells you how the light looks. Warm white feels cozy. Cool white looks bright and sharp. Daylight color helps with security and clear vision.
Color Temperature | Mood/Use |
|---|---|
2700K-3000K | Relaxing |
4000K-5000K | Bright/Safe |
6000K+ | Security |
Why do LED flood lights flicker sometimes?
Flickering happens when the power supply is unstable or the wiring is loose. Check your connections. Replace damaged wires or bulbs. If the problem continues, ask an electrician to inspect your setup.
See Also
Exploring LED Outdoor Lighting: Advantages, Varieties, and Setup Tips
Professional Advice for Designing Effective Flood Lighting
Flood Lighting Solutions: Installation Techniques and Design Tips for All Properties
Various Outdoor LED Lighting Options: Advantages and Installation Guidelines
Outdoor Signage Lighting: Varieties, Uses, and Effective Strategies
