Essential Guide to Designing LED Outdoor Signs for Maximum Impact

Imagine walking on a busy street and seeing a bright LED outdoor sign. That’s the magic of LED outdoor signs. These signs do more than glow—they attract customers to you. Studies say digital signs catch the eye of 63% of people. About 70% of Americans say signs have made them buy a product. For stores, adding digital signs can boost visitors by 24%.
LED outdoor signs also help your brand. They improve your business's look, show your location, and support ads. With energy-saving LED lights, they leave a strong impression and cut power costs. Whether showing a product or sharing info, LED signs make your message stand out. About us, we believe in the power of LED technology to transform your advertising strategy.
Key Takeaways
Put your LED signs where lots of people pass by. This helps more people see them and brings in customers.
Pick the right size and shape for your signs. Bigger, well-made signs can grab up to 85% more attention.
Write clear and simple messages on your signs. Use bright colors and short phrases so people can read them fast.
Add your brand's colors, fonts, and logo to the signs. This helps people remember and trust your business.
Check and fix your signs often to keep them looking good and working well.
Design Considerations for LED Outdoor Signs
Strategic Placement for Maximum Visibility
Where you place your LED outdoor signs is very important. You want as many people as possible to see them. Look for busy spots near your business, like intersections or shopping areas. Places near bus stops or train stations are also great. Put your sign at eye level or a little higher, where people naturally look.
Think about the angle too. A sign facing traffic or walkers gets noticed more. If your store is on a corner, placing the sign at an angle can help people see it from different directions. Pay attention to light. Don’t put your sign where sunlight or shadows make it hard to see.
Tip: Use tools like traffic maps to find the best spot. This helps you reach the right people at the right time.
Optimizing Size and Shape for Impact
The size and shape of your LED outdoor signs affect how well they work. Bigger signs grab attention but shouldn’t look out of place. A sign that’s too small might not get noticed. Choose a size that fits your space and looks balanced.
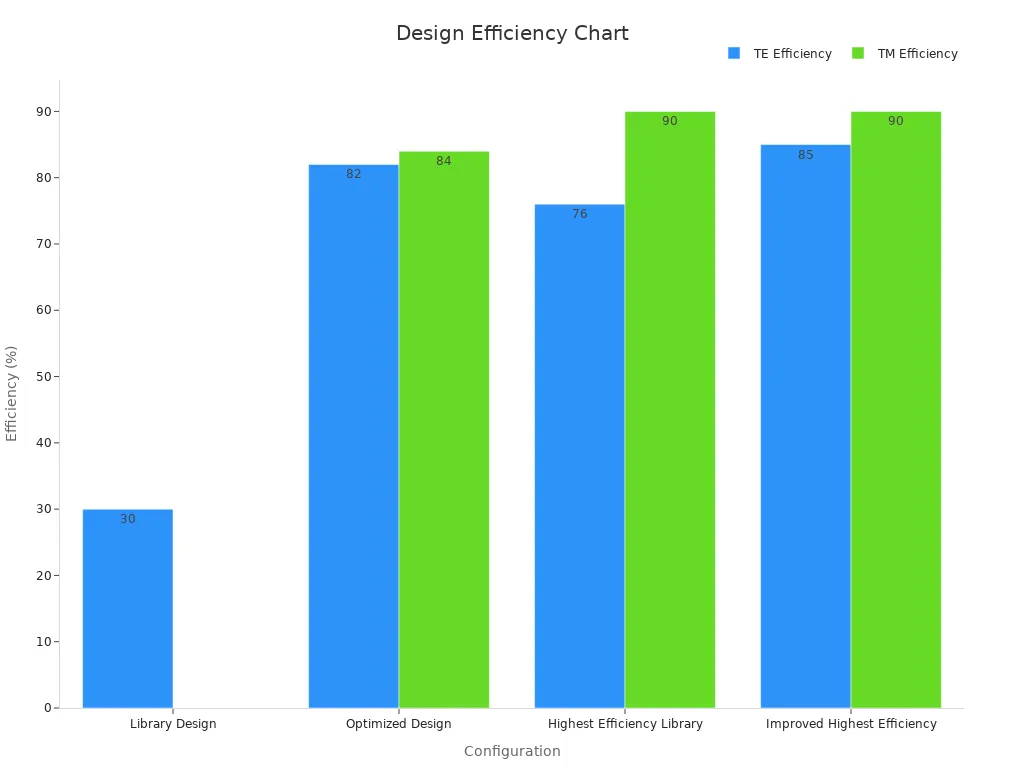
Shapes matter too. Rectangles are common, but unique shapes like circles can stand out more. Studies show that well-designed signs work better. For example, optimized designs can attract up to 85% more attention compared to basic ones.
Configuration | TE Efficiency (%) | TM Efficiency (%) |
|---|---|---|
Library Design | 30 | N/A |
Optimized Design | 82 | 84 |
Highest Efficiency Library | 76 | 90 |
Improved Highest Efficiency | 85 | 90 |
Note: Check local rules about sign size and shape to avoid problems.
Crafting Effective Content and Messaging
The words on your LED outdoor signs should be simple and clear. Use short phrases that people can read quickly. Most people only have a few seconds to see your sign. Add a strong call-to-action like “Shop Now” or “Don’t Miss Out” to get people to act fast.
Colors, fonts, and animations also matter. Bright colors and bold fonts make your message easy to read. Don’t add too much text or too many pictures. Focus on one main idea at a time.
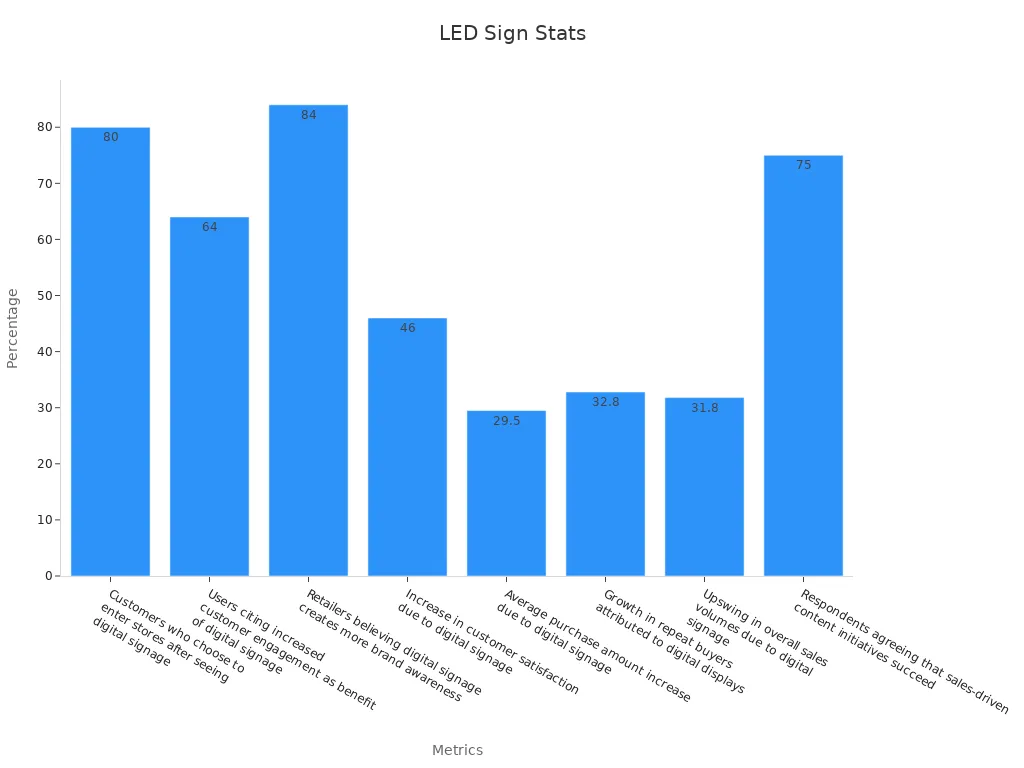
Statistics show why good messaging is key. For example, 80% of people enter stores after seeing digital signs. Also, 84% of businesses say these signs help build their brand, and 64% see more customer interaction.
Statistic | Value |
|---|---|
Customers who choose to enter stores after seeing digital signage | 80% |
Users citing increased customer engagement as a benefit of digital signage | 64% |
Retailers believing digital signage creates more brand awareness | 84% |
Increase in customer satisfaction due to digital signage | 46% |
Average purchase amount increase due to digital signage | 29.5% |
Growth in repeat buyers attributed to digital displays | 32.8% |
Upswing in overall sales volumes due to digital signage | 31.8% |
Respondents agreeing that sales-driven content initiatives succeed | 75% |
Tip: Try different messages to see what works best. Change your content often to keep it interesting.
Integrating Branding into LED Sign Design
Your LED outdoor sign should show more than just information. It needs to reflect your brand’s style and build trust. To do this, include your brand’s colors, fonts, and logo in the design.
Use your brand’s color palette to start. Colors create feelings and connections. For example, red feels exciting, while blue shows trust. Pick colors that match your brand’s personality. Make sure they stand out against the background for easy reading.
Choose fonts that fit your brand’s mood. Fun brands might use casual fonts, while fancy brands may pick elegant ones. Keep the text simple to read from far away. Avoid fonts with too many decorations. Pair bold headline fonts with plain body fonts for better clarity.
Your logo is very important too. Put it where people can see it easily. Don’t crowd the design with too much stuff. A clean layout keeps your message clear. If your logo has small details, simplify it for better visibility.
Make sure your sign matches your branding everywhere else. It should look like your website, social media, and ads. This gives your audience a consistent experience and strengthens your brand.
Tip: Test your sign by looking at it from different angles. This helps you check if your branding stays clear and noticeable.
Think about adding animations or transitions to your sign. A slow fade-in or scrolling text can grab attention. Don’t use too much movement, as it can distract people from your message.
By adding branding to your LED outdoor sign, you create a tool that grabs attention and builds your business’s identity.
Power Requirements for LED Outdoor Signs
Calculating Energy Needs
Knowing how much energy your LED outdoor sign needs is important. First, check how much power your sign uses based on its size and brightness. Bigger signs with brighter lights need more energy. For example, a 5-meter by 5-meter sign with 500 W/m² power density at 75% brightness uses about 9,375 watts per square meter.
Screen size and power density also affect energy use. Use this formula to figure out energy needs:Power Use = Screen Size × Power Density × Brightness
Different lighting types use different amounts of energy. LED neon uses 150 watts, while glass neon uses 400 watts. Fluorescent lights need even more, at 610 watts. These differences can save a lot of energy each year:
Lighting Type | Power Use (Watts) | Yearly Energy Use (KW) |
|---|---|---|
LED Neon | 150 | 657 |
Neon Glass | 400 | 1,752 |
Fluorescent | 610 | 2,672 |
Tip: Pick LED lights to save money and help the environment.
Ensuring Brightness Optimization
Setting the right brightness saves energy and keeps your sign clear. Change brightness based on location and time of day. Lowering brightness at night saves power but keeps the sign visible.
Different LEDs work at different efficiency levels. Blue LEDs are 93% efficient, phosphor-converted LEDs are 76%, and red LEDs are 81%.
LED Type | Efficiency (%) | Efficacy Limit (µmol J−1) |
|---|---|---|
Blue LEDs | 93 | 4.1 |
Phosphor-converted | 76 | 3.4 |
Red LEDs | 81 | N/A |
Note: Choose efficient LEDs to save energy and keep your sign bright.
Choosing Energy-Efficient Components
Using energy-saving parts lowers costs and helps the planet. LED lights use 75% less energy than regular bulbs and 40% less than fluorescent lights. Switching from fluorescent to LED can save $25-50 monthly for small signs. Big businesses, like car dealerships, can save up to $850 each month after switching.
LED upgrades pay off quickly. Most LED changes save enough money to cover costs in two years.
LED lights use much less energy than older lighting.
Switching to LED lowers monthly energy bills.
Savings from LED upgrades often cover costs in two years.
Tip: Use energy-saving parts to cut costs and improve your sign.
Planning Electrical Wiring and Circuitry
Good wiring keeps your LED outdoor sign safe and working well. Start by learning about the main parts you’ll need. These include power cables, signal cables, and network connections. Each part helps your sign run smoothly and stay visible.
Connecting Your Cables Correctly
Organize your cables neatly. Match each cable to the right port. For example, power cables go to power ports, and signal cables connect to the control system. Check all connections twice to avoid mistakes that could cause problems.Identifying the Ports
Find the ports on your LED sign. Common ports include sensor, antenna, signal, and power ports. Each one has a job. For instance, the power port gives electricity, and the signal port sends data to show your content.Post Assembly Wiring
After putting the sign together, connect the signal cables. This step makes sure all parts of the screen work as one. A properly wired system avoids errors and keeps your message clear.Choosing Power Cable Configurations
Pick between daisy chain or individual power cables. Daisy chaining links parts to one power source, cutting down on cables. But individual cables are steadier and better for bigger signs.Establishing Network Connections
Link your sign to a network for easy updates. Use 4G or wireless for flexibility. A strong network lets you quickly change content and keep your sign current.
Tip: Label your cables and ports when setting up. This small step makes fixing issues faster and easier.
Careful wiring and planning make your LED outdoor sign reliable. Good connections improve performance and help your sign last longer.
Installation Best Practices for LED Outdoor Signs
Preparing the Site for Installation
Before putting up LED outdoor signs, get the site ready. Check the wall or surface where the sign will go. Make sure it can hold the sign’s weight and size. If the surface is weak or uneven, you may need to strengthen it. Look at things like wind, temperature changes, and humidity. These can affect how long your sign lasts.
Review the electrical setup carefully. Make sure there’s enough power and proper grounding to avoid problems. If the area doesn’t have good wiring, plan to fix it first. Pick a spot where people can easily see the sign. Avoid places with trees or poles blocking the view.
Tip: Use tools like measuring tapes and laser levels to check the site’s size and alignment. This helps make installation easier.
Selecting Secure Mounting Techniques
Picking the right mounting method keeps your LED outdoor signs safe. Wall mounts are great for stores, while pole mounts work well near roads. For big signs, use steel brackets or frames to spread the weight evenly. Always follow the maker’s instructions for hardware and setup.
Choose materials like stainless steel or aluminum for outdoor signs. These resist rust and handle bad weather. If your sign faces strong winds, use reinforced mounts to protect it. For temporary signs, try portable bases or weighted stands for stability without permanent fixes.
Callout: Safety First! Wear safety gear and use the right tools when mounting your sign. Tighten all screws and bolts to avoid accidents.
Ensuring Structural Safety and Stability
Keeping your LED outdoor signs safe and steady is very important. Line up the panels as the maker suggests. This keeps the visuals smooth and prevents gaps. Tighten all parts to stop them from coming loose.
Set up power supplies and control systems carefully. Make sure they’re grounded and can handle the sign’s energy needs. Test the sign’s colors and brightness before finishing the setup. Adjust settings to fit the area, whether it’s a busy street or quiet spot.
Protect the sign from extreme weather. Use covers to shield parts from heat, cold, or moisture. Check your sign often to catch problems early. Clean and inspect it regularly to keep it working well.
Best Practice | Description |
|---|---|
Site Check and Preparation | Look at the wall, power needs, and weather before installing. |
Picking the Best Spot | Choose a place with good visibility and few blockages. |
Panel Setup and Alignment | Follow maker instructions to arrange panels tightly and evenly. |
Power and Connection Setup | Install power and control systems with proper grounding and capacity. |
Testing and Adjustments | Test panels for color and quality, then adjust settings for the area. |
Cleaning and Regular Checks | Clean and inspect panels often to keep them working well. |
Weather Protection | Control temperature and humidity to protect parts and improve performance. |
Note: Keep extra parts and contact info ready for quick fixes if something breaks.
Testing and Finalizing Installation
Testing your LED outdoor sign makes sure it works well before showing it to the public. This step helps find problems early and ensures your sign creates the impact you want. Follow these simple steps to finish the installation process.
1. Check the Sign’s Appearance
Look closely at the sign for loose screws or broken parts. Make sure the panels are even and the sign looks neat. Check that all brackets and supports are tight and secure.
Tip: Use a flashlight to see hidden areas and spot any issues.
2. Test the Electrical Setup
Turn on the sign to check if all lights work. Make sure the power is steady and wires are connected correctly. Fix flickering or dim lights right away.
Electrical Testing Checklist:
Check if cables are firmly attached.
Confirm the power source matches the sign’s needs.
Test brightness during day and night.
3. Review the Display Content
Look at the text, pictures, and animations on the sign. Make sure everything is clear and correct. Fix spelling mistakes, blurry images, or misaligned graphics. Adjust settings for better readability.
Callout: Pro Tip: View your sign from different angles and distances to see if it catches attention everywhere.
4. Test for Weather Resistance
Pretend it’s raining by spraying water on the sign. Use a fan to check how it handles strong winds. Make sure the sign stays steady and works in these conditions.
Weather Test | Purpose | Expected Result |
|---|---|---|
Water Spray | Check waterproofing | No leaks or damage |
Wind Simulation | Test stability | Sign stays steady |
Temperature Check | Test heat/cold resistance | No problems occur |
5. Adjust Brightness and Settings
Change the brightness to fit the area. Lower it at night to save energy and reduce glare. Use the control system to schedule animations and content updates.
Note: Adjusting brightness saves energy and improves visibility at different times.
6. Get Final Approval
After testing, step back and look at the sign overall. Ask others for their opinions. Make final changes to ensure the sign looks great and professional.
7. Keep a Record
Write down the steps you followed during installation and testing. Include any problems and how you fixed them. This record will help you maintain the sign later.
Emoji Reminder: 🛠️ Always keep tools nearby for quick fixes during testing.
By carefully testing and finishing your LED outdoor sign, you make sure it works well and leaves a strong impression on viewers.
Durability and Maintenance of LED Outdoor Signs
Weatherproofing and Environmental Protection
Keeping your LED outdoor signs safe from bad weather helps them last longer. Pick materials that resist damage from rain, heat, and cold. Choose signs with strong waterproof seals to stop water from getting inside. For places with extreme temperatures, use signs tested for hot and cold conditions. These tests check if signs work between -20℃ and +50℃.
Rust protection is also important, especially near the ocean. Salt in the air can cause rust and weaken the sign. Salt spray tests show how well signs handle salty air. Check the sign’s protective layers often. Replace them if they start wearing out.
Test Type | Purpose |
|---|---|
High and Low Temperature Cycling | Tests if signs work in very hot or cold weather (-20℃ to +50℃). |
Waterproof Performance | Checks how well signs keep water out using spray or immersion tests. |
Salt Spray Test | Measures how signs resist rust in salty air environments. |
Tip: Place your sign where it gets less direct sunlight or heavy rain. This reduces damage over time.
Regular Inspections and Maintenance
Checking your LED outdoor signs often keeps them working well. Make a plan to look for loose wires, dim lights, or broken parts. Write down what you find to track problems and fixes. Train your team to spot issues early. Use inspection records to predict when repairs are needed. This saves money and avoids bigger problems.
Why inspections matter:
Records help track repeated problems.
Predicting repairs saves time and money.
Clear steps ensure all parts are checked.
Training helps your team find issues faster.
Audits improve how inspections are done.
Callout: Pro Tip: Use a checklist during inspections to make sure nothing is missed.
Cleaning and Component Care
Cleaning your LED outdoor signs makes them look better and last longer. Dirt and dust can block light and make the sign harder to see. Use a soft cloth and gentle cleaner to wipe the surface. Don’t use rough materials that might scratch the panels. For tough dirt, spray lightly and clean carefully to keep water out.
Take care of the inside parts too. Dust around wires and fans can cause overheating. Use compressed air to clean these areas and keep airflow steady. Replace old or broken parts quickly to avoid more damage.
Note: Clean your sign during quiet hours to avoid interruptions and keep everyone safe.
Planning for Repairs and Upgrades
Planning repairs and upgrades helps your LED outdoor sign last longer. It also keeps your sign working well and looking great.
1. Make a Maintenance Plan
Set a schedule to check your sign often. Look for dim lights, flickering, or broken parts. Write down when you inspect and what you find. This helps you fix small problems before they get worse.
Tip: Check your sign during quiet times to avoid interruptions.
2. Keep Spare Parts Ready
Have extra parts like LED lights, power supplies, and cables. These help you fix problems quickly. Ask the maker for a list of parts to keep. Replace worn-out pieces right away to stop bigger issues.
Spare Parts Needed | Why They’re Important |
|---|---|
LED Lights | Fix dim or broken areas |
Power Supplies | Keep energy steady |
Signal Cables | Ensure clear connections |
3. Plan for Future Upgrades
Technology changes fast, so update your sign to stay modern. Think about adding better displays or energy-saving LEDs. These upgrades make your sign clearer and save money. Do upgrades during slow times to avoid business delays.
Callout: Pro Tip: Save money for upgrades every 3–5 years to stay current.
4. Work with Experts
Hire skilled technicians for tricky repairs. They can fix electrical problems and check safety rules. Regular expert check-ups can make your sign last longer.
By planning repairs and upgrades, you protect your sign and keep it effective. A well-cared-for sign helps your business stand out and attract customers.
Compliance and Regulatory Requirements for LED Outdoor Signs
Understanding Local Zoning Rules
Knowing local zoning rules is important for placing LED outdoor signs. These rules decide where and how you can install your sign. They depend on things like property size, nearby buildings, and traffic. Breaking these rules can lead to fines or having to remove your sign.
Zoning rules often include limits on sign placement. For example, they may control how tall your sign can be or how far it must be from roads. Below are some common zoning restrictions:
Zoning Rule Elements | What They Mean |
|---|---|
Minimum Lot Size | Smallest property size allowed for building or development |
Maximum Permitted Density | Limits on how many units can fit in a specific area |
Minimum Parking Requirements | Least number of parking spaces needed for a property |
Maximum Building Height | Highest a building or structure can be built |
Tip: Always check with your local zoning office before designing your sign. This helps avoid problems later.
Getting Required Permits
Permits make sure your LED outdoor sign follows local rules. To get a permit, you need to submit detailed plans and pass inspections. Skipping this step can cause delays or fines.
Here’s how the permit process usually works:
Step | What Happens |
|---|---|
Application Preparation | You need to provide detailed site plans and drawings. |
Plan Review | Officials check your plans to ensure they meet zoning and safety rules. |
Inspection Phase | Inspectors confirm your sign is safe and follows all rules. |
Variance Application | If your sign doesn’t meet rules, you can apply for special approval. |
Callout: Pro Tip: Keep copies of all permits and approvals. They may be useful later.
Following Electrical and Safety Rules
Electrical and safety rules keep your LED outdoor sign safe and working well. These rules cover wiring, brightness, and overall safety. Following them prevents accidents and ensures your sign lasts longer.
Here are some key standards to know:
Standard | What It Covers |
|---|---|
UL 48 | Rules for electric signs and lighting systems. |
UL 879 | Guidelines for electric sign parts. |
ULC 590 | Standards for safe design and maintenance of guidance systems. |
ULC 572 | Rules for exit signs and path marking systems. |
Note: Always hire a licensed electrician to handle wiring. This ensures your sign meets safety standards.
Avoiding Legal Issues
If your LED outdoor sign breaks local rules, you could face problems. These might include fines, removing your sign, or even legal action. To stay safe, learn the laws in your area and follow them closely.
Check local rules about where signs can go, how big they can be, and how bright they should be. Many places have rules to avoid distracting drivers or bothering neighbors. For instance, some cities limit brightness at night to keep nearby homes comfortable. Always review these details before creating your sign.
Tip: Talk to your local zoning office or a lawyer to confirm the rules in your area.
The case of City of Austin v. Reagan National Advertising shows why following the law matters. This case dealt with off-site signs, including LED ones. The court stressed the importance of keeping roads safe and areas looking nice. Rules that reduce clutter and improve safety are often seen as fair. Sticking to these rules can help you avoid trouble.
Steps to follow for compliance:
Don’t place signs in banned spots, like near schools or hospitals.
Avoid flashing lights or animations that might distract drivers.
Design your sign to look neat and match local style guidelines.
Common Legal Problems | How to Prevent Them |
|---|---|
Too Bright at Night | Lower brightness to meet local rules. |
Wrong Placement | Use zoning maps to find allowed spots. |
Distracting Effects | Stick to simple images and smooth changes. |
By following these rules, your LED outdoor sign can help your business without causing legal issues.
Making great LED outdoor signs takes good planning and smart choices. A well-designed sign matches your brand and grabs attention. Planning energy use saves money and boosts efficiency. Safe setup and regular care make your sign last longer. Businesses using smart strategies, like adding digital tools and interactive designs, see clear benefits. Following these tips helps you create signs that stand out and work well.
Important Points | Explanation |
|---|---|
Smart Strategies | Use data to make better advertising choices. |
Interactive Designs | Turn signs into fun experiences to engage viewers. |
Tip: Use these ideas to make your LED outdoor signs more effective and stay ahead of competitors.
FAQ
How long do LED outdoor signs last?
LED outdoor signs can work for 50,000 to 100,000 hours. This depends on how they are used and cared for. Cleaning and checking them often can make them last longer. Picking good-quality parts also helps them stay strong and reliable.
Tip: Lower the brightness at night to help your LED lights last longer.
How can I pick the right brightness for my sign?
Set the brightness based on where your sign is and the time of day. Bright places need higher settings, while darker areas need lower ones. Automatic brightness controls make this easier and save energy.
Note: Signs that are too bright can bother drivers or break local rules.
Can LED outdoor signs handle bad weather?
Yes, most LED outdoor signs are built to work in tough weather like rain, wind, and extreme temperatures. Choose signs with weatherproof seals and materials that don’t rust. Regular care keeps them working well in harsh conditions.
Callout: Always read the maker’s details to check how weatherproof your sign is.
How often should I change the content on my LED sign?
Change your sign’s content often to keep it interesting. Weekly updates are good for sales, while daily updates work for urgent messages. Fresh content grabs attention and keeps customers interested.
Emoji Reminder: 🕒 Plan your updates ahead of time to stay organized.
Are LED outdoor signs good for saving energy?
Yes, LED signs use much less energy than older lights. They also make less heat, which lowers cooling costs. Using energy-saving parts cuts your bills and helps the planet.
Lighting Type | Energy Savings (%) |
|---|---|
LED | 75% |
Fluorescent | 40% |
Tip: Pick energy-saving LEDs to save money and reduce your carbon footprint.
See Also
Exploring Outdoor Signage Lighting: Varieties, Uses, and Tips
Ultimate Resource for Selecting LED Outdoor Lighting Solutions
Evaluating Top LED Signs for Effective Outdoor Advertising
