Light Pole Post Installation

Properly setting up light poles during the Light Pole Post Installation process keeps areas safe and useful. Bad installations can cause accidents or pole damage, especially in windy places. Think about wind speed and pole weight limits to avoid problems. At our company, About Us, we emphasize the importance of using high-quality products. In cities, new tools like sound testing and live data checks find issues early. When installing lamp posts, check the site and pick poles that fit your needs, such as our innovative Solar Light options. This makes poles last longer and lowers future repair costs.
Key Takeaways
Pick the right light pole by checking height, material, and weather. This keeps it safe and lasting longer.
Learn local rules and get permits before installing. This avoids fines and follows the law.
Use the correct method—bury small poles or anchor big ones. This makes them strong and steady.
Check and fix light poles often to spot problems early. This saves money and keeps them safe.
Think about solar-powered poles to save energy and help the planet. They cost less over time and need less care.
Preparation for Light Pole Post Installation

Picking the Best Light Pole
Choosing the right light pole is very important. Think about the pole's height, material, and purpose. For homes, shorter poles made of aluminum or fiberglass are better. These materials are light and don’t rust easily. For businesses, taller steel poles are stronger and last longer.
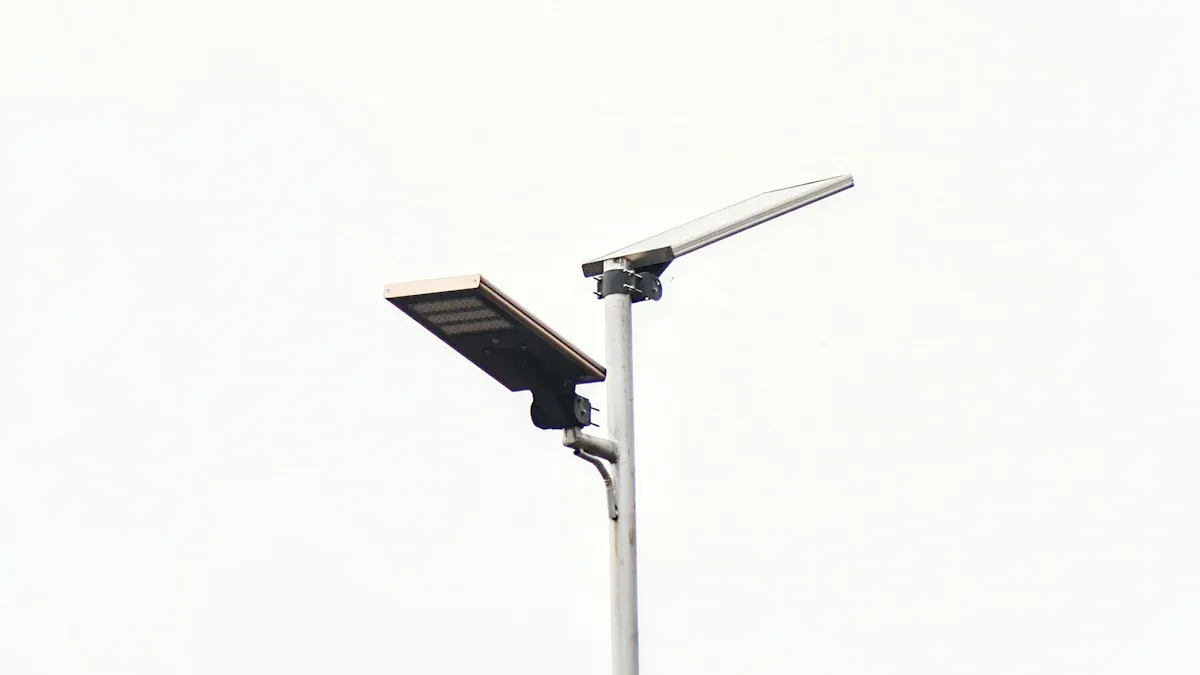
Also, think about the weather in your area. In places with hurricanes, use poles that can handle strong winds. You can also pick solar-powered poles instead of regular ones. Solar poles save energy and are good for the environment. They are a smart choice for many places.
Knowing Local Rules and Laws
Before putting up light poles, learn the local rules. These rules keep people safe and follow city standards. You might need permits for digging or electrical work. Skipping these steps can cause fines or delays.
Safety is also very important. Make sure all materials, like steel and concrete, are good quality. Use cranes and safety tools to avoid accidents during setup. Always check for underground pipes and wires before digging to prevent damage.
Checking the Site and Soil
Where you put the pole affects how stable it is. First, check the type of soil. Sand and gravel are stable and drain water well. Clay holds water and can make poles unstable. Use this table to learn about soil types:
Soil Type | Characteristics | Recommendations |
|---|---|---|
Coarse-grained | Stable and doesn’t move much. | Pick places with coarse-grained soils. |
Fine-grained | Can freeze and change shape; may cause rust. | Avoid fine-grained soils if possible. |
Clays | Holds water; changes moisture levels can make it unstable. | Check water levels and drainage before installing. |
Geological Stability | Underground activity can make areas unstable. | Get expert data to ensure the site is safe. |
Also, think about how windy the area is. In windy places, poles need deeper bases to stay steady. By checking the site carefully, you can make sure the pole is safe and lasts a long time.
Tools and Materials Needed
Using the right tools and materials makes light pole installation easier and safer. Gather everything before starting to avoid wasting time. Below is a list of important items you’ll need:
Tools
Post Hole Digger or Auger: Digs accurate holes for the pole base.
Level: Makes sure the pole is straight and steady.
Wrenches and Socket Sets: Tighten bolts and secure parts properly.
Crane or Lifting Equipment: Safely lifts and moves heavy poles.
Voltage Tester: Checks if electrical connections work correctly.
Safety Gear: Includes gloves, helmets, and glasses for protection.
Materials
Concrete Mix: Creates a strong base for the pole.
Anchor Bolts: Holds poles firmly using the anchor-based method.
Light Pole and Fixture: Pick based on height, material, and lighting needs.
Wiring and Conduits: Protects wires and connects electricity safely.
Grounding Rods: Stops electrical surges for safety.
Standards and Specifications
Make sure tools and materials follow safety and quality rules. The table below shows key standards to check:
Specification/Standard | Description |
|---|---|
UL 1598 | Safety standard for luminaires |
UL 8750 | LED equipment safety standard |
EN 60529 | Protection against dust and water |
IEC 60598-2-3 | Safety for pole-mounted lights |
ANSI C136.31 | Vibration testing standard |
DLC Certification | Ensures energy efficiency and rebate eligibility |
Tip: Always check that your tools and materials meet these standards. This ensures your light pole installation is safe, strong, and works well.
By getting these tools and materials ready and following the standards, you can ensure a successful and durable installation.
Methods for Installing Light Poles
Setting up light poles needs the right method for strength. Two main ways are used: direct burial and anchor-based methods. Each works best in certain situations. Let’s look at both methods.
Direct Burial Method
The direct burial method puts the pole base straight into the ground. This way is simple and costs less, making it great for homes or places with solid soil. First, dig a hole that fits the pole size. Then, place the pole inside and fill the hole with concrete or packed soil to hold it firmly.
This method works well in sandy or coarse soil because it drains water and stays steady. But it’s not good for clay or soft soil, which can move and make the pole unstable. Smaller poles, like garden or pathway lights, often use this method.
Tip: Check the soil type and drainage before using this method. This helps keep the pole safe and steady for a long time.
Anchor-Based Method
The anchor-based method uses a concrete base with bolts to hold the pole. This method is better for big poles, like streetlights or poles in busy areas. It’s strong and handles heavy loads or strong winds well.
Start by pouring a concrete base and adding anchor bolts. Once the concrete hardens, attach the pole to the bolts with nuts. This method makes it easy to replace or adjust the pole later without touching the base.
Tests show this method works well under tough conditions like storms or snow. The table below shows the results:
Condition | Test Item | Result | Limit Value | Pass (Y/N) |
|---|---|---|---|---|
Typhoon load | Max stress | 235 MPa | Y | |
Max displacement | 12.3 mm | 150 mm | Y | |
Snow load | Max stress | 18.3 MPa | 235 MPa | Y |
Max displacement | 2.4 mm | 150 mm | Y | |
Wind and snow load | Max stress | 91.0 MPa | 235 MPa | Y |
Max displacement | 12.6 mm | 150 mm | Y | |
Earthquake load | Max stress | 343.1 MPa | 235 MPa | N |
Max displacement | 1.74 mm | 150 mm | Y |
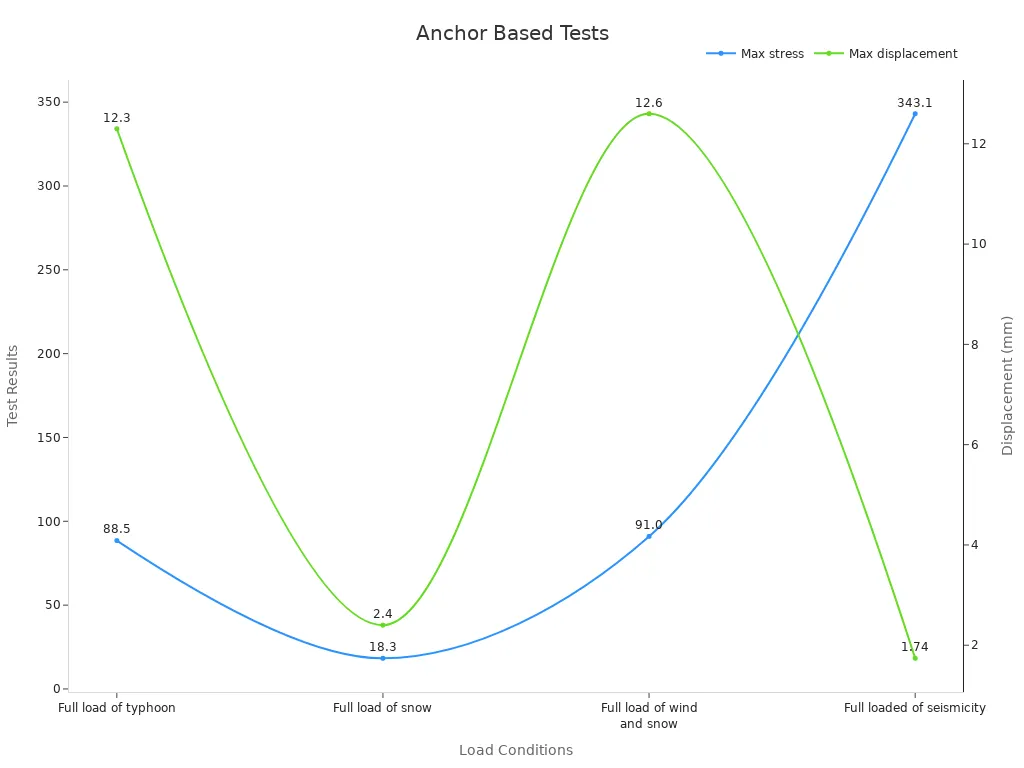
These tests prove the anchor-based method is strong against storms and snow. But it’s not ideal for earthquake-prone areas due to stress limits.
Steps for Each Method
Direct Burial Method:
Pick the Spot: Choose a stable area with good soil.
Dig the Hole: Use a tool to make a hole the right size.
Place the Pole: Put the pole in the hole and check alignment.
Secure It: Fill the hole with concrete or packed soil.
Let It Set: Wait 24 hours for the concrete to harden.
Anchor-Based Method:
Make the Base: Dig and pour a concrete foundation with bolts.
Let It Cure: Wait for the concrete to fully harden.
Attach the Pole: Line up the pole with the bolts and secure it.
Check Alignment: Use a level to make sure the pole is straight.
Tighten Bolts: Fasten the bolts tightly to keep the pole steady.
Both methods need careful planning to keep poles strong and useful. By knowing these methods, you can pick the best one for your needs.
Wiring and Electrical Connections for Light Pole Installation
Making sure the wiring and electrical connections are done right is very important. It keeps the light pole safe and working well. This section explains the tools you need, how to connect the pole to power, and why grounding is important for safety.
Tools Needed for Wiring
Before starting, gather all the tools you’ll need. Having the right tools makes the job faster and safer.
Important Tools:
Wire Strippers: Take off wire coverings without breaking the wires.
Voltage Tester: Checks if electricity is flowing safely.
Conduit Bender: Shapes conduits to protect and organize wires.
Cable Ties and Clips: Keeps wires neat and in place.
Multimeter: Measures voltage, current, and resistance.
Safety Gear: Includes gloves and goggles to stay safe from shocks.
Tool Standards:
Your tools should meet safety rules to work properly. Check this table for key standards:
Standard | Description |
|---|---|
Rules for fiber-reinforced composite light poles. | |
ANSI C136.36C | Guidelines for building and using steel poles. |
ANSI C136.46 | Standards for concrete poles and their materials. |
Tip: Always check your tools for damage before using them. Broken tools can cause accidents or bad installations.
Connecting the Pole to Power
Hooking up the light pole to power is a key step. Follow these steps to do it safely and correctly:
Get the Wires Ready: Use wire strippers to remove the covering. Make sure the wires are clean and not damaged.
Run Wires Through Conduits: Protect wires by running them through a conduit. Use a conduit bender to shape it as needed.
Attach to Power Source: Connect wires to the power terminals. Match colors (e.g., black for live, white for neutral, green for ground).
Secure Connections: Tighten all wires so they don’t come loose.
Test the Circuit: Use a voltage tester or multimeter to check if everything works.
Note: Good wiring design is important for safety. Think about load limits, voltage drops, and the right materials to use.
Grounding and Safety
Grounding is very important for protecting the pole and people nearby. It stops electrical surges and keeps the system safe. Follow these tips for proper grounding:
Use Grounding Wires: Connect metal parts of the pole to a grounding wire. This sends extra electricity safely into the ground.
Install Grounding Rods: Place rods near the pole to guide surges into the soil. Make sure they are deep and secure.
Check Grounding Wires: Ensure all wires are tight and not rusty.
Grounding Rules:
Here are some key rules for grounding:
Standard/Regulation | Description |
|---|---|
Says all active equipment must have a backup ground. | |
Explains how to ground equipment and what wires to use. |
Extra Safety Tips:
Keep grounding wires in the same conduit as other wires.
Don’t use damaged tools or wires to avoid risks.
Make sure all plugs and cords are grounded and in good condition.
Reminder: Grounding protects the pole and prevents shocks. It keeps everyone safe.
By following these steps and using the right tools, your wiring and connections will be safe, strong, and long-lasting.
Residential vs. Commercial Light Pole Installation
Differences in Pole Size and Material
The size and material of light poles depend on their use. Residential poles are smaller and lighter. Commercial poles are bigger and stronger for heavy-duty needs.
Pole Size Segments:
Poles under 40 feet are for homes. They are light-duty and follow local rules.
Poles over 70 feet are for businesses or rural areas. These handle high voltage and reach farther.
Material Durability:
Steel: Strong, fireproof, and pest-resistant. It works in all climates with little upkeep.
Concrete: Very tough and lasts long. It’s great for harsh weather.
Wood: Cheap and easy to use. It’s still common in rural places despite newer options.
Picking the right size and material helps poles last longer and fit the location’s needs.
Power and Wiring Requirements
Power and wiring differ for homes and businesses. Homes use low-voltage systems. Businesses need higher power for bigger lights.
The National Electrical Code (NEC) gives safety rules for both. These rules update every three years to match new tech. For homes, low-voltage wiring follows Class 2 rules. This lowers risks of shocks and fires. For businesses, high-power systems must follow strict NEC rules. Hiring experts ensures safety and proper setup.
Aesthetic and Functional Considerations
Looks and use vary for home and business poles. Home poles often match the surroundings. Decorative poles can make homes look nicer while giving enough light.
In businesses, function matters more. Poles light up big areas like parking lots or streets. They are taller with bright lights for safety. New designs now mix function with style, offering sleek looks for businesses.
Knowing these differences helps you pick the best poles for safety and style.
Cost Implications of Installing Light Poles
Factors That Affect Installation Costs
Many things can change how much it costs to install a light pole. The type of pole, the way it’s installed, and the site conditions all matter. Taller poles or ones made from strong materials like steel cost more upfront. The installation method also changes the price. Direct burial is usually cheaper than anchor-based methods, which need concrete and more work.
The condition of the site can also raise costs. For example, rocky or uneven ground might need special tools or extra preparation. Local rules may require permits, which add to the total cost. Always think about these factors to get a clear idea of the overall expense.
DIY vs. Hiring Professionals
Deciding between doing it yourself (DIY) or hiring professionals affects your budget. DIY might seem cheaper, but you’ll need tools, materials, and know-how. Mistakes can make it more expensive later. Hiring professionals costs more upfront but ensures safety and proper installation.
Here’s a cost comparison:
Installation Type | Professional Monitoring Cost | Equipment Cost |
|---|---|---|
DIY and Professional | Packages starting at $349 | |
Professional | Starting at $29.99 per month | Packages starting at $599 |
DIY and Professional | Starting at $21.99 per month | Packages starting at $249.96 |
One person shared their experience with professional parking lot light pole installation. They said the technician’s skills made sure the pole was placed correctly and worked well. Even though the service cost $150, they thought it was worth it for the expert help and quick setup.
Long-Term Maintenance Costs
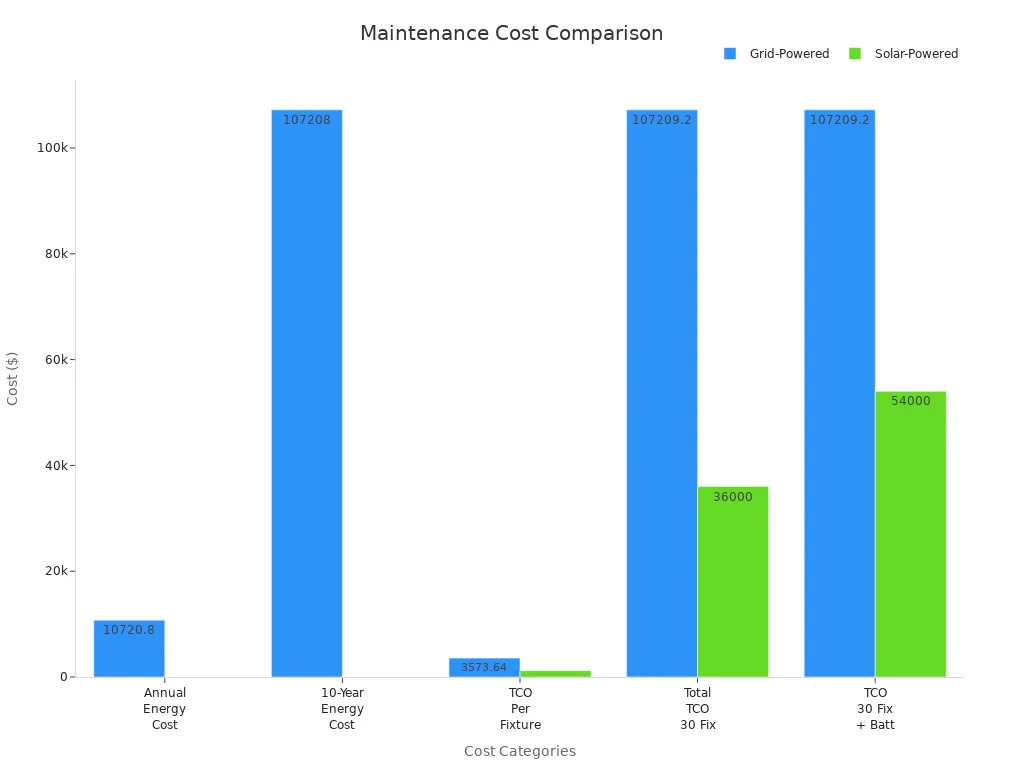
Maintenance costs depend on the type of light pole. Poles connected to the grid have ongoing energy costs. Solar-powered poles save on electricity but need battery replacements sometimes. Over ten years, solar poles often cost less overall.
Feature | Grid-Powered (CARA 199W) | Solar-Powered (SUNA 200W) |
|---|---|---|
Annual Energy Use (Per Fixture) | None | |
Annual Energy Cost (Per kWh) | $0.41 | $0 |
Total Annual Energy Cost (30 fixtures) | $10,720.80 | $0 |
Energy Cost Over 10 Years | $107,208 | $0 |
Battery Replacement (Per Fixture) | N/A | $600 (every 5-10 years) |
Total Battery Replacement Cost (30 fixtures) | N/A | $18,000 (in 5-10 years) |
TCO Over 10 Years (Per Fixture) | $3,573.64 | $1,200 |
Total TCO Over 10 Years (30 fixtures) | $107,209.20 | $36,000 |
Total TCO Over 10 Years (30 fixtures, with battery replacement) | $107,209.20 | $54,000 |
By thinking about these costs, you can choose the best and most affordable option for your light pole installation.
Common Challenges in Light Pole Installation
Uneven or Rocky Ground
Installing light poles on uneven or rocky ground is hard. These surfaces make poles less stable and need extra work. You might have to flatten the ground or remove big rocks first. In rocky spots, tools like rock drills or jackhammers can help make a solid base.
Sometimes, experts suggest using strong concrete bases to keep poles steady. This method helps poles stay firm even if the ground moves later. Always check the site carefully to spot problems early. Good planning saves time and avoids expensive errors.
Tip: If the ground is very unstable, ask an expert to check the site and suggest the best fix.
Wiring and Electrical Issues
Wiring troubles often happen during light pole setups. Broken wires, bad connections, or theft can cause problems. For instance, copper wire theft cases rose sharply, from 607 in 2017/2018 to 6,344 in 2021/2022. Fixing these issues can take weeks, unlike regular maintenance, which takes just hours. Delays can risk safety and pile up repair jobs.
To prevent wiring problems, use strong materials and cover wires with protective conduits. Regular checks can find issues early. Fix exposed or broken wires right away to stop bigger problems.
Note: Using tamper-proof covers can help stop theft and damage to wires.
Stability in High-Wind Areas
Strong winds can make light poles unstable. Engineers measure the wind's effect using the effective projected area (EPA). This shows how much of the pole faces wind pressure. They also test poles under real-like conditions to check their strength.
In windy places, choose poles with smaller EPA or stronger designs. Deeper foundations also make poles steadier. These steps help poles stay safe and work well during storms.
Reminder: Always check wind load ratings when picking poles for windy areas. This ensures they are safe and long-lasting.
Post-Installation Maintenance for Light Poles
Regular Safety Inspections
Checking light poles often keeps them safe and working well. Look for loose bolts, cracks, or worn-out parts. These checks help find problems early before they get worse. Use a checklist to stay organized. Check the base, wires, and lights carefully. Tools like CMMS can remind you when to inspect poles.
Reviewing inspection data can show repeated issues with certain parts. Fixing these problems early prevents bigger repairs later. Train your team to follow safety steps during every inspection.
Maintenance Task | Purpose |
|---|---|
Keep equipment safe, reliable, and working efficiently. |
Cleaning and Corrosion Prevention
Clean poles regularly to stop dust from causing problems. Use a soft cloth or brush to wipe off dirt. For tough spots, use mild soap but avoid strong chemicals. These can harm the pole’s surface.
Preventing rust is also important, especially in wet or salty areas. Check for rust or damage often. Add a protective layer to metal poles to stop rust. Fix any damage quickly to keep poles working well.
Maintenance Task | Purpose |
|---|---|
Cleaning | Remove dirt to stop overheating or clogging of parts. |
Corrosion prevention | Spot and fix rust or damage to keep poles working. |
Replacing Damaged Components
Fixing broken parts quickly helps poles last longer. During checks, look for damaged lights, wires, or other parts. Replace them right away to avoid more damage. Always use good-quality parts that meet safety rules.
If you’re unsure how to fix something, ask an expert. They can repair it safely and correctly. Keeping extra parts ready can save time when repairs are needed.
Maintenance Task | Purpose |
|---|---|
Component replacement | Fix problems fast to make poles last longer. |
Tip: Regular maintenance, like inspections, cleaning, and fixing parts, keeps poles safe and working for a long time.
Putting up a light pole needs careful planning and steps. You must pick the right pole, connect wires safely, and ground it properly. Each step helps make the pole safe and long-lasting. Doing the job right prevents accidents and keeps your pole working for years. Whether it's for your yard or a business area, knowing how to install a light pole makes the process easier.
If you're not sure about any step or the cost, ask an expert. They can help you avoid mistakes and finish the job safely and quickly.
FAQ
1. How deep should you dig for a light pole base?
The depth depends on the pole's height and soil type. For home poles, dig 2-3 feet deep. For business poles, dig 4-6 feet. Always check local rules for exact details.
2. Can you install light poles without professional help?
Yes, you can install light poles if you have the tools and know-how. But hiring experts ensures safety and follows local rules, especially for business setups.
3. What is the best material for light poles in coastal areas?
Pick aluminum or fiberglass poles for coastal places. These materials resist rust from salt and water, making them strong and easy to maintain.
4. How often should you inspect light poles after installation?
Check light poles every six months. Look for loose bolts, rust, or broken wires. Regular checks keep poles safe and lasting longer.
5. Are solar-powered light poles worth the investment?
Solar poles save energy and cut long-term costs. They work great in sunny spots and need little upkeep. They are a smart choice for eco-friendly lighting.
See Also
Choosing Street Light Poles: Key Factors for Your Project
Evaluating Lighting Poles: Finding the Best Value Option
Advantages of LED Parking Lot Lights: Setup and Care
Comprehensive Guide for Installing High Bay LED Fixtures
Flood Lighting Solutions: Expert Design and Installation Tips
