Outdoor Area Lighting Planning: Coverage Calculations and Fixture Placement

You can plan outdoor area lighting by doing good coverage calculations. You also need to place fixtures in smart spots. Good lighting keeps people safe and works well. It lowers risks. The National Safety Council says 20% of parking lot accidents happen because of bad lighting. You should use technical standards like IES and NEMA. These are shown below. They help you pick the right Led Light for your Home, Product displays, or About Us page.
Standard/Type | Description | Typical Applications |
|---|---|---|
IES Standards | Minimum light levels for safety | Parking, walkways, security |
NEMA Types | Light distribution patterns | Roads, parking, pathways |
Key Takeaways
Make a plan for outdoor lighting with clear goals. These goals can be safety, saving energy, and making areas look nice. Use the right types of lights and beam patterns for your space. This helps cover the area evenly and stops dark spots. Figure out how many lights you need by using your area size. Multiply it by the suggested light level. Put fixtures at the right heights and distances. This keeps brightness balanced, cuts down glare, and saves energy. Use smart controls and weather-resistant fixtures. Do regular maintenance to keep your lighting safe and working well.
Outdoor Area Lighting Basics

Planning Goals
When you plan outdoor area lighting, you need clear goals. Different areas need different lighting plans. You want people to feel safe at night. You also want everyone to see well. Good lighting makes your property look nice. It also helps save energy. Here are some main goals to remember:
Light each space for its use, like pathways, gardens, parking lots, or entrances.
Make places safer by helping people see and stopping unwanted activity.
Use layered lighting and the right color temperature to make things look nice and welcoming.
Save energy by picking LED fixtures, using timers, and adding motion sensors.
Follow local rules and standards to help stop light pollution.
Use controls and automation to change lights when needed.
Pick the best light color and spread for each area, like warmer lights for homes and cooler ones for businesses.
Tip: Layered lighting uses different lights, like accent, pathway, and general area lighting, to make things look balanced and safer.
Key Considerations
You should think about some important things before you put in outdoor area lighting. These things help you avoid problems and get good results.
Factor Category | Key Considerations |
|---|---|
Follow safety codes, building codes, energy rules, and zoning laws. Do not let light go where it should not. | |
Lighting Needs Assessment | Check how much light you need, look at the layout, and talk to people who use the space. |
Technology Selection | Pick LED fixtures for long life and low energy use. Choose the right color temperature and smart controls. |
Outdoor Outlets Compliance | Use weather-resistant outlets with GFCI protection. Put them in safe spots and at the right height. |
Sustainability | Use energy-saving fixtures and controls. Think about solar power and ways to lower costs and pollution. |
You should always think about safety. Only use fixtures made for outside. Put lights so they cover paths, stairs, and doors. Keep wires safe and dry. Do not put lights near things that can catch fire. Check and fix your lights often to stop hazards.
Note: Good outdoor lighting can show off your home’s best parts, make your yard more fun, and even raise your property value.
Outdoor Lighting Patterns
NEMA Types
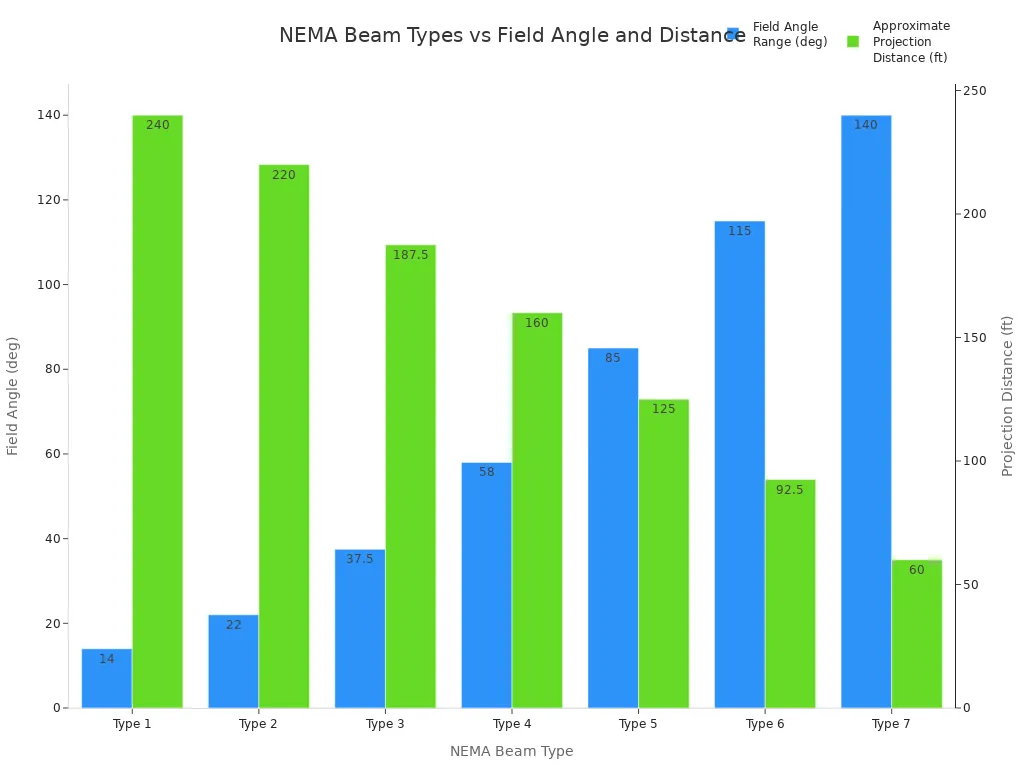
You need to understand NEMA types when you plan outdoor lighting. NEMA beam types help you choose the right fixture for your space. Each type shows how wide or narrow the light beam will be. This affects how much area the light covers and how far it reaches.
Type 1 (Very Narrow): Beam angle less than 10°, good for spotlighting and long-distance lighting.
Type 2 (Narrow): Beam angle 10° to 18°, works well for small sports courts and focused floodlighting.
Type 3 (Medium Narrow): Beam angle 18° to 29°, used for smaller sports fields and local floodlighting.
Type 4 (Medium): Beam angle 29° to 46°, fits mid-sized sports fields and parking lots.
Type 5 (Medium Wide): Beam angle 46° to 70°, best for large areas like recreational fields and parking lots.
Type 6 (Wide): Beam angle 70° to 100°, covers large sports fields and stadiums.
Type 7 (Very Wide): Beam angle greater than 100°, perfect for parks and big industrial zones.
NEMA beam types classify light distribution by measuring the beam spread at 10% of the brightest spot. Narrow beams reach farther but cover less area. Wide beams cover more area but do not shine as far. This helps you match the right fixture to your needs.
Field Angle Range (degrees) | Approximate Projection Distance | |
|---|---|---|
Type 1 | 10 to 18 | 240 ft and greater |
Type 2 | >18 to 29 | 200 to 240 ft |
Type 3 | >29 to 46 | 175 to 200 ft |
Type 4 | >46 to 70 | 145 to 175 ft |
Type 5 | >70 to 100 | 105 to 145 ft |
Type 6 | >100 to 130 | 80 to 105 ft |
Type 7 | >130 and up | Under 80 ft |
Pattern Selection
You should pick the right light distribution patterns for your space. Think about what you want the lights to do and where you need them. Here are some tips to help you choose:
Decide the purpose. Security lighting needs more brightness and wide coverage. Accent lighting needs less brightness and a focused beam.
Make sure the light output and direction fit the area. Pathways and entryways need precise light distribution.
Pick fixtures that can handle weather. Look for IP65 or higher ratings for outdoor use.
Use smart controls. Motion sensors, timers, and brightness settings help save energy and make your system smarter.
Follow local rules. Check for light pollution limits and building codes before you install anything.
Tip: The right pattern gives you even light, saves energy, and keeps your outdoor area safe and comfortable.
Coverage Calculation
Area Size and Shape
You should check how big and what shape your outdoor area is before picking lights. The size tells you how many lights you need and which kind is best.
Small places like walkways or little yards do well with LED flood lights that use less power, about 15 to 30 watts. These lights give enough light and do not waste energy.
Big business areas or large yards need stronger flood lights. More power and more lumens help you meet safety and brightness needs.
The shape matters too. Long, skinny places like driveways or paths need lights that shine in a straight line. Wide or open spots need lights that spread out more.
You can use very big wall lights for tall or wide spaces. These lights make the area look cool and help spread light evenly.
Different lights do different jobs. Use spotlights for steps, wall lights for outdoor kitchens, and flood lights for safety.
The way you put up the lights and their size should fit your area and the look you want.
Putting lights in the right place and picking the right size makes your outdoor area safe and nice to look at.
Illuminance Standards
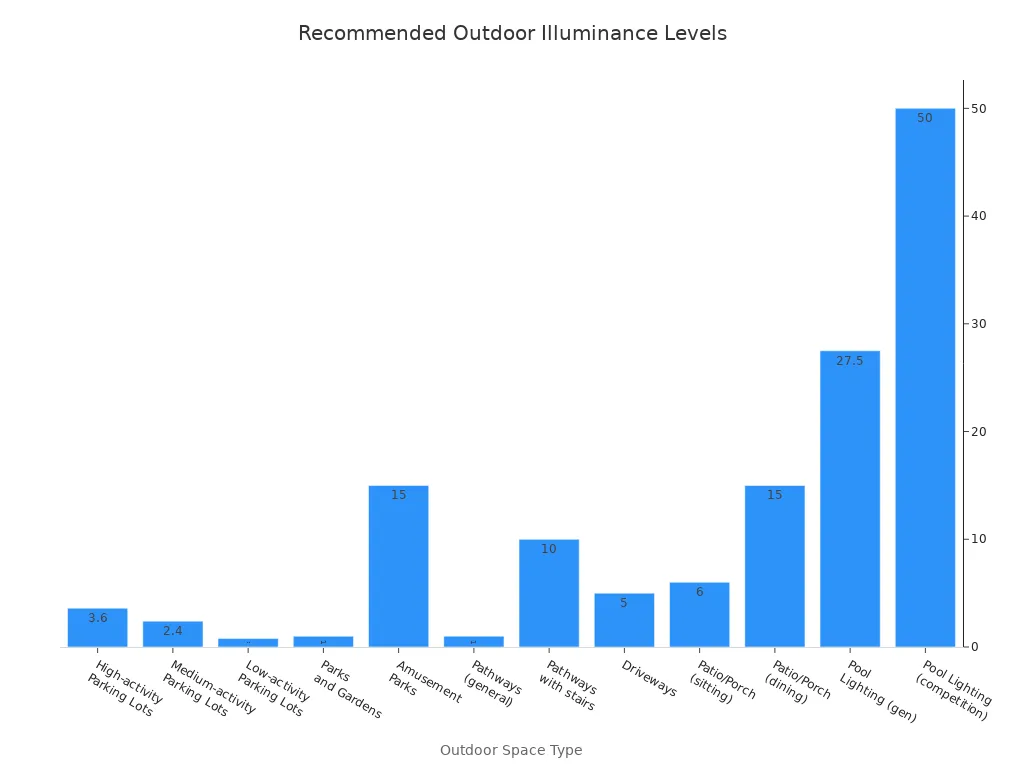
You have to use the right illuminance levels to keep your outdoor area safe and comfy. Illuminance means how much light hits a surface. It is measured in lux or footcandle. Each outdoor space has its own footcandle rule.
Outdoor Space Type | Recommended Illuminance Level (foot-candles) | Approximate Illuminance Level (lux) |
|---|---|---|
High-activity Parking Lots (e.g., sports fields, mega malls) | 3.6 fc | ~39 lux |
Medium-activity Parking Lots (e.g., airports, hospitals) | 2.4 fc | ~26 lux |
Low-activity Parking Lots (e.g., industrial, neighborhood stores) | 0.8 fc | ~9 lux |
Parks and Gardens | 1 fc | ~11 lux |
Amusement Parks | 15 fc | ~161 lux |
Pathways (general) | 1 fc | ~11 lux |
Pathways with stairs or elevation changes | 10 fc | ~108 lux |
Driveways | 5 fc | ~54 lux |
Patio or Porch (outdoor sitting areas) | 6 fc | ~65 lux |
Patio or Porch (dining spaces) | 15 fc | ~161 lux |
Pool Lighting (general) | 25-30 fc | ~269-323 lux |
Pool Lighting (professional competition) | ~50 fc | ~538 lux |
To find out how many lumens you need, use this easy formula:
Total Lumens Needed = Area (in square feet) × Recommended Footcandle Level
For example, if your patio is 500 square feet and you need 6 footcandles, you do 500 × 6 = 3,000 lumens.
Lighting calculators, isofootcandle curves, and footcandle tables help you see if your plan is right. These tools make it simple to match your design to the correct light level.
Fixture Spacing
You need to put your lights the right distance apart so there are no dark spots and the light is even. Good pole spacing gives you even light and saves energy.
Here are some easy rules for different uses:
For pathways, put lights 5 to 10 feet apart. This keeps the path bright and safe.
For landscape lighting, put lights 8 to 10 feet apart. This shows off plants and features without too much overlap.
For wall lights near doors, put them about 5.5 to 6 feet high. Pick a light that is one-fourth to one-third as tall as the door.
For garage lights, use sconces on pillars or floodlights above the garage for wide light.
For post lights along driveways, space them evenly for soft or bright light.
Application Type | NEMA Light Pattern | Fixture Placement | Mounting Height / Spacing Rule |
|---|---|---|---|
Sidewalks, Paths | Type I (15°) | Center | Mounting height equal to walkway width |
Wide Walkways, Ramps | Type II (25°) | At or close to side | Road width ≤ 1.75 × mounting height |
Conventional Roadways | Type III (40°) | At side | Road width ≤ 2.75 × mounting height |
Wide Roadways, Walls | Type IV (60°) | At side | Road width ≤ 3.7 × mounting height |
Roadways, Intersections | Type V (360°) | At or near center | Equal light distribution at all angles |
Roadways, Intersections | Type VS (360° square) | At or near center | Equal light distribution with defined edge |
Street Lighting Pole Spacing Guidelines |
|---|
Spacing between poles should be 2.5 to 3 times the pole height (e.g., 30 ft pole → 75-90 ft spacing) |
Taller poles allow wider spacing due to broader light spread |
Pole arrangement depends on street width: |
- >65 ft wide: poles on both sides, symmetrical |
- 51-65 ft wide: poles on both sides, intertwined/shifted |
- ≤50 ft wide: poles on one side |
For streets with dividers, additional center poles with dual fixtures can be used |
Street Lighting Pole Height Guidelines |
|---|
Pole height roughly equals width of area to be illuminated |
Minimum height: 15 ft to prevent glare; typical range 25-50 ft; high mast poles >50 ft if needed |
Tip: Use lighting calculators and footcandle tables to check your fixture spacing and make sure you meet all lighting rules.
Fixture Placement
Mounting Height
You need to choose the right mounting height for your lights. The height affects how much area the light covers and how bright it looks. For most homes, poles stand about 10 to 15 feet tall. This height gives a warm and safe feeling in your yard. In commercial areas, poles usually reach 20 to 30 feet. These taller poles help cover bigger spaces like parking lots. Sports fields need even taller poles, sometimes 30 feet or more, to light up the whole field.
Setting | Typical Mounting Height (feet) |
|---|---|
Residential Yards | 10 to 15 |
Commercial Lots | 20 to 30 |
Pickleball Courts | |
Tennis Courts | 20 to 40 |
Soccer Fields | 30 to 75 |
Football Fields | 50 to 70 |
Higher-level Sports | 50 to 100+ |
The type of fixture and the spread of light also help you decide the best height. If you use a pole that is too short, you might get dark spots. If you use a pole that is too tall, you could cause glare. Always match the mounting height to the size of the area and the purpose of the light.
Area Lighting Placement
Good area lighting depends on smart fixture placement. You want to spread light evenly and avoid dark spots. The spacing-to-height ratio helps you do this. Most experts use a ratio of 1:4. If your pole is 15 feet tall, you should space your lights about 60 feet apart. This rule keeps the light even and helps people see better.
Spacing Distance | Impact on Lighting Coverage and Safety | Energy Use | Notes |
|---|---|---|---|
Causes glare and too much brightness | High | May need redesign | |
Optimal (Standard) | Even light, few shadows or dark spots | Balanced | Best for most sites |
Too Far Apart | Dark spots, poor visibility | More needed | Unsafe, not efficient |
You should always make a detailed site sketch before you start. Measure your area and mark where you want each fixture. Check for trees, buildings, or power lines that could block the light. Make sure you keep lights away from traffic and equipment to avoid accidents.
Tip: Even fixture placement helps you save energy and keeps your area safe.
You can also layer different types of lights. Use flood lights for wide coverage and bollard lights for paths. This mix gives you better uniformity and makes your space look nice.
Outdoor Lighting for Pathways
Pathways need special care when you plan fixture placement. You want people to walk safely without tripping. Use LED pathway lights, solar-powered lights, or bollard lights for best results. Place your lights 6 to 8 feet apart for most paths. For wider paths, stagger the lights on both sides. This setup gives a natural look and avoids dark patches.
Bollard Size | Mounting Height | Recommended Spacing |
|---|---|---|
8 inches | 8 feet | |
Medium Bollard | 1.5 feet | 15 feet |
Large Bollard | 3 feet | 30 feet |
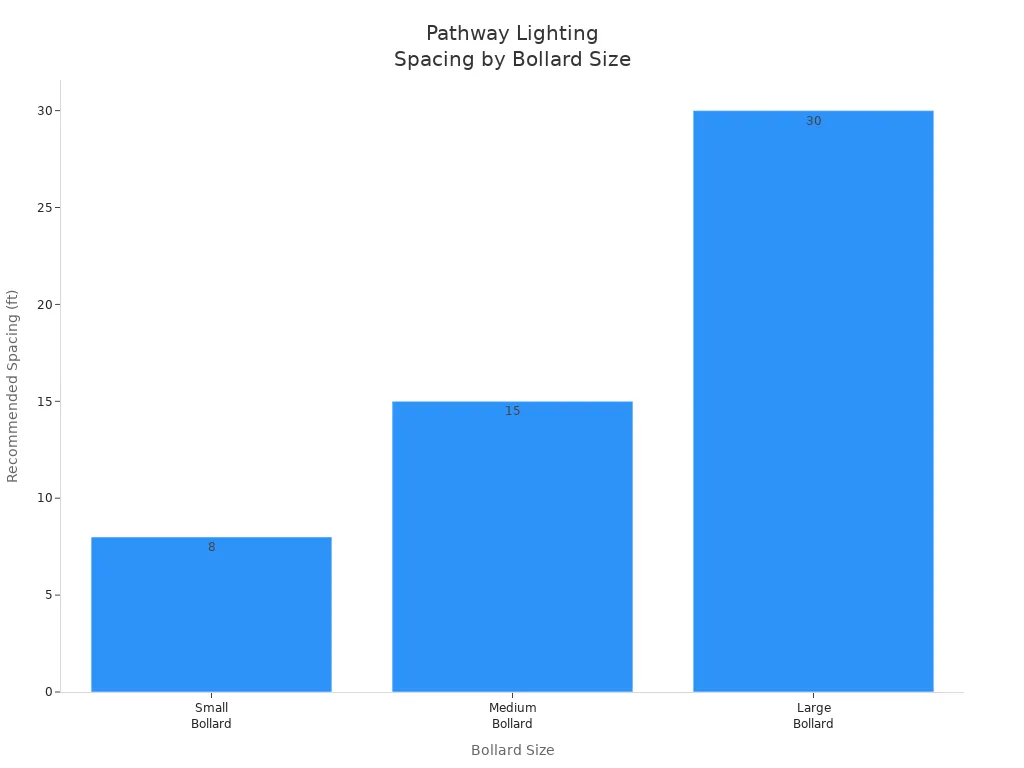
You should use downward-facing fixtures or frosted lenses to stop glare. Highlight steps or changes in elevation with extra lights. Pick warm white LEDs to make the path look inviting. Low-to-the-ground lights help people see bumps or cracks. Well-lit pathways guide people and keep your property secure.
Parking Lot Lighting
Parking lot lighting needs careful fixture placement to keep people and cars safe. Most parking lots use poles between 15 and 35 feet tall. The taller the pole, the farther apart you can place the lights. For example, 15-20 foot poles should be 20-30 feet apart. If you use 25-35 foot poles, space them 40-50 feet apart. This setup gives even light and avoids dark corners.
You should place lights near entrances, exits, and busy spots. Focus on both the ground and vertical surfaces to reduce shadows. Use LED fixtures for bright, even light and lower energy bills. Always follow the Illuminating Engineering Society (IES) standards for safety and uniformity. Most parking lot lighting plans aim for a uniformity ratio of 3:1 or less, which means the brightest spot is not more than three times brighter than the darkest spot.
Parking lot lighting must also follow dark sky rules. Use full cut-off fixtures to keep light from shining up into the sky. Keep color temperature at 3000K or lower to reduce skyglow. Add motion sensors or timers to save energy when the lot is empty. Always check your local codes before you install new lights.
Note: Good fixture placement in parking lots helps prevent accidents and makes people feel safe.
How to Minimize Glare and Light Pollution
You can reduce glare and light pollution by following these steps:
Use full cutoff or shielded fixtures to direct light downward.
Angle fixtures downward at no more than 45 degrees.
Pick warm color temperatures (2700K–3000K) to cut down blue light.
Install timers or motion sensors to limit lighting to when needed.
Choose the right brightness for each area to avoid overlighting.
Check your lights at night to find and fix glare or light spill.
Use lower mounting heights and proper angles to keep light out of people’s eyes.
Layer ambient, task, and accent lighting for balance.
Use trees or buildings to help block and soften light.
Smart lighting systems can adjust brightness based on activity.
Tip: Careful fixture placement not only saves energy but also protects the night sky and your neighbors’ comfort.
Lighting Design Tools
Layout Tools
A lighting layout tool helps you plan outdoor lighting. These tools let you measure your space and set goals. You can pick the best fixtures for your area. First, enter the size and shape of your yard. The tool lets you choose where each light goes. You can move and aim the lights to see what works. You can also change how high the lights are. Some tools let you zoom in or out and move around the plan. You can set how far apart the lights are. You can also change the angle of each fixture. Some tools let you use colors and lines to show how bright each spot is. You can pick your favorite units and see stats about your plan.
A layout tool shows you how the light will spread before you buy anything. For example, the TCP Landscape Lighting Design Tool shows where light and shadows will fall. You can change your plan to save energy and stop dark spots. Photometric analysis tools show how light spreads in your yard. This helps you pick the best places for your fixtures.
Tip: Try different setups with a layout tool to find the best lighting for your space.
Step | Feature Description |
|---|---|
1 | Pick photometric files and set light loss factors. |
2 | Move and aim lights to adjust your layout. |
3 | Change brightness lines and pick colors. |
4 | Zoom, pan, and change the scale to plan better. |
5 | Set rules for how far apart to put fixtures. |
6 | See stats and summaries for your design. |
7 | Choose units that are easy for you to read. |
Reference Tables
Reference tables make lighting design easier. You can look up how bright your lights should be. You can also check how far apart to put them and how high to mount them. These tables help you follow safety rules and avoid mistakes.
Many layout tools have built-in reference tables. These tables show the best ways to place lights in parking lots, paths, and gardens. You can compare your plan to these tips and change things if you need to.
Some tools let you print or share your plan with others. This makes it easy to get advice from experts or friends. You can use these tools to check your work and make sure your lighting plan meets your goals.
Note: Using reference tables and layout tools together helps you make safe, smart, and nice-looking outdoor lighting.
Best Practices
Common Mistakes
When you plan outdoor lighting, you can avoid many problems by learning from common mistakes. Here are some issues you should watch out for:
Placing fixtures in the wrong spots often causes uneven lighting or harsh shadows. You should install wall sconces at eye level and space recessed lights correctly.
Using old bulbs wastes energy and raises costs. Switch to LED lighting and smart controls to save money and help the environment.
Picking lights that do not match your landscape can hurt the look of your yard. Choose styles and sizes that fit your outdoor space.
Forgetting about sunlight for solar lights makes them less effective. Clean solar panels and batteries often, and move them as seasons change.
Using only one type of light creates a flat and dull space. Mix pathway lights, accent lights, and spotlights for a layered effect.
Skipping a full lighting plan can lead to poor results. Think about how each area will be used and how people will move through the space.
Ignoring new lighting technology can make your setup outdated. Stay updated to get the best performance and design.
Tip: Regular maintenance, like cleaning and checking fixtures, keeps your lights working well and looking good.
Planning Checklist
A good checklist helps you cover every step in your outdoor lighting project. Use this list to guide your lighting plans:
Set clear goals for your lighting, such as safety, beauty, or security.
Walk around your property and map out key areas that need light.
Choose strong, weather-resistant fixtures made from materials that last.
Design your layout with zones and layers to create different moods and functions.
Make safety a top priority. Use GFCI outlets, proper wiring, and light up hazards like stairs.
Pick LED lights and smart controls to save energy and future-proof your system.
Blend your lighting with the natural surroundings and use warm colors to reduce glare.
Plan your installation and wiring carefully. Get professional help for complex jobs.
Add timers or automation for convenience and energy savings.
Keep your system in top shape with regular inspections, cleaning, and bulb changes.
Note: A thoughtful checklist ensures your outdoor lighting is safe, efficient, and attractive.
You can get good outdoor lighting if you have a simple plan. First, draw a map of your yard and measure each area. Use lighting calculators to figure out how many lights you need. These tools also help you know where to put each fixture. Pick weather-resistant fixtures to last outside. Always follow trusted rules for safety and saving energy.
Remember, using the right steps stops dark spots and saves power. It also keeps your property safe. For the best results, check tips from groups like DarkSky International or ask a lighting expert for help.
FAQ
How do you figure out how many outdoor lights you need?
You can use this formula:
Total Lumens Needed = Area (sq ft) × Footcandle Level
Check the recommended footcandle for your space. Divide the total lumens by the lumens per fixture to find the number of lights.
What is the best height for outdoor lighting fixtures?
Most homes use fixtures 10 to 15 feet high. For parking lots, use 20 to 30 feet. Sports fields need taller poles. Always match the height to the area size and purpose.
How can you reduce glare and light pollution outside?
Use shielded fixtures that point light down. Pick warm white LEDs. Add timers or motion sensors. Check your lights at night and adjust them if you see glare or light spilling outside your property.
Do you need a professional to design outdoor lighting?
You can plan simple lighting yourself using calculators and layout tools. For large or complex projects, a lighting professional helps you meet safety codes and get the best results.
See Also
Selecting Ideal Brightness And Coverage For Outdoor Flood Lighting
Effective LED Lighting Solutions For Parking Areas
Expert Design And Installation Tips For Flood Lighting Systems
Comprehensive Overview Of High Bay Lights And Their Uses
Outdoor Sign Lighting: Varieties, Uses, And Installation Tips
