Road Light Installation

Road light installation begins with good planning and careful setup. Safety and following rules are important at every step. Many projects get delayed because teams wait for other workers. Sometimes, there are not enough skilled workers. Materials can also arrive late. Bad weather and last-minute design changes can slow things down too. Every road light installation should use clear steps: planning, getting the site ready, installing, testing, and keeping up with maintenance. This is true for a Home, a Product showcase, or a Led Light upgrade. Paying close attention to details gives the best results. About Us pages often show skill in this work.
Key Takeaways
Make a good plan by looking at the street, traffic, and how much light is needed. This helps keep people safe and saves energy.
Pick the best equipment like LED or solar lights. These use less energy and last longer.
Always follow safety rules and wear the right gear. This keeps workers safe while they work.
Put up poles, fixtures, and wiring one step at a time. Check that the lights are even and all connections are tight.
Check the lights often and fix them quickly if needed. This keeps streets safe and saves money.
Planning
Assess Needs
A good street light project starts with checking the site. Teams look at what kind of street it is. They see how many cars and people use it. They think about what kind of light the area needs. They look at many things to keep everyone safe and save energy:
The light must be bright enough for the street. This helps drivers and people walking stay safe.
The light should spread out evenly. This stops dark spots and too much brightness.
Glare control keeps drivers from getting distracted.
Color temperature and rendering help people see things better at night.
Energy efficiency saves money and helps the planet.
Where the poles go and how tall they are changes how the light spreads.
The kind of road and how busy it is changes what lights are needed.
The design should not make too much light pollution.
The lights need to last through bad weather. 10. The cost and how often you fix the lights matter for saving money.
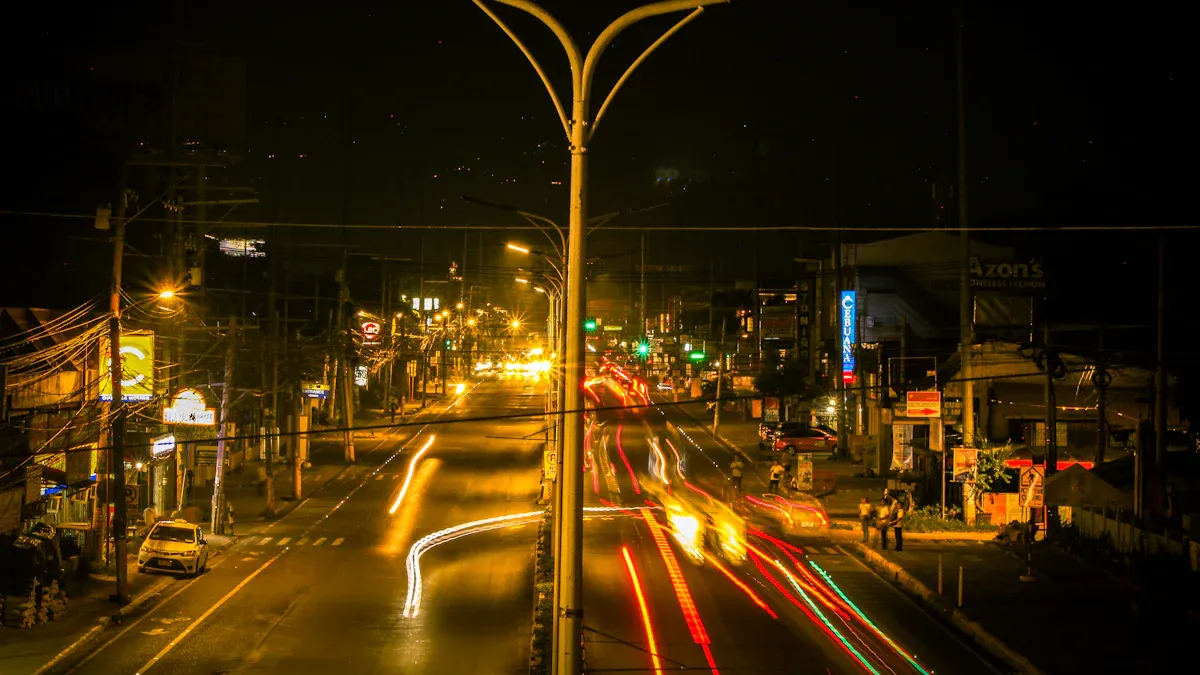
Busy roads and highways need taller poles and brighter lights. City streets use medium poles for cars and people. Neighborhoods and parks use short poles and softer lights. This keeps homes from getting too bright. The lowest brightness, called lux, changes with the street’s job. Highways need less light than busy city streets.
Select Equipment
Picking the right equipment is very important. Teams look at LED, solar, and old-style lights. Each one has its own good points:
Lighting Type | Energy Efficiency | Lifespan (hours/years) | Maintenance & Installation | Additional Features & Benefits |
|---|---|---|---|---|
Solar Street Lights | Use solar energy; LED is very efficient; smart controls save power | Lasts 5 to 10 years | Easy to put in; needs little fixing | Makes less pollution; can dim lights; batteries stay cool; solar panels can move |
LED Street Lights | Uses much less energy than old lights; very efficient | Lasts 50,000 to 100,000 hours | Needs less fixing because it lasts longer | Saves energy; makes less CO2; lasts longer than old lights |
Traditional Lights | Not very efficient; uses more energy | Lasts about 20,000 hours | Needs to be fixed often; wiring is harder | Costs more to run and fix; makes more pollution |
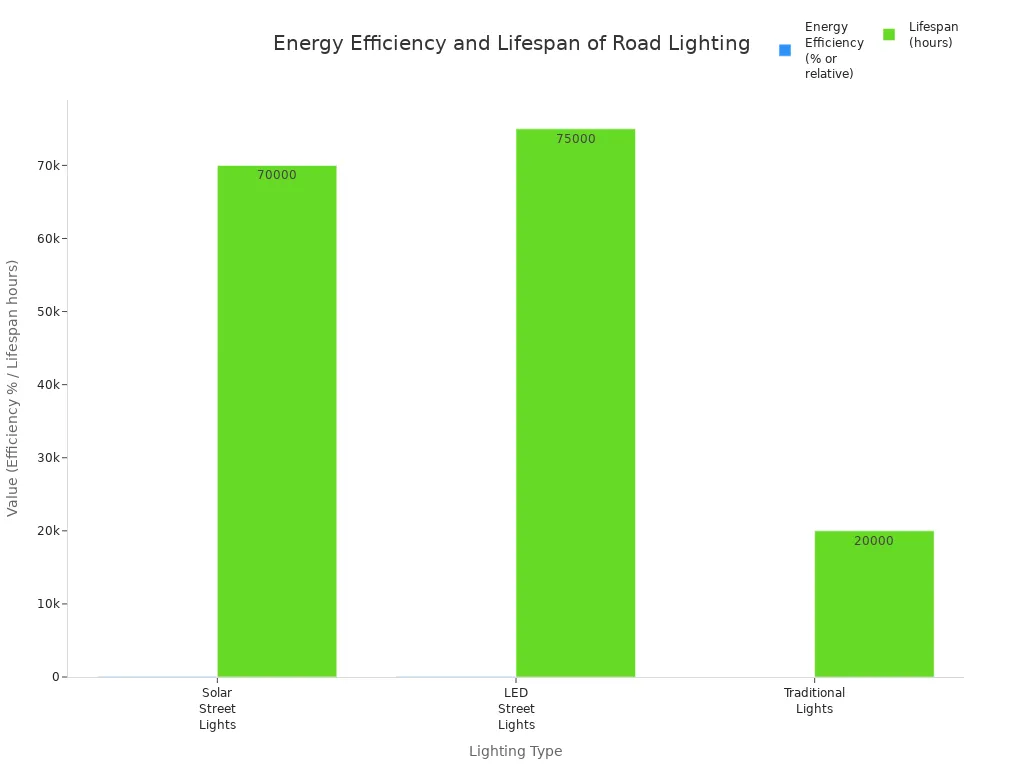
LED street lights save the most energy and last the longest. Solar lights are good where there are no power lines.
Check Regulations
Every street light job must follow rules. In the United States, teams use rules like ANSI/IES RP-8-21 and the AASHTO Roadway Lighting Design Guide. These rules tell how to design, keep safe, and take care of the lights. Local rules may add more things to protect people and nature. Most rules want safety, saving energy, and less light pollution. Teams must check all rules before starting. This helps them follow the law and not waste money later.
Materials and Tools
Equipment List
Having the right equipment is key for street light projects. Different streets need different poles, luminaires, and heights. The table below lists what is used for each type of street:
Lighting Application | Pole Type(s) | Luminaire Type(s) | Mounting Heights | Special Modules / Remarks |
|---|---|---|---|---|
Freeway Lighting | Type 21, 30, 31, 32 | 35' to 40' | Barrier Rail Mounted (Type 21) | |
OH Sign Illumination | TRUSS, Tubular | LED | Per OH Sign Plans | Single Post Type |
Ramp Meter Lighting | Type 15TS, 61 | LED Roadway 1 | 30' to 34'-3" | Located at Entrance Ramp |
Intersection Lighting | Type 15, 15TS, 17, 19, 24, 26 | LED Roadway 1 | 30' to 34'-3" | Includes Lighting and CCTV Combo |
Advance Warning Flashing Beacon | Type 1-A, 15-FBS | Flashing LED Signal Module | 10' to 18' | Used for Ramp Meter |
Designers pick the right poles and lights for each street. They look at how high the lights go and how far apart they are. They also check how bright the lights need to be. This helps keep the street bright enough for safety. It also helps stop glare and too much light in the sky.
Safety Gear
Workers must wear safety gear to stay safe on the job. The items below help protect them and follow OSHA rules:
Safety vests and suits protect the body
Gloves keep hands safe, and rubber gloves help with wires
Safety boots and knee pads protect feet and legs
Harnesses and lanyards stop falls from high places
Goggles and face shields protect eyes and faces
Respirators and masks help workers breathe clean air
Ear muffs and plugs protect hearing from loud sounds
Tip: Workers should always check their safety gear before using it. If something is broken, they need to get a new one. Training and safety checks help everyone stay safe at work.
Tools Needed
Many tools are needed to put up street lights. Workers use these tools to get the site ready and put in the lights:
Measuring tapes and chalk lines help mark where things go
Shovels and excavators dig holes for the poles
Concrete mixers help set the poles in place
Wrenches, screwdrivers, and pliers put parts together
Wire strippers and cutters help with the wires
Voltage testers and multimeters check if circuits work
Ladders and lifts help workers reach high places
Portable generators give power when there is no electricity
Each tool helps make sure the street lights work well and are safe.
Site Preparation
Mark Locations
Crews start by marking where each street light pole will go. They use measuring tapes and chalk lines to match the lighting plan. Workers check the space between poles for even lighting. Before digging, teams look at utility maps and call local utility services. This helps avoid hitting cables or pipes underground. Talking with utility companies keeps everyone safe and informed.
Tip: Always check the marked spots again before digging. Mistakes here can cause delays or safety problems.
Excavation
Teams dig holes for the street light bases. They look at utility drawings and compare them for accuracy. Each day, the team meets to talk about plans and safety. Workers use daylighting to find and mark underground utilities. Hydro excavation is safer and cheaper than digging by hand. Crews write down details of each dig and stay away from marked utilities. If they find new lines, they stop and call the utility company.
Use PVC pipes to check how deep utilities are.
Keep all utility marks easy to see during work.
Change utility drawings if new things are found.
Foundation Work
A strong base holds up each street light pole. Most bases are 3 to 6 feet deep, depending on the pole and soil. Workers use special concrete that is strong and can handle weather. The top six inches of the base must be above the ground. Crews use forms and templates for the top part. Rebar spreads out stress and stops cracks. Anchor bolts must not rust and must be lined up right. The Village Engineer checks the site before pouring concrete. After pouring, the base needs 14 days to get strong. Teams protect the base from weather and damage during this time.
Note: Good ground work and careful concrete pouring stop future problems with the street light.
Road Light Installation Steps

Set Poles
Crews start by putting up the poles. They pick poles based on how heavy the fixture is and how strong the wind gets. The team also thinks about how the street looks. Before they begin, they check city rules and get the right permits. Workers look at the wind and make sure the pole can handle it. The kind of soil and what is underground change how deep the base goes.
Here are the steps for setting poles:
Dig a hole that is about twice as wide as the pole. The hole’s depth depends on how tall the pole is. An 8- to 18-foot pole needs a 3-foot hole. A 40- to 50-foot pole needs a 6-foot hole.
Put the pole in the hole. Pull the wires through the holes in the pole.
Pour 4 to 6 inches of backfill or concrete. Use a plumb bob to keep the pole straight.
Add more backfill or concrete in layers. Pack it down and check that the pole stays level.
Put in steel bars and metal plates at the right spot. Clamp them tight, following the plan.
Pour concrete slowly, not more than 11 inches at a time. Let the concrete get strong with insulation and water after it reaches 2.5MPa.
Fill the base with good soil, not loose dirt from digging.
Use a crane or lift for heavy poles. Tighten anchor screws and check if the pole is straight.
Note: In places with strong winds or bad weather, crews make poles stronger with concrete bases or guy wires.
Urban and rural jobs are different here. In cities, workers dig trenches and work around things underground. In the country, solar LED systems can skip trenching and use easier ways.
Mount Fixtures
After the poles are up, workers put on the lamp fixtures. They pick brackets that fit the pole and let them change the angle. The team uses strong brackets to keep the fixtures safe. In windy places, they add extra supports.
Steps for mounting fixtures:
Pick the right bracket for the pole and fixture.
Attach the bracket to the pole. Make sure it is tight and level.
Put the fixture on the bracket. Change the angle for the best light.
Tighten all bolts and fasteners. Check that everything is steady.
A big mistake is putting new lights on old poles without planning. This can make the light uneven and unsafe. Teams stop this by using a good lighting plan and the right mounts. They also match the light’s brightness and color to what the street needs.
Tip: Always use lighting experts for street light jobs. This keeps things safe and makes sure the lights work well.
Wiring
Wiring is a very important step. Teams use wire strippers, cutters, and voltage testers to connect power safely. For grid-tied systems, workers run wires in underground pipes to the main power. For solar street lights, wiring connects the solar panel, battery, and LED on the pole. This means no trenching is needed.
Main wiring steps:
Pull wires through the pole and pipe. Keep wires neat and labeled.
Connect wires to the fixture, following the maker’s guide.
For grid-tied systems, connect to the main power. For solar, connect the panel, battery, and controller.
Use waterproof connectors and seal all joints to keep out water.
Test each connection with a multimeter to check voltage and flow.
Bad wiring can cause shocks, flickering, or lights not working. Teams stop these problems by using the right connectors, following wiring plans, and checking every connection.
Aspect | Urban Road Lighting Projects | Rural Road Lighting Projects |
|---|---|---|
Typical Technology | Grid-tied LED systems | Solar LED systems |
Installation Requirements | Trenching, cabling, utility grid | Trench-free, wire-free, off-grid |
Installation Complexity | More complex | Simpler, faster |
Impact on Infrastructure | Possible disruption | Minimal disruption |
Permitting and Delays | More likely | Faster deployment |
Resilience | Vulnerable to outages | Independent, resilient |
Cost Considerations | Higher labor and installation | Lower labor, higher upfront cost |
Suitability | Urban streets, downtown | Rural roads, remote areas |
Additional Benefits | Smart city integration | Climate resilience, funding |
Smart LED systems now use sensors and wireless networks. These let teams watch the lights, change brightness, and find problems from far away. Solar panels on street lights give power without needing the grid, which helps in far-off places.
Common Mistakes and How to Avoid Them
Putting lights on old poles without checking can be unsafe and make bad lighting.
Using the wrong wires or connectors can cause electrical problems.
Not planning with experts can lead to mismatched lights and uneven light.
To stop these problems:
Make a clear lighting plan.
Use mounts and fixtures made for the street.
Hire trained workers for every part of the job.
Environmental and Technological Considerations
LEDs use less energy and are better for the planet than old lights. LEDs last longer, use less power, and work with smart controls. Solar street lights help even more by using the sun’s energy. New systems with sensors and IoT help cities save energy and keep people safe.
Using LED and solar lights helps the environment and gets streets ready for smart city upgrades.
Electrical and Testing
Power Connection
Connecting power to street lights needs careful work. Electricians must follow safety rules to avoid danger. They put in equipment the way the maker says. Rubber or plastic insulation keeps people safe from shocks. Workers use boxes or barriers to cover live parts. This stops people from touching them by mistake.
Before they start, teams ground all the wires. This sends extra electricity away from people. They connect metal parts to make a safe path for current. GFCI devices protect outdoor wires, especially near water. Circuit breakers and fuses stop wires from getting too hot.
Electricians follow these steps to stay safe:
Check cords and plugs for damage before using them.
Take off jewelry and use tools with insulation.
Turn off power and use lockout/tagout steps.
Keep the area around panels clear.
Use GFCI in wet places.
Put warning signs near high voltage spots.
Do not use extension cords as permanent wires.
Tip: Always unplug equipment by pulling the plug, not the cord. This keeps cords from breaking.
Test Lights
After power is connected, teams test each light. They use testers and meters to check the wires. If a light blinks or does not turn on, they fix it. This makes sure every street has good, even light.
Crews check if the lights are bright enough. They move fixtures to stop dark spots or glare. They also test smart controls like sensors and timers. If something does not work, they fix it before finishing.
Note: Testing right away helps stop future problems. It keeps the street safe for everyone.
Safety and Compliance
Standards Check
Every road light job must follow safety standards. The ANSI/IES RP-8-22 standard gives the main rules in the United States. This standard covers roads, parking lots, tunnels, and work zones. It helps keep drivers, cyclists, and people walking safe. The standard tells how to design, put in, and take care of lights. It says lights must help people see well and spot dangers. Lights should spread out evenly and be easy to fix. Saving energy is also important. Teams must check their work follows these rules before they finish. Local rules may add more steps, so crews talk with city engineers or inspectors.
Note: Following all standards helps stop accidents and keeps roads safe for everyone.
Traffic Light Installation Considerations
Putting in traffic lights has more steps than regular road lights. Teams need approval from local leaders before they start. This checks if the intersection needs a signal and if the plan is legal. Special permits and checks are needed for traffic signals.
Key things for traffic light jobs are:
Pedestrian phases let people cross safely when cars stop.
Detection systems help control busy traffic at peak times.
Clear signals help drivers make fewer mistakes and stay safe.
Extra signals fix problems with seeing the lights or blind spots.
Warning systems tell drivers early to stop safely.
LED signals use less energy and last longer than old ones.
Regular checks and strong parts keep signals working in bad weather.
Consideration | Traffic Lights | Stop Signs |
|---|---|---|
Used at busy intersections with cars from many ways. | Used where there are fewer cars or uneven flow. | |
Traffic Flow Complexity | Good for tricky patterns, lots of walkers, and many turns. | Best for simple intersections with easy flow. |
Safety History | Used if accidents show a need for better control. | Used where you can see well and stopping is safe. |
Delay and Efficiency | Used if stop signs slow down traffic too much. | Good if traffic lights would slow things down more. |
Pedestrian and Cyclist Needs | Used to help people cross and for bikes too. | Used if people can cross safely when cars are gone. |
Intersection Geometry | Best for tricky intersections with many lanes or odd shapes. | Used for simple, straight intersections. |
Legal and Regulatory Compliance | Follows local and national rules and standards. | Follows rules but for easier control. |
Cost and Maintenance | Costs more because of wires and upkeep. | Cheaper and easier to take care of. |
Public/Community Input | Community thoughts matter, especially for local shops and homes. | People’s ideas matter mostly in neighborhoods. |
Traffic light teams use strong materials that can handle bad weather. They must follow rules for timing and colors. LED lights are used most because they last long and save energy. These steps help signals work in all weather and keep roads safe for everyone.
Maintenance
Routine Checks
Routine maintenance helps keep street lights working well and safe. Experts say to check commercial lights every 6 to 12 months. The schedule changes based on the type of light and how busy the street is. LED lights need fewer checks, but busy streets may need more. Each year, teams measure how bright the lights are at certain spots. If the lights get dim, cleaning or fixing them can help.
Regular maintenance has many good points:
Using modern LED lights and regular checks can cut energy use by up to 84%.
It makes lamps last longer, so you do not have to buy new ones as often.
Teams can change the lights for different times, traffic, or weather to save more energy.
It lowers the amount of dangerous waste and makes throwing things away cheaper.
It keeps the street safer and more reliable for everyone.
Tip: Strong materials and LED lights mean fewer repairs and less time when the lights are off.
Troubleshooting
Street lights can have some common problems. Fixing them fast keeps the street bright and safe. The table below shows usual problems, why they happen, and how to fix them:
Common Issue | Causes | Solutions |
|---|---|---|
LED Driver Failure | Overheating, power surges | Use good drivers, add surge protectors, make sure air can flow |
Poor LED Chips | Bad chips, colors do not match | Pick good brands, check for bright and matching colors |
Weak Surge Protection | Lightning, voltage spikes | Put in strong surge protectors, ground wires right |
Overheating | Bad heat sinks, high heat | Use big heat sinks, pick heat-safe materials |
Flickering or Flashing | Power changes, bad parts | Use steady drivers, put in voltage stabilizers |
Lighting Distribution Issues | Wrong beam angles, bad lenses | Use good lenses, pick the right beam angle |
Teams should look for loose wires, water, or broken parts. Modular LED systems let teams swap out bad parts fast, which saves time and money. Smart city tools can warn teams about problems before they get worse.
Road light installation works best when teams use simple steps. These steps are planning, getting ready, putting in lights, testing, and fixing them later. Safety is very important. Teams must follow rules like ISO 9000, RoHS, and EMC. These rules help keep people safe and make lights last longer.
Teams need to check local rules before starting work. They should use tools with insulation and not put too much power on one circuit.
Certified products can handle bad weather and do not break as often.
If workers are not sure what to do, they should ask a licensed electrician for help.
Taking care of the lights and asking experts for advice keeps road lights safe, working well, and lasting a long time.
FAQ
How long does it take to install a road light?
Most road light installations take one to three days per pole. The timeline depends on weather, site conditions, and equipment availability. Teams work faster with good planning and no delays.
What is the best type of road light for energy savings?
LED street lights offer the best energy savings. They use less power and last longer than traditional lights. Solar-powered LEDs save even more energy in areas without grid access.
Who should install road lights?
Licensed electricians or trained professionals should install road lights. They know safety rules and local codes. DIY installation is not recommended for public roads.
How often should road lights be maintained?
Experts recommend checking road lights every 6 to 12 months. Busy streets or harsh weather may require more frequent inspections. Regular maintenance keeps lights working and streets safe.
See Also
Step-By-Step Guide To Installing Light Pole Posts
Choosing Street Light Poles Based On Material And Height
How To Install Street Light Poles Safely And Effectively
