Wall Mounts for Outdoor Lighting: Types, Installation, and Selection Tips

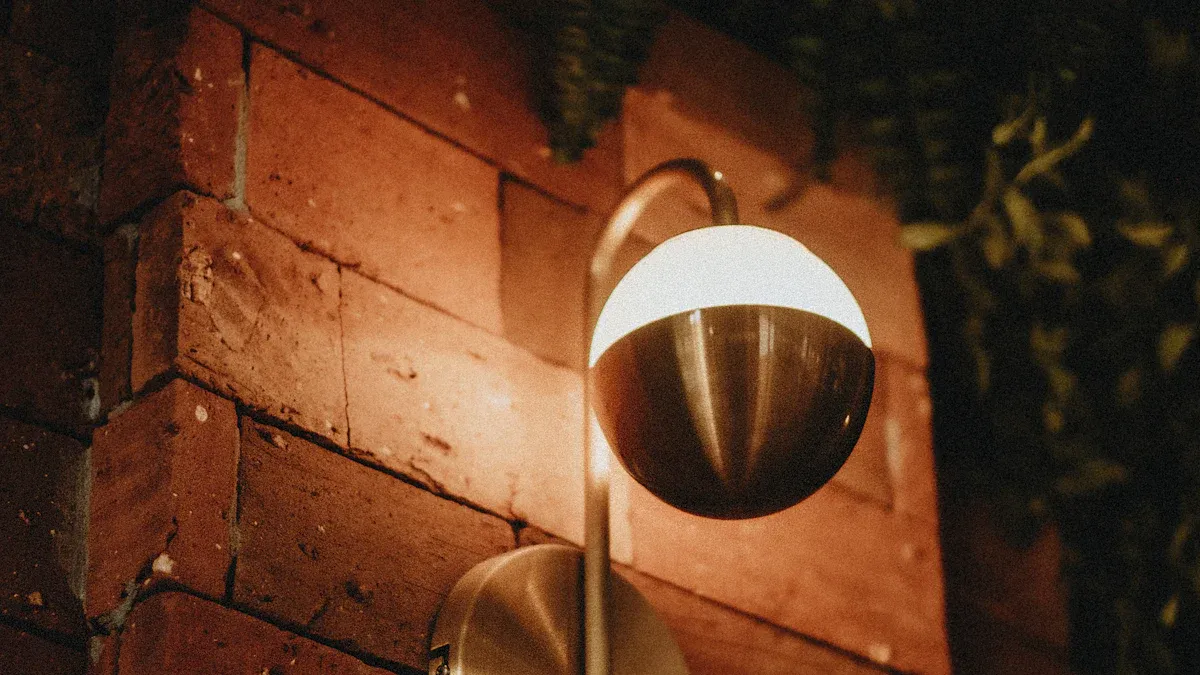
When selecting wall mounts for outdoor lighting at your home, you can choose from various styles such as flush, arm, lantern, and decorative mounts. The right size and placement of outdoor wall lights are crucial for safety and energy efficiency. For instance, installing lights about 6 feet high and 8 to 10 feet apart helps reduce glare and eliminate dark spots. Many homeowners prefer solar outdoor wall sconces and LED light fixtures because they save energy and enhance home security. Outdoor wall lights made with weather-resistant materials ensure durability in all conditions. Before choosing a product, consider your home’s style, the areas that need lighting, and the features you want. Our About Us section often provides helpful tips for selecting the best outdoor wall mounts and LED light options for your space.
Studies show that outdoor wall lights placed strategically, especially LED light products, can reduce nighttime crime by over 30% and make outdoor areas safer for everyone.
Key Takeaways
Pick a wall mount style that matches your home. You can choose flush, arm, lantern, or decorative styles. Make sure it fits your lighting needs too.
Put outdoor lights about 5 to 6 feet high. Space them 8 to 10 feet apart. This helps stop glare and dark spots.
Use weather-resistant materials like stainless steel or aluminum. These materials help your lights last in any weather.
Choose LED or solar-powered lights to save energy. They also help lower costs and are easy to install.
Clean and check your outdoor wall lights often. This keeps them safe, bright, and working for a long time.
Types of Wall Mounts
Picking the right wall mounts makes your outdoor space safe and nice to look at. There are many kinds of outdoor lighting mounting brackets. Each one has its own special features. The table below lists the main types and what they are good for:
Category | Mounting Style | Lighting Focus | Typical Use Cases | Features and Style Notes |
|---|---|---|---|---|
Flush Mount Sconce | Mounted flush against the wall | Ambient, stylish | General outdoor lighting | Stylish and useful, comes in many looks |
Arm Mount | Attached to an arm extending from wall | Ambient, directional | Used in many places, like barn lights | Barn lights shine down, fit old or new styles |
Wall Lantern | Semi flush mount (arm + plate) | Accent lighting | For decoration and accent lighting | Looks like old lanterns, made of metal and glass, many finishes |
Bulkhead Light | Wall mounted with protective cage | 180-degree lighting | For work areas, garages, workshops | Has a cage for protection, great for places that might get hit |
Motion Sensor | Wall mounted, focused beam | Bright, focused light | For safety, shows off landscape | Lights up certain spots, some have motion sensors |
Decorative Mount | Wall or semi-flush, ornate | Accent, ambient | Good for entryways, patios, gardens | Has special designs, makes outdoor spaces look cool |
Flush Mounts
Flush mounts sit right next to the wall. People use these outdoor lighting mounting brackets on porches or by doors. They give soft light and are good for lighting up big areas. Flush mount sconce styles match many homes, old or new. Some solar wall mount lights come in this style, so they are easy to put up and save energy.
Arm Mounts
Arm mounts have a bracket that sticks out from the wall. This lets you point the light where you want it. Barn lights and gooseneck fixtures are arm mounts people like. These outdoor lighting mounting brackets are good for garages, driveways, and stairs. You can pick solar wall lights with arm mounts for style and usefulness.
Lantern Mounts
Lantern mounts give your outdoor space a classic look. These outdoor wall sconces use a bracket with an arm and plate. Lanterns are often made of glass and metal, with finishes like bronze or copper. You can use decorative solar wall lights in this style to make patios or doors look nice.
Bulkhead Mounts
Bulkhead mounts use a strong bracket and a cage for protection. These lights can handle bad weather and bumps. You see bulkhead lights in workshops, garages, or play areas. They shine light in a wide area and are good for industrial or beach homes. Many solar wall lights now come in bulkhead styles for easy care.
Motion Sensor Mounts
Motion sensor mounts have a bracket that holds both a sensor and a light. These outdoor lighting mounting brackets help keep you safe by turning on when they sense movement. You can put them by doors, stairs, or dark spots. Many solar wall mount lights now have motion sensors for more safety and to save energy.
Decorative Mounts
Decorative mounts use special bracket designs to make your home look better. These outdoor wall lights come in many shapes and colors. You can use decorative solar wall lights to show off gardens, patios, or doors. They look good and work well, making your outdoor space stand out.
Tip: Pick LED or solar lighting for your wall mounts. These choices use less power and last longer, so you save money and do not have to fix them as much.
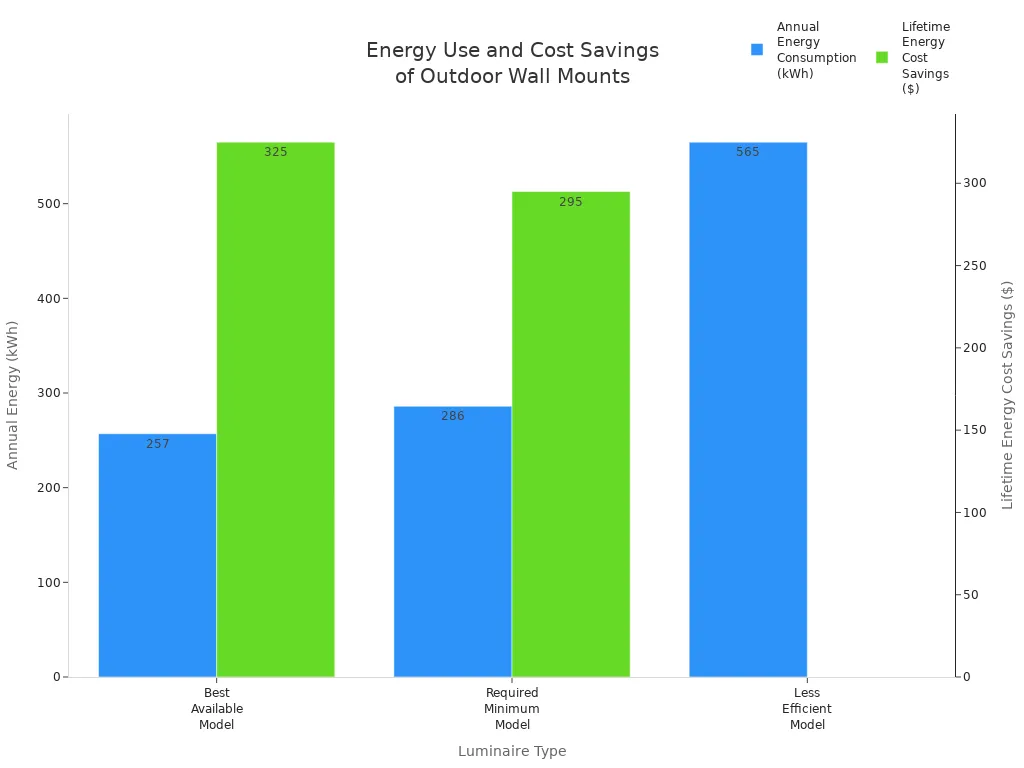
You can see that LED and solar wall mount lights use less energy and cost less over time. Many outdoor wall sconces now use these new technologies. When you pick the right mounting bracket and light style, your outdoor space looks better and is safer too.
Outdoor Lighting Installation
Tools and Materials
Before you start your outdoor wall lights installation, gather all the tools and materials you need. This step helps you avoid delays and makes the process smoother. Here is a table showing common items and their typical costs:
Item Category | Specific Items | Typical Cost Range |
|---|---|---|
Electrical Supplies | Wire connectors, electrical tape, wire nuts | $5 to $20 |
Technical Tools | Ladder, wire stripper, voltage tester, screwdrivers | $50 to $100 |
You may also need dimmer switches ($10–$25), smart home hookups ($20–$100), or electrical panel upgrades ($800–$4,000) if you want advanced features. If you plan to install outdoor solar wall lights or solar wall mount lights, you often need fewer tools because these products offer easy installation.
Safety Tips
Safety should always come first during any installation. Follow these steps to protect yourself and your home:
Plan your outdoor lighting system. Decide if you want low-voltage, solar, or line-voltage lights.
Turn off the power at the breaker before starting any electrical work.
Use only fixtures rated for outdoor use and the right weather conditions.
Secure all wiring and keep it out of reach to prevent damage.
Use waterproof, outdoor-rated wiring and components.
Install motion sensors and timers to improve security and save energy.
Never use indoor extension cords outside. Choose waterproof cords or those with GFCI protection.
If you feel unsure about wiring, hire a licensed electrician.
Tip: Regularly inspect your outdoor wall lights for damage or wear. Replace bulbs and check wiring to keep your lighting safe and bright.
Installation Steps
You can install most outdoor wall lights yourself if you follow the right steps. Here is a simple guide:
Use the mounting bracket as a template. Mark the screw holes on the wall.
Attach the mounting bracket to the wall with screws and wall anchors if needed.
Connect the wires. Match the colors and use wire nuts to secure them.
Attach the fixture to the mounting bracket. Make sure it clicks or locks in place.
Tighten all screws and check that the fixture feels secure.
Restore power and test the lights.
If you install outdoor solar wall lights or solar wall mount lights, you usually skip the wiring step. Just use the mounting bracket, attach the solar light fixture, and let the sun do the rest. Always check that the wall, screws, and anchors can support the weight of your lights.
Wiring Tips
Proper wiring keeps your outdoor lighting safe and long-lasting. Here are some important tips:
Use outdoor-rated wiring, like Underground Feeder (UF) cable, for all outdoor installations.
Keep low-voltage and standard electrical wiring at least 12 inches apart.
Avoid sharp bends in cables. Use smooth curves to prevent damage.
Seal all wire connections with waterproof tape or connectors.
Follow local electrical codes and get permits if needed.
Hire a licensed electrician for complex jobs or if you feel unsure.
Inspect your wiring regularly for signs of wear or damage.
Solar wall mount lights and outdoor solar wall lights reduce wiring needs. You only need to secure the mounting bracket and place the fixture in a sunny spot.
Mounting Height and Placement
Correct placement and height make your outdoor wall lights both safe and attractive. Use these guidelines:
Mount outdoor wall lights 5 to 6 feet above the ground or align them with the top of the door frame.
Choose fixtures that are one-quarter to one-third the height of your door.
Place one light on each side of the door for balanced lighting, or a single fixture above the doorframe.
Leave 6 to 12 inches between the fixture and the door frame.
For side doors and garage doors, keep the mounting height consistent.
Avoid placing lights too high or too low to prevent glare or dark spots.
For outdoor solar wall lights, pick a spot with direct sunlight for best performance.
Choosing the right bracket and proper placement helps your outdoor lighting last longer. Use weatherproof materials like stainless steel, aluminum, or UV-resistant plastics. Look for fixtures with high IP ratings (IP65 or higher) to protect against rain and dust. Good placement and quality materials keep your outdoor solar wall lights and other fixtures working well for years.
Note: Avoid common mistakes like overcrowding lights, using the wrong bulb type, or skipping weatherproofing. Always plan your layout and follow these installation tips for the best results.
Selection Tips
Material and Durability
Pick outdoor wall mounts made from strong materials. Stainless steel, aluminum, and HDPE last through rain, snow, and sun. These materials do not rust or break down easily. Your lights will look nice and work well for a long time. You will not need to fix or replace them often. They do not fade, chip, or crack quickly. Strong materials also help stop theft or damage.
Durability & Weather Resistance | Lifespan & Suitability | Cons & Limitations | |
|---|---|---|---|
Stainless Steel | Excellent corrosion resistance, very durable | Long lifespan in harsh weather | Heavy, higher cost |
Aluminum | Lightweight, good corrosion resistance | Durable in most outdoor conditions | Less strong than steel |
Polycarbonate | High impact resistance, UV stabilized | Great for extreme temperatures | Prone to scratches |
If you live near the ocean, use marine-grade stainless steel or powder-coated aluminum. These materials fight salt and wet air.
Weather Resistance
Outdoor lights must handle all types of weather. Look for high IP ratings like IP65 or higher. These ratings mean your lights block dust and water. Sealed gaskets keep water out and protect your lights. Finishes that resist rust and UV rays stop fading and cracks. LED lights work well in cold weather and last longer than regular bulbs. Smart outdoor lighting can change with the seasons. This saves energy and keeps your yard bright.
Style and Compatibility
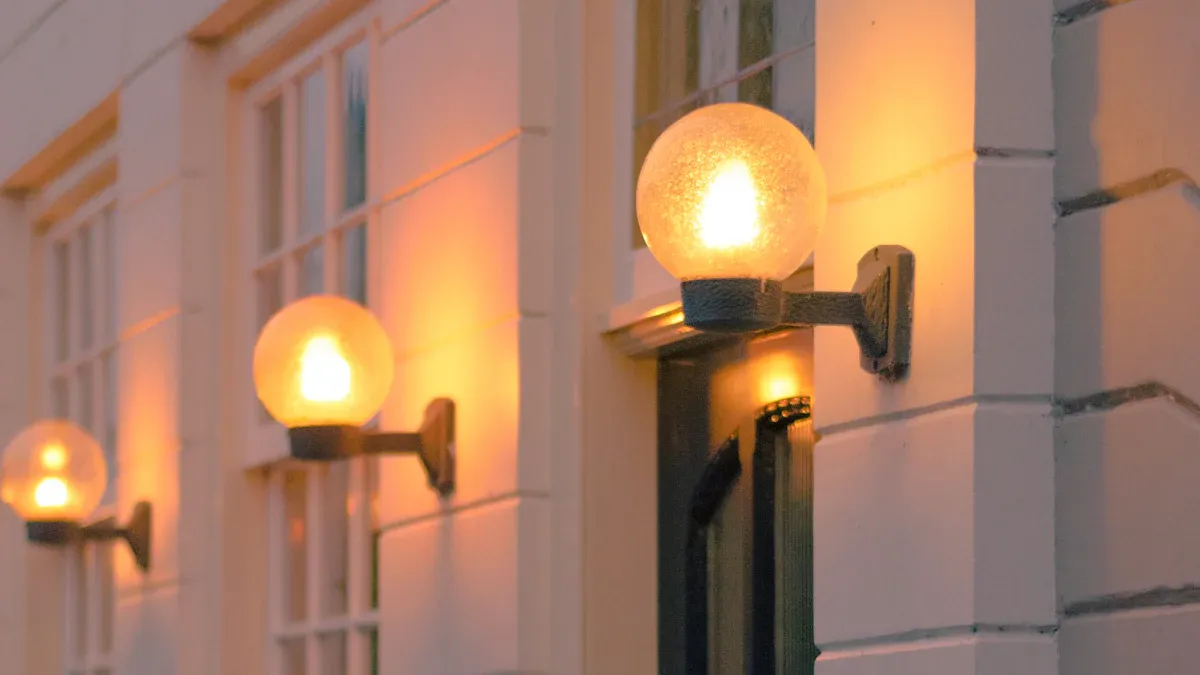
Choose a style that fits your home. Modern wall sconces look good on new houses. Rustic lanterns match old or farmhouse homes. Bulkhead lights give a beach look. Pick colors and shapes that go with your walls and doors. The right style makes your home look better and feel safer.
Rustic lights make stone or brick houses feel warm.
Glass globe lights fit many outdoor spaces.
Sizing and Fit
Measure before you buy any outdoor wall lights. The light should be about one-third as tall as your door. Place it 6 to 12 inches above or next to the door. Use the same rule for garage doors. Check the width of the spot and the light’s beam angle. This helps you avoid dark corners. Plan your lights so the area is bright everywhere. Use more lights for big spaces and small ones for tight spots.
Tip: Pick LED lights for safe, even, and cheap outdoor lighting.
Power Source Options
You can power your outdoor lights in different ways. Solar-powered lights are easy to put up and save money, but need sunlight. Battery lights work anywhere but need new batteries often. Hardwired lights are bright and last a long time, but cost more to install. LEDs use less energy and lower your bills over time.
Power Source | Advantages | Disadvantages |
|---|---|---|
Solar-Powered | Eco-friendly, easy to install | Needs sunlight, less bright |
Battery-Operated | Flexible placement, easy setup | Frequent battery changes |
Hardwired (LED) | Bright, long-lasting, energy-efficient | Higher upfront cost, needs wiring |
Outdoor Wall Sconces
Placement Tips
When you install outdoor wall sconces, you want your lights to look great and keep your home safe. Place each sconce at eye level, about 5 to 6 feet from the ground. This height gives you enough light without causing glare. Space your outdoor wall sconces 8 to 10 feet apart. This keeps your outdoor area bright and avoids dark spots. Put sconces near doors, walkways, and steps. These spots need extra lighting for safety. You can also use a sconce to highlight special features like a tree or a garden wall. Try to layer your lighting by mixing ambient, accent, and security lights. This makes your outdoor space look more interesting and helps you see better at night.
Tip: Use motion-activated outdoor wall sconces around hidden areas or property edges. These lights turn on when they sense movement, which helps keep your home secure and saves energy.
Smart outdoor wall sconces let you control your lights from your phone. You can set timers or dim the lights for different times of day. When buying outdoor wall sconces, think about how the light spreads. Some sconces shine light up and down, while others spread it out. Choose a sconce that fits your needs and matches your home’s style.
Maintenance Advice
You want your outdoor wall sconces to last a long time and work well. Clean your sconces every few months. Use mild soap, water, and a soft cloth. Always turn off the power before you clean any lights. Dry each sconce completely before turning the power back on. Check your outdoor wall sconces for rust, cracks, or loose parts. Replace any broken bulbs with LED lights. These bulbs use less energy and last longer. Inspect the wiring and make sure all connections are tight. If you see any damage, call an electrician.
Trim bushes and trees near your outdoor wall sconces. This keeps the lights clear and bright.
Use weatherproof sealants to protect your sconce from rain and snow.
After storms, check your outdoor wall sconces for damage or water inside the fixture.
Choose outdoor wall sconces made from strong materials like stainless steel or bronze. These materials resist rust and last longer in harsh weather. If you live near the ocean, pick a sconce with extra protection against salt and moisture. Regular care keeps your outdoor wall sconces shining bright and looking good for years.
You can pick from many outdoor wall mounts and lights. Make a plan for where your lights will go. Always think about safety when you put them in. Choose tough materials so your lights last a long time. Surveys say good lighting can make your home worth more. It also keeps people safe and makes your yard look nice.
Bright outdoor lights make your house look better and help stop falls.
Lights scare away people who should not be there and show off cool spots.
Put path and step lights first to help people see.
Use accent lights to shine on trees or gardens.
Mix different lights to make your yard useful and fun.
Tip: Good outdoor lighting lets you enjoy your yard even when it is dark.
FAQ
How do you choose the right size for outdoor wall lights?
Measure your door height. Pick a fixture that is about one-third the height of your door. For garage doors, use the same rule. This keeps your lighting balanced and attractive.
Can you install outdoor wall lights yourself?
Yes, you can install most outdoor wall lights. Always turn off the power first. Use the correct tools and follow the instructions. If you feel unsure, hire a licensed electrician for safety.
What makes a wall mount weather-resistant?
Look for fixtures with a high IP rating, like IP65. Choose materials such as stainless steel or aluminum. Sealed gaskets and rust-resistant finishes help protect your lights from rain, dust, and sun.
Do solar wall lights work in cloudy weather?
Solar wall lights still work on cloudy days, but they may not shine as bright or last as long at night. Place them where they get the most sunlight for the best results.
How often should you clean outdoor wall sconces?
Clean your outdoor wall sconces every few months. Use mild soap and water. Always turn off the power before cleaning. Regular cleaning keeps your lights bright and helps them last longer.
See Also
A Comprehensive Guide To Outdoor Lamp Models And Installation
Exploring Signage Lighting Types And Best Outdoor Display Uses
Understanding Outdoor LED Light Varieties Benefits And Setup
Key Benefits And Installation Tips For LED Exterior Lighting
Choosing Street Light Posts Based On Material Height And Setup
